They are subtle, but I can already see the signs of fall descending here. Fall is my favorite season of the year, and I’m lucky to live in a place where I can experience it. College football, Thanksgiving, turning leaves, cooler temperatures: these are all some of my favorite things about fall.
Of course, I’m leaving out the food that it brings, but that’s somewhat of a given. I think I could live off roasted fall root vegetables like carrots, sweet potatoes, parsnips (my personal favorite), and butternut squash. When accented with roasted garlic and fresh herbs, I think there is not much else that's better. For those of you who can’t quite do with that much monotony, there is always macaroni and cheese.
Wow. That aptly sums up my feelings about this dish (yet I keep writing…). I surprised myself with how delicious this was. I knew that I wanted to make a butternut squash macaroni and cheese, primarily because I knew it would be healthier than a balls-to-the-walls version that, though undoubtedly delicious, would not leave me feeling too great afterward.
But this? This I can get behind. A rich-tasting cheese sauce is enriched with both pureed and diced roasted butternut squash for some variation in texture, as well as sweet caramelized onions (because I can’t seem to make anything without them). Hearty and nutty whole wheat pasta complements the Parmesan cheese and sweet squash. A toasty crumb topping crowns the whole thing. It is glorious.
And! It was so easy. I’m not sure why but I had it in my mind that macaroni and cheese was difficult to make (the sauce! the pasta! everything at once!), but with some smart prep work it can all be made in under an hour.
That means that in less than sixty minutes you could be digging into a plateful of this.
So what are you waiting for?
Healthier Butternut Squash Macaroni and Cheese
Inspired by In Sock Monkey Slippers
In efforts to make the macaroni healthier, I used mostly reduced-fat products: reduced-fat cheddar cheese, reduced-fat cream cheese, and skim milk. However, use whatever you have on hand, knowing that the finished product will taste good no matter what you use (although then I can't necessarily vouch for its wholesomeness). I prefer the flavor of whole-wheat pasta and whole-wheat breadcrumbs, so I used both here. Again, use whatever you prefer. Although the whole squash is roasted, only about 3/4 of it is used. Use all if you like.
Yield: 4 to 6 servings
1 medium butternut squash, peeled and cut into 3/4-inch cubes
Kosher salt and freshly ground black pepper
1 medium onion, sliced into 1/2-inch half-moons
Water
1 tablespoon butter
1 tablespoon flour
3/4 cup skim milk
1 cup grated reduced-fat cheddar cheese
2 tablespoons reduced-fat cream cheese (Neufchatel)
1/2 cup grated Parmesan cheese (the real stuff, please!)
2 cups whole wheat macaroni or short-cut pasta
1 slice whole-wheat sandwich bread (or 1/2 cup of whole-wheat bread crumbs)
Adjust an oven rack to the middle position and preheat the oven to 400 degrees F. Line a baking sheet with aluminum foil. Place squash on baking sheet and season liberally with salt and pepper. Toss to coat evenly. Loosely cover the squash with another sheet of aluminum foil and roast for about 15 to 20 minutes, or until the squash is tender. Once the squash is tender, remove the top piece of foil, toss, and return to the oven for 10 minutes more, until the cubes have just started to brown around the edges. Remove from the oven and lower the oven temperature to 350 degrees F. (The squash can be roasted several days ahead and stored in the refrigerator until ready to use.) When the squash is cool enough to handle, mash 1/2 cup with a fork or potato masher. Set aside along with 1 cup of roasted cubed squash.
Meanwhile, heat a large saucepan or pot over medium heat. Add the onions and cook until they become translucent, stirring occasionally. Season with salt and pepper. When browned bits begin to form on the bottom of the pan, deglaze with a few tablespoons of water and stir to release the browned bits. Allow the water to cook off and the onions to continue browning. Continue this process - allowing the onions to brown and then deglazing the pan - until the onions are soft, sweet, and a deep golden brown, about 15 minutes longer.
While the onions cook, heat a pot of water over high heat. Once the water begins to boil, season very liberally with salt and add the pasta. Stir to make sure the pasta doesn't stick together. Cook until the pasta is al dente, about 8 to 10 minutes depending on the brand and type of pasta. When the pasta is cooked, drain and set aside.
Once the onions have caramelized, add the butter to the pot and allow to melt. When the butter has melted, add flour and whisk to form a thick paste. Continue whisking constantly for about 1 more minute. Slowly add the milk and whisk to combine.
Next add the cheeses and the butternut squash puree and roasted cubes. Whisk to combine and melt the cheese. Season to taste with salt and pepper. Go easy on the salt, though, as the Parmesan is pretty salty on its own. Add the cooked pasta to the cheese sauce and stir to combine.
To make the bread crumbs, process the bread in a food processor until it becomes coarse crumbs. Alternatively, if you don't have a food processor (like me), bread crumbs can be made successfully by grating a slice of frozen bread on the large holes of a box grater.
Spray an 8-by-8-inch baking dish or similarly-sized dish (I used a cake pan) with nonstick cooking spray and transfer the macaroni and cheese to it. Sprinkle evenly with the breadcrumbs and transfer to the oven. Cook in the oven for 10 to 15 minutes, until the breadcrumbs are evenly browned and toasty.
Remove from the oven and allow to cool for a few minutes before digging in. The macaroni and cheese will keep, stored well in the refrigerator, for up to 4 days.
Showing posts with label vegetables. Show all posts
Wednesday, September 28, 2011
Thursday, August 25, 2011
A Trio of Fish Taco Condiments
For my last meal at home, I opted for fish tacos. This is a meal that my family has only recently—in the last few years or so—started to make regularly. Although certain elements are always constants—the fish of course, good spicy salsa, and my mom’s cheese dip—I like to make different condiments to go alongside. Since we eat fish tacos most often in the summer, I also prefer to take advantage of fresh fruits and vegetables. The fresh toppings just taste better in the summer, offering cool contrasts to the spicier fish and salsa.
Usually the condiments are a reflection of whatever we happen to have in the refrigerator at the moment. Case in point: this pineapple and cucumber relish. The pineapple is sweet and juicy while the cucumber offers a crispness and crunch. A little hot sauce rounds out the flavors, and salt (ever the culinary workhorse) brings out the sweetness and juices in the pineapple and cucumber.
The guacamole is usually on the table but it’s taken me a while to get it just right since there are so many factors at play in guacamole. The texture should be creamy but not so smooth that it’s pureed (on the other hand, it shouldn’t be too chunky). I also like the contrasting texture that tomatoes provide: they lend a savory flavor that pairs well with avocado and their juiciness also smooths the guacamole out. In terms of seasoning, I usually go with salt, pepper, hot sauce, and dashes of cumin and cilantro (either dried or fresh). The cumin and cilantro are takeaways from my mom, who has instilled in me the proper way to make guacamole and perfect cheese dip, among other things.
The final condiment, a creamy carrot salad, is my homage to the coleslaw or cabbage that is often served with fish tacos on the West Coast. It’s utterly simple, equal parts creamy, sweet, and crunchy. I love the idea of a carrot salad, but not the heavy mayonnaise dressing that usually adorns it. My solution? A tart yogurt dressing with fresh citrus that pairs perfectly with grilled fish.
In fact, my favorite part about these condiments is that they are as good complementing a fish taco as they are as dips for tortilla chips or vegetables, with chicken or shrimp, on sandwiches, and of course—like you even need to ask—on their own. Sometimes I’m more tempted by the fish taco accompaniments than the fish tacos themselves, but I’m not sure there’s such a thing as Fish Taco Condiment Night. Not yet anyway.
Pineapple and Cucumber Relish
This relish is wonderful with fish tacos, but it’s also great with other seafood like shrimp or scallops or with chicken. Alternatively, serve it as a dip with chips or crudité for a new take on fruit salsa.
Yield: about 2 cups
½ medium pineapple
¼ cup cucumber, diced into ½-inch pieces
Kosher salt
Hot sauce, to taste
1 tablespoon chopped assorted fresh herbs, such as basil, parsley, cilantro, and mint
Dice ¾ of the pineapple into ½-inch pieces and place in a medium bowl. Grate the remainder on the small holes of a box grater. The pineapple will break up and become very juicy and pulpy. Transfer pineapple pulp and all juice to medium bowl with diced pineapple and add cucumber. Season pineapple and cucumber liberally with salt. Add hot sauce to taste (I go with 4 or 5 dashes). Add chopped herbs.
Cover and refrigerate until ready to serve, at least 30 minutes and up to 4 or 5 hours. Serve chilled. Leftovers will keep, covered well and kept in the refrigerator, for up to 3 days.
Guacamole
Guacamole is most aesthetically pleasing when served right after it’s made, lest the avocado oxidize and turn a murky greenish brown. I’ve tried all the “secrets” designed to ward off this unwanted effect, from adding acid to the guacamole to storing it with an avocado pit, and nothing has ever worked. Luckily, leftovers stored in the refrigerator taste just as good, if not better, than freshly made guacamole, and only the surface of the guacamole oxidizes. Simply stir the guacamole a bit and it will be almost as green as new.
Yield: about 2 cups
2 ripe Haas avocados
1 teaspoon fresh lemon juice
¼ medium tomato, diced into ½-inch pieces
Kosher salt and freshly ground black pepper
Hot sauce, to taste
1/8 teaspoon cumin
¼ teaspoon dried cilantro or 1 teaspoon chopped fresh cilantro
In a medium bowl, mash avocados with a fork until creamy but some chunks still remain. Add lemon juice and tomato and stir to combine. Season with salt, pepper, and hot sauce (I go with 4 to 5 dashes), to taste. Add cumin and cilantro and stir to combine. Serve immediately.
Leftovers will keep, covered well and kept in the refrigerator, for up to 4 days.
Creamy Carrot Salad
I use Greek yogurt in the dressing because we have it on hand more often than plain yogurt. However, you can use plain yogurt and omit the water. To shred the carrots, peel them first and then grate on the large holes of a box grater.
Yield: about 2 cups
2 tablespoons Greek yogurt
1 tablespoon fresh lemon juice
1 teaspoon water
½ teaspoon sugar
Kosher salt and fresh black pepper
2 cups shredded carrots
In a medium bowl, whisk together Greek yogurt, lemon juice, water, and sugar. Season well with salt and pepper. Add carrots and stir to combine. Cover and refrigerate until ready to serve, at least 30 minutes and up to 4 or 5 hours. Serve chilled. Leftovers will keep, covered well and kept in the refrigerator, for up to 4 days.
Usually the condiments are a reflection of whatever we happen to have in the refrigerator at the moment. Case in point: this pineapple and cucumber relish. The pineapple is sweet and juicy while the cucumber offers a crispness and crunch. A little hot sauce rounds out the flavors, and salt (ever the culinary workhorse) brings out the sweetness and juices in the pineapple and cucumber.
The guacamole is usually on the table but it’s taken me a while to get it just right since there are so many factors at play in guacamole. The texture should be creamy but not so smooth that it’s pureed (on the other hand, it shouldn’t be too chunky). I also like the contrasting texture that tomatoes provide: they lend a savory flavor that pairs well with avocado and their juiciness also smooths the guacamole out. In terms of seasoning, I usually go with salt, pepper, hot sauce, and dashes of cumin and cilantro (either dried or fresh). The cumin and cilantro are takeaways from my mom, who has instilled in me the proper way to make guacamole and perfect cheese dip, among other things.
The final condiment, a creamy carrot salad, is my homage to the coleslaw or cabbage that is often served with fish tacos on the West Coast. It’s utterly simple, equal parts creamy, sweet, and crunchy. I love the idea of a carrot salad, but not the heavy mayonnaise dressing that usually adorns it. My solution? A tart yogurt dressing with fresh citrus that pairs perfectly with grilled fish.
In fact, my favorite part about these condiments is that they are as good complementing a fish taco as they are as dips for tortilla chips or vegetables, with chicken or shrimp, on sandwiches, and of course—like you even need to ask—on their own. Sometimes I’m more tempted by the fish taco accompaniments than the fish tacos themselves, but I’m not sure there’s such a thing as Fish Taco Condiment Night. Not yet anyway.
Pineapple and Cucumber Relish
This relish is wonderful with fish tacos, but it’s also great with other seafood like shrimp or scallops or with chicken. Alternatively, serve it as a dip with chips or crudité for a new take on fruit salsa.
Yield: about 2 cups
½ medium pineapple
¼ cup cucumber, diced into ½-inch pieces
Kosher salt
Hot sauce, to taste
1 tablespoon chopped assorted fresh herbs, such as basil, parsley, cilantro, and mint
Dice ¾ of the pineapple into ½-inch pieces and place in a medium bowl. Grate the remainder on the small holes of a box grater. The pineapple will break up and become very juicy and pulpy. Transfer pineapple pulp and all juice to medium bowl with diced pineapple and add cucumber. Season pineapple and cucumber liberally with salt. Add hot sauce to taste (I go with 4 or 5 dashes). Add chopped herbs.
Cover and refrigerate until ready to serve, at least 30 minutes and up to 4 or 5 hours. Serve chilled. Leftovers will keep, covered well and kept in the refrigerator, for up to 3 days.
Guacamole
Guacamole is most aesthetically pleasing when served right after it’s made, lest the avocado oxidize and turn a murky greenish brown. I’ve tried all the “secrets” designed to ward off this unwanted effect, from adding acid to the guacamole to storing it with an avocado pit, and nothing has ever worked. Luckily, leftovers stored in the refrigerator taste just as good, if not better, than freshly made guacamole, and only the surface of the guacamole oxidizes. Simply stir the guacamole a bit and it will be almost as green as new.
Yield: about 2 cups
2 ripe Haas avocados
1 teaspoon fresh lemon juice
¼ medium tomato, diced into ½-inch pieces
Kosher salt and freshly ground black pepper
Hot sauce, to taste
1/8 teaspoon cumin
¼ teaspoon dried cilantro or 1 teaspoon chopped fresh cilantro
In a medium bowl, mash avocados with a fork until creamy but some chunks still remain. Add lemon juice and tomato and stir to combine. Season with salt, pepper, and hot sauce (I go with 4 to 5 dashes), to taste. Add cumin and cilantro and stir to combine. Serve immediately.
Leftovers will keep, covered well and kept in the refrigerator, for up to 4 days.
Creamy Carrot Salad
I use Greek yogurt in the dressing because we have it on hand more often than plain yogurt. However, you can use plain yogurt and omit the water. To shred the carrots, peel them first and then grate on the large holes of a box grater.
Yield: about 2 cups
2 tablespoons Greek yogurt
1 tablespoon fresh lemon juice
1 teaspoon water
½ teaspoon sugar
Kosher salt and fresh black pepper
2 cups shredded carrots
In a medium bowl, whisk together Greek yogurt, lemon juice, water, and sugar. Season well with salt and pepper. Add carrots and stir to combine. Cover and refrigerate until ready to serve, at least 30 minutes and up to 4 or 5 hours. Serve chilled. Leftovers will keep, covered well and kept in the refrigerator, for up to 4 days.
Sunday, August 14, 2011
Summer Squash Frittata
I feel as if I have just woken up from a long sleep, a midsummer hibernation.
About a month ago I got it in my head that I wanted to read all seven Harry Potter books before fall semester started. It was a pretty ambitious goal, especially since at the time I was still working all day and came home tired and unwilling to do much of anything. But I was determined to get through the thousands of pages and hundreds of chapters. Suffice it to say that I've done a lot of reading this summer (ten books in all), and now that I've finished the seventh and final book in the series, I'm sort of at a loss of what to do.
Particularly in the last week and a half, I've done nothing but read. All day and often late into the night, sometimes forgoing lunch or dinner for just one more chapter. It was incredible. After cooking and baking, reading is my favorite way to pass the time. I loved getting lost in the books, in the fantastic world J.K. Rowling created, in horcruxes and pensieves, Quidditch and charms. These books surpassed my expectations in every way imaginable. Rowling's writing and storytelling really inspire me. No detail goes unexplained, and I am continually amazed at the the vividness of her characters. I think I could read these books forever and continue to get something out of them. I only wish I had started to read them earlier in the summer; then I could have had the time to read them through a second time. (Seriously.)
All this is to say that with so much reading, I haven't had too much time for cooking. On the few occasions that I decided I could put my book down for a few hours and make a meal, I was drawn toward quick-cooking dinners that highlighted fantastic summer produce. One of our favorites this summer has been frittata, a quick-cooking style of omelet. Start to finish it takes about thirty minutes and we've enjoyed it with everything from mushrooms to peppers to spinach. This particular version has sliced zucchini and summer squash, sauteed onions and garlic, and salty Parmesan cheese and fresh basil on top. Perfect alongside a crisp green salad, this frittata is the perfect easy dinner (or lunch or breakfast), and easily adaptable for all seasons.
Summer Squash Frittata with Parmesan and Basil
Instead of squash, try mushrooms, peppers, spinach, fennel, asparagus, roasted tomatoes, or corn. Check out my post on strata for ingredient combinations. In total you'll want about 3 to 4 cups of vegetables or other add-ins (such as cooked chicken or sausage). In place of Parmesan, you can also use goat cheese (with sweet potatoes and thyme, it's another favorite), Fontina, Manchego, Gruyere, or sharp cheddar. Similarly, try different herbs to match your tastes and the season; everything from marjoram to rosemary to parsley would be delicious.
Yield: 4 to 6 servings
1 teaspoon olive oil
1/2 medium onion, diced (about 1/2 cup)
2 cloves minced garlic
2 medium yellow squash, sliced into 1/4-inch rounds
1 medium zucchini, sliced into 1/4-inch rounds
Kosher salt and freshly ground black pepper
6 eggs
1 tablespoon Dijon mustard
2 tablespoons finely grated Parmesan cheese
2 tablespoons chopped or chiffonade basil
Add olive oil to a 10-inch nonstick pan and heat over medium-high heat. Position an oven rack to the center position and heat the broiler on high. Add onion to pan and cook, stirring occasionally, until onion is translucent and begins to soften, about 5 minutes. Add garlic and cook until fragrant, about 30 seconds, stirring contantly.
Add both squashes to the pan, spreading slices as evenly as possible. Season liberally with salt and pepper. Reduce the heat to medium and continue cooking, stirring frequently, until squash is tender and slightly browned, onions are browned, and all the moisture in the pan has evaporated, about 10 minutes more.
Meanwhile, in a small bowl or measuring cup, beat eggs and mustard. Season liberally with salt and pepper. Add 1 tablespoon of cheese and stir to combine. Pour eggs over sauteed vegetables as evenly as possible, tilting pan to distribute the eggs throughout the pan if necessary. Cover pan with lid and cook for 5 minutes. The eggs will be mostly set around the edges but the top will still be runny.
After 5 minutes, uncover the pan, sprinkle with remaining tablespoon of cheese, and transfer to the broiler. Cook for 5 to 10 minutes more, until eggs are set and cheese is melted. Remove from the broiler and sprinkle with fresh basil. Serve immediately or cool and serve at room temperature.
The frittata will keep, covered and refrigerated, for up to 5 days.
About a month ago I got it in my head that I wanted to read all seven Harry Potter books before fall semester started. It was a pretty ambitious goal, especially since at the time I was still working all day and came home tired and unwilling to do much of anything. But I was determined to get through the thousands of pages and hundreds of chapters. Suffice it to say that I've done a lot of reading this summer (ten books in all), and now that I've finished the seventh and final book in the series, I'm sort of at a loss of what to do.
Particularly in the last week and a half, I've done nothing but read. All day and often late into the night, sometimes forgoing lunch or dinner for just one more chapter. It was incredible. After cooking and baking, reading is my favorite way to pass the time. I loved getting lost in the books, in the fantastic world J.K. Rowling created, in horcruxes and pensieves, Quidditch and charms. These books surpassed my expectations in every way imaginable. Rowling's writing and storytelling really inspire me. No detail goes unexplained, and I am continually amazed at the the vividness of her characters. I think I could read these books forever and continue to get something out of them. I only wish I had started to read them earlier in the summer; then I could have had the time to read them through a second time. (Seriously.)
All this is to say that with so much reading, I haven't had too much time for cooking. On the few occasions that I decided I could put my book down for a few hours and make a meal, I was drawn toward quick-cooking dinners that highlighted fantastic summer produce. One of our favorites this summer has been frittata, a quick-cooking style of omelet. Start to finish it takes about thirty minutes and we've enjoyed it with everything from mushrooms to peppers to spinach. This particular version has sliced zucchini and summer squash, sauteed onions and garlic, and salty Parmesan cheese and fresh basil on top. Perfect alongside a crisp green salad, this frittata is the perfect easy dinner (or lunch or breakfast), and easily adaptable for all seasons.
Summer Squash Frittata with Parmesan and Basil
Instead of squash, try mushrooms, peppers, spinach, fennel, asparagus, roasted tomatoes, or corn. Check out my post on strata for ingredient combinations. In total you'll want about 3 to 4 cups of vegetables or other add-ins (such as cooked chicken or sausage). In place of Parmesan, you can also use goat cheese (with sweet potatoes and thyme, it's another favorite), Fontina, Manchego, Gruyere, or sharp cheddar. Similarly, try different herbs to match your tastes and the season; everything from marjoram to rosemary to parsley would be delicious.
Yield: 4 to 6 servings
1 teaspoon olive oil
1/2 medium onion, diced (about 1/2 cup)
2 cloves minced garlic
2 medium yellow squash, sliced into 1/4-inch rounds
1 medium zucchini, sliced into 1/4-inch rounds
Kosher salt and freshly ground black pepper
6 eggs
1 tablespoon Dijon mustard
2 tablespoons finely grated Parmesan cheese
2 tablespoons chopped or chiffonade basil
Add olive oil to a 10-inch nonstick pan and heat over medium-high heat. Position an oven rack to the center position and heat the broiler on high. Add onion to pan and cook, stirring occasionally, until onion is translucent and begins to soften, about 5 minutes. Add garlic and cook until fragrant, about 30 seconds, stirring contantly.
Add both squashes to the pan, spreading slices as evenly as possible. Season liberally with salt and pepper. Reduce the heat to medium and continue cooking, stirring frequently, until squash is tender and slightly browned, onions are browned, and all the moisture in the pan has evaporated, about 10 minutes more.
Meanwhile, in a small bowl or measuring cup, beat eggs and mustard. Season liberally with salt and pepper. Add 1 tablespoon of cheese and stir to combine. Pour eggs over sauteed vegetables as evenly as possible, tilting pan to distribute the eggs throughout the pan if necessary. Cover pan with lid and cook for 5 minutes. The eggs will be mostly set around the edges but the top will still be runny.
After 5 minutes, uncover the pan, sprinkle with remaining tablespoon of cheese, and transfer to the broiler. Cook for 5 to 10 minutes more, until eggs are set and cheese is melted. Remove from the broiler and sprinkle with fresh basil. Serve immediately or cool and serve at room temperature.
The frittata will keep, covered and refrigerated, for up to 5 days.
Labels:
breakfast and brunch,
cheese,
eggs,
herbs,
mains,
summer squash,
vegetables,
zucchini
Wednesday, June 29, 2011
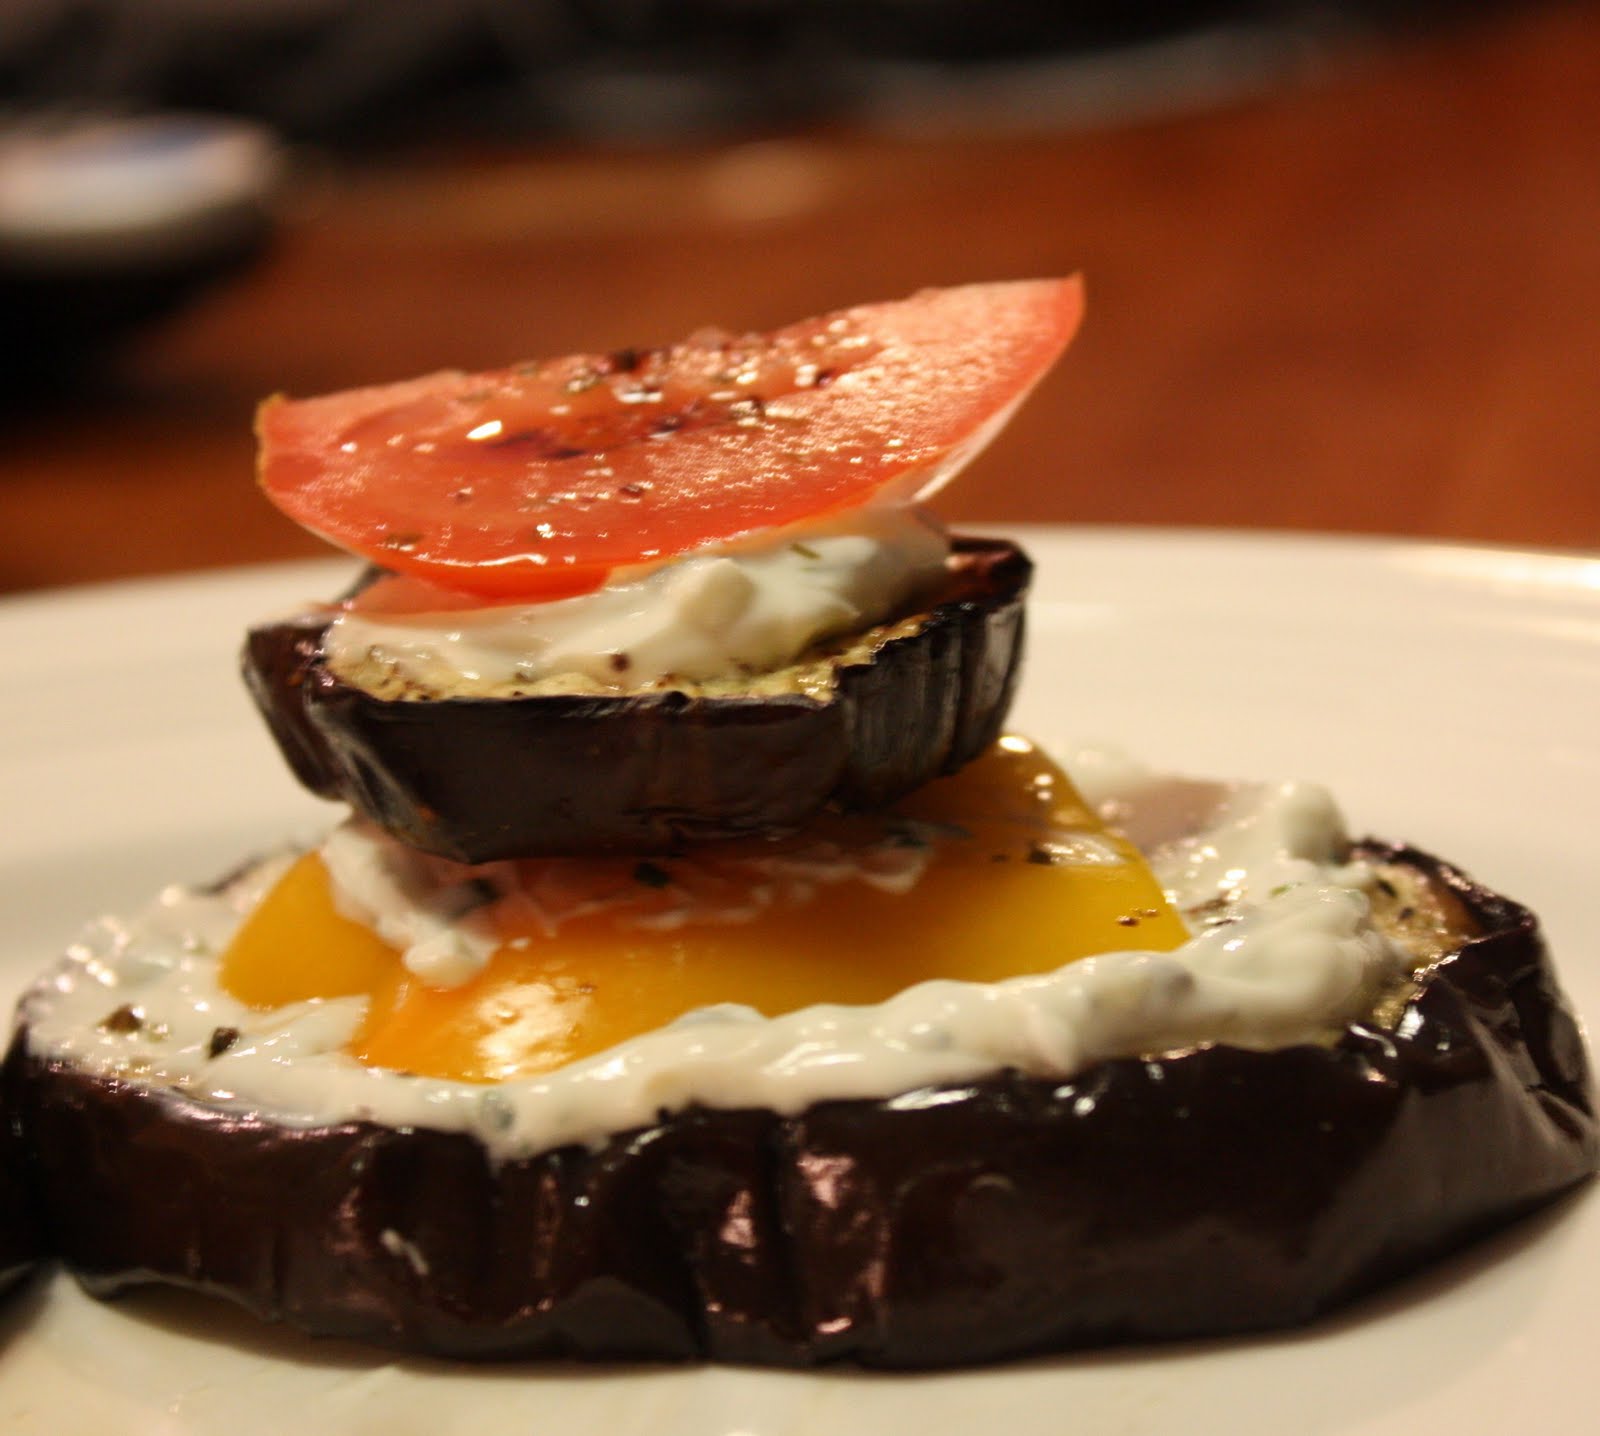
Grilled Eggplant Stacks with Creamy Herb Yogurt
Wow.
Never in a million years would I think that my blogging would become as scarce as it has in the past few weeks, especially since it’s the summer. I have so much respect for the people who wake up every weekday at 5 or 6 in the morning, go work a 12-hour day, and then come home to blog about their lives. After a handful of weeks of a similar experience (except I don’t work nearly as much as a 12-hour day!), I can attest to how tired I am. After sitting in what can sometimes amount to nearly two hours of traffic a day, often times the last thing I want to do is stand in a hot kitchen (it’s been steadily 90+ degrees every day for the past month or so) and cook dinner.
But these are all excuses – and lame ones, if I do say so myself.
Still, my lack of posting does not necessarily equate to lack of cooking. (Quite the contrary, in fact, as I have a few recipes waiting in the wings that I need to write up.) Lately, the summer produce (peaches, melon, plums, tomatoes, squash, peppers, asparagus, and the list goes on) has just been so delicious that most nights we assemble a “salad plate” (our term for assorted crudités) and just dig in. It’s so tasty, but obviously not that inspirational. Who needs a recipe for slicing up some vegetables anyway?
One thing our family has been embracing in the past few weeks has been the grill. While I’ve yet to master the outdoors grill, I can say that I have become quite adept at using the grill pan indoors. We love to grill vegetables for salads or as sides to grilled fish or chicken.
One of my favorite vegetables to grill is eggplant. It takes on a lovely charred flavor and savory quality that pairs perfectly with bright, fresh summer flavors. I had the idea of making eggplant “stacks” (for lack of a better term). You could call them napoleons if you wanted to get fancy, but who am I really kidding? They’re stacks. But don’t be fooled by the pedestrian name – this is one delicious dinner. It’s light but certainly filling and a perfect way to utilize the best the season has to offer.
I decided to layer the grilled eggplant, which has a soft and tender texture, with fresh bell peppers and tomatoes for some welcome crunch. In between each layer I spread a dollop of a creamy herbed garlic yogurt sauce. And wow was this yogurt sauce good. It uses one of my absolute favorite ingredients, Greek yogurt, and has the added punch of fresh garlic and parsley and basil from our herb “garden” (is it still called a garden if it’s really only a single pot?). It was absolutely delicious and worked so well to provide a creamy element in this summer vegetable medley. Served alongside an outstanding summer salad (more on that in a few days) and a baguette with extra yogurt sauce (do not waste any extra yogurt sauce!), this was a summer meal worth repeating. Even better, I can now cross one thing off my 20 Before 20 List: something grilled! Here’s to the next 19!
Grilled Eggplant Stacks with Herb Garlic Yogurt Sauce
This recipe makes enough for two servings, or a total of four eggplant stacks. Each eggplant stack contains two slices of eggplant (one larger, one smaller), one bell pepper plank, one tomato slice, and about 2 tablespoons of yogurt sauce, so adjust accordingly to make a specific number of servings. You can grill the eggplant earlier in the day and make the yogurt sauce beforehand and store it in the refrigerator, so this is a perfect make-ahead meal. In the future, I’d love to try this idea with different grilled vegetables (such as zucchini, yellow squash, and roasted peppers) and with different flavors of yogurt sauce. Be creative with your combinations and have fun with it!
Yield: 2 servings (2 stacks per serving)
1 large eggplant
Nonstick cooking spray
Kosher salt and freshly ground black pepper
½ cup Greek yogurt
1 tablespoon lemon juice
2 tablespoons fresh basil, chopped finely
1 tablespoon fresh parsley, chopped finely
1 garlic clove, minced
¼ large tomato
½ bell pepper (red, yellow, or orange)
Flaked sea salt, for serving (optional)
Each stack contains two slices of eggplant. Two eggplant stacks is enough for a light serving, so to make two servings you need 8 slices. Slice the eggplant into thick rounds, about ¾-inch thick. Preheat a grill pan (or grill) to medium-high and spray with nonstick cooking spray. Season the eggplant slices liberally on both sides with salt and pepper. Once the grill pan is very hot, begin to grill the eggplant. Grill each round about 5-7 minutes per side, turning once the eggplant takes on some browning and visible grill marks. You’ll know the eggplant round is cooked when it becomes tender and begins to give off some moisture. Remove the eggplant from the grill and set aside until ready to serve.
To make the yogurt sauce, combine Greek yogurt, lemon juice, basil, parsley, and garlic in a small bowl. Season to taste and refrigerate until ready to serve. The yogurt sauce will keep for several days covered in the refrigerator.
To prepare the eggplant stacks, start by cutting the bell pepper and tomato to size. You’ll need one bell pepper plank and one tomato slice per stack (so 4 total for two stacks). Try to cut the pepper and tomato so that they have about the same diameter as the medium-sized eggplant rounds.
To assemble each eggplant stack, place a larger round of eggplant on a plate. Evenly spread about 1 tablespoon yogurt sauce on the top of the eggplant. Top with a plank of bell pepper. Spread another ½ tablespoon yogurt sauce evenly on top of the bell pepper and top with a smaller round of eggplant. Again top with ½ tablespoon of yogurt sauce and a tomato slice. If using, sprinkle a bit of sea salt on each stack for some extra crunch and to really accentuate the flavors of the vegetables and creamy yogurt. Serve immediately.
Never in a million years would I think that my blogging would become as scarce as it has in the past few weeks, especially since it’s the summer. I have so much respect for the people who wake up every weekday at 5 or 6 in the morning, go work a 12-hour day, and then come home to blog about their lives. After a handful of weeks of a similar experience (except I don’t work nearly as much as a 12-hour day!), I can attest to how tired I am. After sitting in what can sometimes amount to nearly two hours of traffic a day, often times the last thing I want to do is stand in a hot kitchen (it’s been steadily 90+ degrees every day for the past month or so) and cook dinner.
But these are all excuses – and lame ones, if I do say so myself.
Still, my lack of posting does not necessarily equate to lack of cooking. (Quite the contrary, in fact, as I have a few recipes waiting in the wings that I need to write up.) Lately, the summer produce (peaches, melon, plums, tomatoes, squash, peppers, asparagus, and the list goes on) has just been so delicious that most nights we assemble a “salad plate” (our term for assorted crudités) and just dig in. It’s so tasty, but obviously not that inspirational. Who needs a recipe for slicing up some vegetables anyway?
One thing our family has been embracing in the past few weeks has been the grill. While I’ve yet to master the outdoors grill, I can say that I have become quite adept at using the grill pan indoors. We love to grill vegetables for salads or as sides to grilled fish or chicken.
One of my favorite vegetables to grill is eggplant. It takes on a lovely charred flavor and savory quality that pairs perfectly with bright, fresh summer flavors. I had the idea of making eggplant “stacks” (for lack of a better term). You could call them napoleons if you wanted to get fancy, but who am I really kidding? They’re stacks. But don’t be fooled by the pedestrian name – this is one delicious dinner. It’s light but certainly filling and a perfect way to utilize the best the season has to offer.
I decided to layer the grilled eggplant, which has a soft and tender texture, with fresh bell peppers and tomatoes for some welcome crunch. In between each layer I spread a dollop of a creamy herbed garlic yogurt sauce. And wow was this yogurt sauce good. It uses one of my absolute favorite ingredients, Greek yogurt, and has the added punch of fresh garlic and parsley and basil from our herb “garden” (is it still called a garden if it’s really only a single pot?). It was absolutely delicious and worked so well to provide a creamy element in this summer vegetable medley. Served alongside an outstanding summer salad (more on that in a few days) and a baguette with extra yogurt sauce (do not waste any extra yogurt sauce!), this was a summer meal worth repeating. Even better, I can now cross one thing off my 20 Before 20 List: something grilled! Here’s to the next 19!
Grilled Eggplant Stacks with Herb Garlic Yogurt Sauce
This recipe makes enough for two servings, or a total of four eggplant stacks. Each eggplant stack contains two slices of eggplant (one larger, one smaller), one bell pepper plank, one tomato slice, and about 2 tablespoons of yogurt sauce, so adjust accordingly to make a specific number of servings. You can grill the eggplant earlier in the day and make the yogurt sauce beforehand and store it in the refrigerator, so this is a perfect make-ahead meal. In the future, I’d love to try this idea with different grilled vegetables (such as zucchini, yellow squash, and roasted peppers) and with different flavors of yogurt sauce. Be creative with your combinations and have fun with it!
Yield: 2 servings (2 stacks per serving)
1 large eggplant
Nonstick cooking spray
Kosher salt and freshly ground black pepper
½ cup Greek yogurt
1 tablespoon lemon juice
2 tablespoons fresh basil, chopped finely
1 tablespoon fresh parsley, chopped finely
1 garlic clove, minced
¼ large tomato
½ bell pepper (red, yellow, or orange)
Flaked sea salt, for serving (optional)
Each stack contains two slices of eggplant. Two eggplant stacks is enough for a light serving, so to make two servings you need 8 slices. Slice the eggplant into thick rounds, about ¾-inch thick. Preheat a grill pan (or grill) to medium-high and spray with nonstick cooking spray. Season the eggplant slices liberally on both sides with salt and pepper. Once the grill pan is very hot, begin to grill the eggplant. Grill each round about 5-7 minutes per side, turning once the eggplant takes on some browning and visible grill marks. You’ll know the eggplant round is cooked when it becomes tender and begins to give off some moisture. Remove the eggplant from the grill and set aside until ready to serve.
To make the yogurt sauce, combine Greek yogurt, lemon juice, basil, parsley, and garlic in a small bowl. Season to taste and refrigerate until ready to serve. The yogurt sauce will keep for several days covered in the refrigerator.
To prepare the eggplant stacks, start by cutting the bell pepper and tomato to size. You’ll need one bell pepper plank and one tomato slice per stack (so 4 total for two stacks). Try to cut the pepper and tomato so that they have about the same diameter as the medium-sized eggplant rounds.
To assemble each eggplant stack, place a larger round of eggplant on a plate. Evenly spread about 1 tablespoon yogurt sauce on the top of the eggplant. Top with a plank of bell pepper. Spread another ½ tablespoon yogurt sauce evenly on top of the bell pepper and top with a smaller round of eggplant. Again top with ½ tablespoon of yogurt sauce and a tomato slice. If using, sprinkle a bit of sea salt on each stack for some extra crunch and to really accentuate the flavors of the vegetables and creamy yogurt. Serve immediately.
Labels:
20 Before 20,
eggplant,
grilling,
mains,
sides,
vegetables,
yogurt
Sunday, May 15, 2011
Spring Vegetable Risotto
One of my favorite things about living in Atlanta is that we get seasons. By that, I mean that there are distinctive differences between summer, fall, winter, and spring. Summer is brutally hot, usually humid, and lasts far too long if you ask me (as in, four-plus months of at least 90-degree weather). Fall is strange, characterized by moderate weather that creeps up on you very quickly (but it still is my favorite season). The only nice thing about winter here is the cute knitted items my mom makes for me, but other than that, no redeeming qualities. Spring is nice, though. Moderate temperatures, slight breezes, the first sign of life after a few months of gray skies. The only problem is that it just doesn't last long enough. Before I know it, it's too hot to roll down my windows when driving lest I melt from the searing temperatures. Still, after a winter full of citrus fruits (not my favorite) and... not much else, bright red fresh strawberries are just the thing to give me a case of spring fever. Of course, those usually arrive in late February or early March, when spring hasn't officially "sprung," so there are still more weeks to wait before the season's characteristic produce makes its way into markets. But once it does? Oh, I love spring.
One of my favorite ways to highlight seasonal produce is to make risotto. In fall, it's delicious with sauteed butternut squash and hints of saffron; wild mushrooms in winter make a wonderful savory risotto. We really enjoyed this version, which used a medley of asparagus, broccoli, fennel, and onions. Carrots would also be delicious, as would green peas. Some shrimp added while the rice is cooking can also bring it into true main dish territory (we are perfectly happy with a meatless risotto as the main dish with a green salad and good bread to accompany).
Risotto often gets a reputation for being a fussy, time-consuming dish, but the truth is that I think it's actually very low-maintenance. Despite what others say, you really don't have to stir it constantly for close to an hour. A few seconds of good stirring every few minutes will leave you with a perfectly creamy (yet creamless) final product.
Like many of my other favorite things to cook up in the kitchen, I love risotto because it feels like a fancy or special-occasion food but is so simple and easy to make and can be recreated in countless ways (see: cheesecake). The work is minimal but the payoff is a superb, unbeatable combination: a creamy and colorful rice brimming with the freshest vegetables that the season has to offer. A love letter to spring. Now, if only the 75-degree weather would return...
Spring Vegetable Risotto
Inspired by Ina Garten
To prepare the fennel, first reserve the fronds. Then chop the top stalks off and discard. Slice the bulb in half. To remove the core, make two 45-degree cuts into the core (it is a triangular solid whitish section at the bottom of the bulb) and remove the core. To prepare the asparagus, place one hand at each end of the stalk and bend until the asparagus snaps. Instead of or in addition to broccoli, consider adding green peas. If they're frozen, add them at the very end of the cooking time (no need to defrost). If they're fresh, blanch them for a few minutes until the starchiness is cooked off. Cooked shrimp would also be a delicious addition to this risotto.
Yield: 6-8 servings
2 teaspoons olive oil
1 medium onion, diced
1 fennel bulb, cored and diced, fronds reserved (see Note)
1 1/2 cups Arborio rice
1/2 cup dry white wine
6 cups chicken or vegetable stock
1 bunch asparagus, trimmed (see Note)
10 ounces chopped broccoli
Zest of 1 lemon
Kosher salt and freshly ground black pepper
Heat the olive oil in a large pot over medium heat. Add the onion and fennel and saute for 5 to 7 minutes, until the onions are translucent and both the onion and fennel have softened. Add the Arborio rice and stir to incorporate. Cook for 1 to 2 minutes; the ends of the rice grains will begin to look translucent. Add the wine and stir to deglaze the pan. Once the wine is absorbed, begin adding the chicken stock. Add the stock about 1 1/2 cups at a time, stirring to incorporate the stock at first. If you like, you can stir constantly, but if you don't enjoy standing over a hot stove, allow the rice to simmer away for a few minutes unattended, stirring every few minutes. Once all the stock has been absorbed, add 1 1/2 more cups until all the stock is gone or the rice is al dente, whichever comes first.
Meanwhile, while the rice is cooking, cut the asparagus into 1-inch pieces. Blanch the asparagus and broccoli briefly either in the microwave or in a pot on the stove. To blanch in the microwave, put the vegetables in a microwave-safe bowl, add enough water to come half-way up the vegetables, and microwave on high for about 2 minutes; then drain the vegetables. To blanch in a pot on the stove, heat a medium saucepan full of water. Once the water comes to a boil, add the vegetables and cook for about 4 minutes; then drain the vegetables. The asparagus and broccoli should be bright green and al dente.
Once half the stock is gone, add the asparagus and broccoli to the rice. Continue adding stock incrementally as before. When the rice is done, add the lemon zest, reserved fennel fronds, and salt and pepper to taste. Serve immediately.
The risotto will keep in the refrigerator for up to a week.
One of my favorite ways to highlight seasonal produce is to make risotto. In fall, it's delicious with sauteed butternut squash and hints of saffron; wild mushrooms in winter make a wonderful savory risotto. We really enjoyed this version, which used a medley of asparagus, broccoli, fennel, and onions. Carrots would also be delicious, as would green peas. Some shrimp added while the rice is cooking can also bring it into true main dish territory (we are perfectly happy with a meatless risotto as the main dish with a green salad and good bread to accompany).
Risotto often gets a reputation for being a fussy, time-consuming dish, but the truth is that I think it's actually very low-maintenance. Despite what others say, you really don't have to stir it constantly for close to an hour. A few seconds of good stirring every few minutes will leave you with a perfectly creamy (yet creamless) final product.
Like many of my other favorite things to cook up in the kitchen, I love risotto because it feels like a fancy or special-occasion food but is so simple and easy to make and can be recreated in countless ways (see: cheesecake). The work is minimal but the payoff is a superb, unbeatable combination: a creamy and colorful rice brimming with the freshest vegetables that the season has to offer. A love letter to spring. Now, if only the 75-degree weather would return...
Spring Vegetable Risotto
Inspired by Ina Garten
To prepare the fennel, first reserve the fronds. Then chop the top stalks off and discard. Slice the bulb in half. To remove the core, make two 45-degree cuts into the core (it is a triangular solid whitish section at the bottom of the bulb) and remove the core. To prepare the asparagus, place one hand at each end of the stalk and bend until the asparagus snaps. Instead of or in addition to broccoli, consider adding green peas. If they're frozen, add them at the very end of the cooking time (no need to defrost). If they're fresh, blanch them for a few minutes until the starchiness is cooked off. Cooked shrimp would also be a delicious addition to this risotto.
Yield: 6-8 servings
2 teaspoons olive oil
1 medium onion, diced
1 fennel bulb, cored and diced, fronds reserved (see Note)
1 1/2 cups Arborio rice
1/2 cup dry white wine
6 cups chicken or vegetable stock
1 bunch asparagus, trimmed (see Note)
10 ounces chopped broccoli
Zest of 1 lemon
Kosher salt and freshly ground black pepper
Heat the olive oil in a large pot over medium heat. Add the onion and fennel and saute for 5 to 7 minutes, until the onions are translucent and both the onion and fennel have softened. Add the Arborio rice and stir to incorporate. Cook for 1 to 2 minutes; the ends of the rice grains will begin to look translucent. Add the wine and stir to deglaze the pan. Once the wine is absorbed, begin adding the chicken stock. Add the stock about 1 1/2 cups at a time, stirring to incorporate the stock at first. If you like, you can stir constantly, but if you don't enjoy standing over a hot stove, allow the rice to simmer away for a few minutes unattended, stirring every few minutes. Once all the stock has been absorbed, add 1 1/2 more cups until all the stock is gone or the rice is al dente, whichever comes first.
Meanwhile, while the rice is cooking, cut the asparagus into 1-inch pieces. Blanch the asparagus and broccoli briefly either in the microwave or in a pot on the stove. To blanch in the microwave, put the vegetables in a microwave-safe bowl, add enough water to come half-way up the vegetables, and microwave on high for about 2 minutes; then drain the vegetables. To blanch in a pot on the stove, heat a medium saucepan full of water. Once the water comes to a boil, add the vegetables and cook for about 4 minutes; then drain the vegetables. The asparagus and broccoli should be bright green and al dente.
Once half the stock is gone, add the asparagus and broccoli to the rice. Continue adding stock incrementally as before. When the rice is done, add the lemon zest, reserved fennel fronds, and salt and pepper to taste. Serve immediately.
The risotto will keep in the refrigerator for up to a week.
Sunday, February 20, 2011
Butternut Squash, White Bean, and Kale Soup
I've said it here before but I rarely get the opportunity to cook. Living in a dorm really limits my resources, and my hectic schedule also makes it difficult to cook more than oatmeal or a baked potato. Thankfully I'll be living in an apartment-style suite next year that comes fully equipped with everything a cooking student could want: a refrigerator, a microwave, a stove, an oven, and - here's the real kicker - a dishwasher. Is it crazy to think that a dishwasher is the most underrated and under-appreciated kitchen tool out there?
Because I'm me, I've already started thinking about recipes that would be suitable for college life. My mind immediately goes to soups and stews, which are endlessly adaptable, easy to make ahead, and can last a while. There's also the added benefit that they can feed a lot of people for not that much money.
Last weekend I spent a few days at home and made this butternut squash and white bean soup for my mom and me. I changed a handful of things from the original recipe, but in the end, I am extremely pleased with how it turned out. The end result was a hearty soup with a mixture of textures and flavors. The white beans were creamy, the butternut squash was perfectly tender, and the kale, a last minute addition, gave the soup a much-needed green component and definitely boosted the soup overall. For being so simple, the soup is surprisingly complex. There's a lot going on, but I think that only makes it more fun to eat.
The most unique thing about this soup - what really makes it worthy of sharing - is the balance between savory, sweet, and acidic flavors. The white beans and chicken broth are earthy and balanced by the sweet squash and acidic additions of tomatoes and dry white wine. Altogether, they combine to form a vibrantly colored and delicious soup that is ideal for any kitchen table.
Butternut Squash, White Bean, and Kale Soup
Inspired by Sweet Paul Magazine via Dancing by the Light
I changed quite a few things about the original recipe to adapt our tastes and what we had on hand. The original recipe instructed you to cook the butternut squash in a pan with the onions and garlic until the squash was tender. Since we don't have a pan ginormous enough to fit that much onion and squash, I improvised and roasted the squash in the oven for 20 minutes, until the white beans and broth had finished simmering together. After additional time in the broth, the squash had softened just enough.
I prefer soups to be pretty loose and not so thick, so I added a few cups of water after the soup had simmered and then seasoned the broth to taste. If you like thicker soups, you can certainly omit this step. As it sits, the soup thickens considerably, so you can add chicken broth to loosen it up some then, as well.
Yield: 8 to 10 servings
1 pound dry white beans (such as Great Northern, Navy, or Cannellini)
6 cups chicken or vegetable broth
1 teaspoon olive oil
1 medium onion, diced
3 cloves minced garlic
Kosher salt
Freshly ground black pepper
1 medium butternut squash, peeled and diced into 1-inch pieces
1 cup dry white wine
1 teaspoon sugar, or to taste
4 Roma tomatoes, chopped into 1-inch pieces
1 teaspoon dried thyme
1 bunch kale, stemmed and torn into bite-size pieces
Rinse the beans in a colander, picking them over to remove any small rocks. Place the beans in a large pot and add 8 cups water. Bring to a boil, remove the pot from the heat, cover, and let sit for 1 hour. After 1 hour, drain the beans. Return the beans to the pot and add 6 cups of chicken broth. Heat the beans and broth over medium heat and simmer for 45 minutes, until the beans are just soft.
Meanwhile, in a medium skillet heat the olive oil over medium-high heat. Add the onions and cook, stirring occasionally, until the onions soften and become translucent. Add the garlic, a pinch of salt, and a pinch of pepper and continue to cook until the garlic becomes fragrant, about 1 minute more.
After the beans and broth have been simmering together for 20 minutes, preheat the oven to 400 degrees F and line a baking sheet with foil. Roast the butternut squash for 20 minutes, until it just starts to become tender.
After the beans and broth have simmered for 45 minutes, add the onions and garlic and the squash to the pot. Add the wine, sugar, tomatoes, and thyme. Stir to combine. Continue to cook for 45 minutes more. After 45 minutes, the soup will have reduced and thickened some. If you like, you can thin it out with 2 cups of water and adjust the seasonings to taste from there.
Add the kale to the soup and cook for 10 minutes more, until the kale has softened some but remains al dente. Taste the broth and season to taste. Serve hot with crusty bread to soak up the delicious broth.
The soup will keep, stored in an airtight container, for up to a week. As it sits, it will thicken considerably. When reheating, add additional broth to loosen it up.
Because I'm me, I've already started thinking about recipes that would be suitable for college life. My mind immediately goes to soups and stews, which are endlessly adaptable, easy to make ahead, and can last a while. There's also the added benefit that they can feed a lot of people for not that much money.
Last weekend I spent a few days at home and made this butternut squash and white bean soup for my mom and me. I changed a handful of things from the original recipe, but in the end, I am extremely pleased with how it turned out. The end result was a hearty soup with a mixture of textures and flavors. The white beans were creamy, the butternut squash was perfectly tender, and the kale, a last minute addition, gave the soup a much-needed green component and definitely boosted the soup overall. For being so simple, the soup is surprisingly complex. There's a lot going on, but I think that only makes it more fun to eat.
The most unique thing about this soup - what really makes it worthy of sharing - is the balance between savory, sweet, and acidic flavors. The white beans and chicken broth are earthy and balanced by the sweet squash and acidic additions of tomatoes and dry white wine. Altogether, they combine to form a vibrantly colored and delicious soup that is ideal for any kitchen table.
Butternut Squash, White Bean, and Kale Soup
Inspired by Sweet Paul Magazine via Dancing by the Light
I changed quite a few things about the original recipe to adapt our tastes and what we had on hand. The original recipe instructed you to cook the butternut squash in a pan with the onions and garlic until the squash was tender. Since we don't have a pan ginormous enough to fit that much onion and squash, I improvised and roasted the squash in the oven for 20 minutes, until the white beans and broth had finished simmering together. After additional time in the broth, the squash had softened just enough.
I prefer soups to be pretty loose and not so thick, so I added a few cups of water after the soup had simmered and then seasoned the broth to taste. If you like thicker soups, you can certainly omit this step. As it sits, the soup thickens considerably, so you can add chicken broth to loosen it up some then, as well.
Yield: 8 to 10 servings
1 pound dry white beans (such as Great Northern, Navy, or Cannellini)
6 cups chicken or vegetable broth
1 teaspoon olive oil
1 medium onion, diced
3 cloves minced garlic
Kosher salt
Freshly ground black pepper
1 medium butternut squash, peeled and diced into 1-inch pieces
1 cup dry white wine
1 teaspoon sugar, or to taste
4 Roma tomatoes, chopped into 1-inch pieces
1 teaspoon dried thyme
1 bunch kale, stemmed and torn into bite-size pieces
Rinse the beans in a colander, picking them over to remove any small rocks. Place the beans in a large pot and add 8 cups water. Bring to a boil, remove the pot from the heat, cover, and let sit for 1 hour. After 1 hour, drain the beans. Return the beans to the pot and add 6 cups of chicken broth. Heat the beans and broth over medium heat and simmer for 45 minutes, until the beans are just soft.
Meanwhile, in a medium skillet heat the olive oil over medium-high heat. Add the onions and cook, stirring occasionally, until the onions soften and become translucent. Add the garlic, a pinch of salt, and a pinch of pepper and continue to cook until the garlic becomes fragrant, about 1 minute more.
After the beans and broth have been simmering together for 20 minutes, preheat the oven to 400 degrees F and line a baking sheet with foil. Roast the butternut squash for 20 minutes, until it just starts to become tender.
After the beans and broth have simmered for 45 minutes, add the onions and garlic and the squash to the pot. Add the wine, sugar, tomatoes, and thyme. Stir to combine. Continue to cook for 45 minutes more. After 45 minutes, the soup will have reduced and thickened some. If you like, you can thin it out with 2 cups of water and adjust the seasonings to taste from there.
Add the kale to the soup and cook for 10 minutes more, until the kale has softened some but remains al dente. Taste the broth and season to taste. Serve hot with crusty bread to soak up the delicious broth.
The soup will keep, stored in an airtight container, for up to a week. As it sits, it will thicken considerably. When reheating, add additional broth to loosen it up.
Labels:
butternut squash,
greens,
mains,
soups,
vegetables,
white beans
Friday, January 21, 2011
Creamed Spinach
Here we are, three weeks into the New Year. Isn't it crazy how time flies? Snowpocalypse 2011 really shook things up here for a while, but this week definitely marked a return to normalcy, with busy mornings and nights, homework and quizzes, and slightly higher temperatures.
All of this has made it more difficult to post here, but today I bring you one of my favorite vegetable side dishes. Traditional creamed spinach is a dish that, while undoubtedly delicious, I can't justify eating regularly because of its inherent richness. Sure, spinach contains lots of healthy vitamins and minerals, but when covered in a cream sauce often enhanced with some kind of meat, any nutritional benefits that it offers are virtually erased.
Enter a healthier version of creamed spinach. Like all white sauces, this one begins with roux of fat and flour. However, instead of adding heavy cream or half and half to the roux, this sauce uses a combination of skim milk and chicken broth, which is then reduced down to a creamy consistency. The milk provides the familiar, slightly sweet dairy flavor while the broth adds a savory element to the otherwise meatless dish.
Sauteed shallots provide a sweet onion flavor and nutmeg, customary in many dishes with a white sauce or greens (or both), gives the sauce a wonderful fragrant spice and a certain warmth. (If I was Rachael Ray, I'd tell you that the nutmeg will make people go, "Hmmm... what is that?" Since I am not, I will tell you that the nutmeg really boosts this dish up. You wouldn't immediately recognize it, but you'd notice if it was absent.)
Perhaps my favorite thing about this dish is the ease versus payoff factor. I'm a huge fan of things that go together quickly or with minimal effort but that really impress (ahem, cheesecake). The use of frozen spinach makes this dish one you can make any time, since all of the ingredients are pantry staples. The sauce comes together practically by itself, which allows you to attend to more important kitchen matters (ahem, cheesecake). What I'm trying to say is that you should make this, now, because nothing is stopping you. You will be greatly rewarded for your (not so) hard work with a dish that you can feel good about eating and serving.
Healthier Creamed Spinach
Adapted from Ellie Krieger
When we first discovered this recipe in 2009, we made it often and served it several ways. The creamed spinach is perfectly fine on its own, but we've also added sliced mushrooms to the sauce to bulk it up. If you opt to do this, slice a few cremini mushrooms and saute them along with the shallots. The creamed spinach (with or without mushrooms) also makes a great pasta sauce. We used it with butternut squash ravioli, which was a wonderful foil to the earthier flavor of the mushrooms and spinach. In addition to ravioli or plain pasta (I'd go with a short-cut pasta like penne or rigatoni to trap more of the sauce), the spinach would also go wonderfully with gnocchi. (To make the creamed spinach a bit "saucier," either add less spinach or more milk/broth. If you add more milk/broth, just cook the sauce longer to reduce it down to the correct consistency.) I've made this with both skim and low-fat milk, and both work equally well. If you can, use freshly grated nutmeg, which is much more fragrant and flavorful than pre-grated nutmeg.
Yield: 4-6 servings
2 (10-ounce) packages frozen chopped spinach, thawed
2 teaspoons extra-virgin olive oil
2 small shallots, minced
4 teaspoons all-purpose flour
1 1/2 cups skim milk
1/2 cup low-sodium chicken broth
1/4 teaspoon freshly grated nutmeg
Kosher salt and freshly ground black pepper
Once the spinach is thawed (I usually do this in the microwave), squeeze all of the water from the spinach. A clean kitchen towel or multiple layers of paper towels are ideal for this job.
In a large saucepan, heat the oil over medium heat. Add the shallots and cook, stirring occasionally, until softened, about 2 minutes. (If you opt to add mushrooms, now would be the time to add them.) Add the flour to the pan and cook, stirring, about 30 seconds. Cooking the flour now gets rid of that pasty, raw flour taste.
Add the milk and chicken broth and cook, scraping up any bits from the bottom of the pan. Bring to a simmer and cook, stirring ocassionally, until the sauce is reduced and thickened, about 15 minutes. When the sauce is ready, it will coat the back of the spoon.
Add the spinach to the sauce and cook until tender, about 5 minutes. Stir in the nutmeg, and season to taste with salt and pepper.
Serve hot, either alone or alongside pasta or gnocchi.
The creamed spinach can be stored in a well-sealed container in the refrigerator for up to a week, if it lasts that long.
All of this has made it more difficult to post here, but today I bring you one of my favorite vegetable side dishes. Traditional creamed spinach is a dish that, while undoubtedly delicious, I can't justify eating regularly because of its inherent richness. Sure, spinach contains lots of healthy vitamins and minerals, but when covered in a cream sauce often enhanced with some kind of meat, any nutritional benefits that it offers are virtually erased.
Enter a healthier version of creamed spinach. Like all white sauces, this one begins with roux of fat and flour. However, instead of adding heavy cream or half and half to the roux, this sauce uses a combination of skim milk and chicken broth, which is then reduced down to a creamy consistency. The milk provides the familiar, slightly sweet dairy flavor while the broth adds a savory element to the otherwise meatless dish.
Sauteed shallots provide a sweet onion flavor and nutmeg, customary in many dishes with a white sauce or greens (or both), gives the sauce a wonderful fragrant spice and a certain warmth. (If I was Rachael Ray, I'd tell you that the nutmeg will make people go, "Hmmm... what is that?" Since I am not, I will tell you that the nutmeg really boosts this dish up. You wouldn't immediately recognize it, but you'd notice if it was absent.)
Perhaps my favorite thing about this dish is the ease versus payoff factor. I'm a huge fan of things that go together quickly or with minimal effort but that really impress (ahem, cheesecake). The use of frozen spinach makes this dish one you can make any time, since all of the ingredients are pantry staples. The sauce comes together practically by itself, which allows you to attend to more important kitchen matters (ahem, cheesecake). What I'm trying to say is that you should make this, now, because nothing is stopping you. You will be greatly rewarded for your (not so) hard work with a dish that you can feel good about eating and serving.
Healthier Creamed Spinach
Adapted from Ellie Krieger
When we first discovered this recipe in 2009, we made it often and served it several ways. The creamed spinach is perfectly fine on its own, but we've also added sliced mushrooms to the sauce to bulk it up. If you opt to do this, slice a few cremini mushrooms and saute them along with the shallots. The creamed spinach (with or without mushrooms) also makes a great pasta sauce. We used it with butternut squash ravioli, which was a wonderful foil to the earthier flavor of the mushrooms and spinach. In addition to ravioli or plain pasta (I'd go with a short-cut pasta like penne or rigatoni to trap more of the sauce), the spinach would also go wonderfully with gnocchi. (To make the creamed spinach a bit "saucier," either add less spinach or more milk/broth. If you add more milk/broth, just cook the sauce longer to reduce it down to the correct consistency.) I've made this with both skim and low-fat milk, and both work equally well. If you can, use freshly grated nutmeg, which is much more fragrant and flavorful than pre-grated nutmeg.
Yield: 4-6 servings
2 (10-ounce) packages frozen chopped spinach, thawed
2 teaspoons extra-virgin olive oil
2 small shallots, minced
4 teaspoons all-purpose flour
1 1/2 cups skim milk
1/2 cup low-sodium chicken broth
1/4 teaspoon freshly grated nutmeg
Kosher salt and freshly ground black pepper
Once the spinach is thawed (I usually do this in the microwave), squeeze all of the water from the spinach. A clean kitchen towel or multiple layers of paper towels are ideal for this job.
In a large saucepan, heat the oil over medium heat. Add the shallots and cook, stirring occasionally, until softened, about 2 minutes. (If you opt to add mushrooms, now would be the time to add them.) Add the flour to the pan and cook, stirring, about 30 seconds. Cooking the flour now gets rid of that pasty, raw flour taste.
Add the milk and chicken broth and cook, scraping up any bits from the bottom of the pan. Bring to a simmer and cook, stirring ocassionally, until the sauce is reduced and thickened, about 15 minutes. When the sauce is ready, it will coat the back of the spoon.
Add the spinach to the sauce and cook until tender, about 5 minutes. Stir in the nutmeg, and season to taste with salt and pepper.
Serve hot, either alone or alongside pasta or gnocchi.
The creamed spinach can be stored in a well-sealed container in the refrigerator for up to a week, if it lasts that long.
Tuesday, November 30, 2010
Roasted Root Vegetables
We have a very large tupperware at our house. It holds about 26 cups of stuff (in the past it has stored chex mix, pasta salad, and fruit salad). It currently sits in our refrigerator, taking up way too much space, with a big heap of roasted root vegetables in it.To say that I like roasted root vegetables would be an understatement. To say that I like to make a lot of roasted root vegetables would also be an understatement. More than stuffing, carrot ring, and cranberry sauce, I look forward to these roasted vegetables on the Thanksgiving table. Forget about mashed potatoes; at our house, roasted root vegetables are king.
(I wonder how many times the phrase "roasted root vegetables" has been used in the span of seven sentences. My apologies for the lack of phrase variation.)
Anyway, one of my favorite things about this recipe is that it's really more of a method than precise instructions. Once you learn the technique, you can craft dozens of different variations with all kinds of vegetables. This year, our mix included carrots, parsnips (my favorite of the bunch), sweet potatoes, fingerling potatoes, butternut squash, pearl onions, and cremini mushrooms. However, Brussels sprouts, rutabagas, beets, and even celery, which takes on a wonderful savory flavor when roasted, would also be delicious.
I chop furiously. It's kinda fun.
Roasted Root VegetablesYou can prepare this dish early in the day if you like. Just cover the roasted vegetables. When you are ready to serve them, warm them in an oven and top them with the garlic-herb mixture. If you prefer, you can peel the root vegetables, but I love the texture (and nutrition) that the peels provide. As I said before, you can substitute or add in other root vegetables if you like. Just be sure to cut them into similarly-sized pieces. If you choose to add beets, rutabagas, or celery, cook them along with the root vegetables. If you choose to add Brussels sprouts, halve or quarter them and cook alongside the mushrooms and onions. We use a large disposable aluminum roasting pan (the kind you'd use to roast a turkey) for the root vegetables. It's very important both to season the vegetables liberally and to toss them every 15 or so minutes so that they cook evenly (this is a lot of vegetables we're talking about here). We cook the vegetables using our oven's "convection roast" setting. If your oven doesn't have this setting, roast at the same temperature, keeping in mind that it may take longer for the vegetables to cook through. To ensure even cooking, just toss every 15 minutes until they are tender.
Yield: an insanely large amount; at least 20 servings
2 pounds carrots
2 pounds parsnips
2 large sweet potatoes
2 pounds fingerling potatoes
1 medium butternut squash, peeled and seeded
1/2 pound cremini mushrooms
2 (10-ounce) bags of pearl onions
10-12 cloves of garlic, unpeeled
Kosher salt and freshly ground black pepper
Olive oil
Large handful of fresh parsley
2-3 sprigs of fresh rosemary
Adjust two oven racks to the upper and lower middle positions and preheat the oven to 400 degrees F. Cut the carrots, parsnips, sweet potatoes, fingerling potatoes, and butternut squash into 3/4-inch to 1-inch pieces. It's important that the root vegetables be close to the same size so that they cook at the same rate. Place in a large roasting pan and set aside.
Halve or quarter the mushrooms and place on a foil-lined half-sheet pan. Meanwhile, bring a medium saucepan of water to a boil. When it has reached a bowl, drop in one of the bags of pearl onions. Cook for 1 minute. Drain in a colander and run cold water over the onions to cool them down. Using a paring knife, peel the outer layer off the pearl onions and add to the half-sheet pan with the mushrooms. Repeat with the second bag of pearl onions. Add the unpeeled garlic cloves to the half-sheet pan, too.
Lightly drizzle the root vegetables with olive oil and season liberally with salt and pepper. (You can also spray them with nonstick cooking spray and achieve the same result.) Toss the vegetables with your hands to ensure they are sufficiently and evenly seasoned. Repeat with the mushrooms and onions.
Place the roasting pan of root vegetables on the lower middle rack of the oven and roast for 15 minutes. After 15 minutes have passed, carefully and quickly toss the vegetables with a large spoon. Roast for another 15 minutes and toss again.
After the root vegetables have been roasting for 30 minutes (they will have been tossed twice), place the mushrooms and onions in the oven on the upper middle rack. Roast for 15 minutes and again toss both the root vegetables and mushroom-onion mix.
Roast for a final 15 minutes, or until the root vegetables are browned and fork tender. The mushrooms will be browned (and shrunken) and the onions will also have taken on some color. Remove all the vegetables from the oven and let cool while you prepare the garlic-herb mixture.
Finely chop both the parsley and rosemary and place into a small dish. Peel and mash the roasted garlic and add to the herb mixture. Mix the herbs and garlic together.
Transfer the vegetables to a serving platter, add the garlic-herb mixture, and toss to incorporate everything together. Serve hot.
Labels:
butternut squash,
carrots,
healthy,
herbs,
holidays,
parsnips,
potatoes,
sides,
sweet potatoes,
vegetables
Saturday, November 27, 2010
The Rogovin Family Stuffing
Let's talk about stuffing. Or, rather, dressing. I think some people take the difference between the two terms very seriously, but in our house, even though the only thing it stuffs is our bellies, it's always been stuffing.For the past two years, I've been dying to make a homemade stuffing. I dreamed of toasted cubes of artisanal breads, sauteed wild mushrooms, buttered leeks, and woodsy rosemary and sage. Despite the deliciousness of the stuffing that we have made every year since I can remember, I was fully willing to cast it aside for a "foodier" (a word I just made up meant to signify more "foodie"-like; reminds me of "truthiness," but I digress...) recipe. You see, we use the Pepperidge Farms stuffing cubes in our recipe. Unfortunately, my food snob mentality had me believing that the entire product was pre-made (like that jiggly cranberry mold that comes from the can) and therefore unacceptable on our Thanksgiving table.
And then, a revelation.
Like so many things on this great earth of ours, the revelation came from Ina Garten. I was watching a Thanksgiving episode of hers, and she made stuffing with the same Pepperidge Farm stuffing cubes that we do! If it's good enough for Ina, it's certainly good enough for me. (I did not, however, approve of her serving cupcakes for Thanksgiving dessert. Really, Ina? I know it wasn't her actual Thanksgiving dinner, but the thought is unsettling enough.) Gosh, I am such a food snob.
Anyway, this recipe is so delicious that I've convinced my mom that we need to make two pans to keep up with people's demands for it. The recipe below makes only one pan and that will certainly be enough if you don't have ravenous stuffing-philes in your home.
Unlike many stuffing recipes, this one contains no meat and no butter. It does contain savory mushrooms and celery, which are moistened with chicken stock and baked with those bread cubes into a tried and true stuffing that is just as delicious covered in gravy, on a turkey sandwich, or completely unadorned (my preference). You would never guess that ingredients this simple could make something so incredibly scrumptious.
Rogovin Family StuffingYou can assemble the stuffing early in the day (or the night before) and refrigerate it, covered in aluminum foil, until you are ready to bake it. The oven temperature and baking time are pretty flexible. We bake the stuffing at 325 because it cooks along with the more delicate carrot ring. However, you could increase the baking temperature and decrease the time accordingly to suit your baking schedule. Just look for visual cues that the stuffing is done: a moist interior and crunchy top layer.
Yield: 10-12 servings
8 ounced cremini mushrooms, coarsely chopped into 1/2-inch pieces
5 stalks of celery, diced into 1/2-inch pieces
2 1/2 cups of chicken stock
1 bag of Pepperidge Farm herbed stuffing cubes
Adjust an oven rack to the upper-middle position and preheat the oven to 325 degrees F. In a large bowl, mix mushrooms and celery with chicken stock. Add stuffing cubes and toss to coat. Pour into a 9-by-13-inch pan. Bake for 45 minutes to an hour, until the top is golden and toasty. Serve hot.
Monday, August 9, 2010
Summer Salad with Stone Fruits and Tomato Vinaigrette
My mom and I both love salad and fruit. The combination of green leaves and sweet/tart fruit is a winning one. In the fall I like to add apples or sauteed pears, in the winter oranges are a great addition, and spring means strawberries. But come summer, the options are so much greater (and so much tastier). This particular rendition utilizes chopped peaches, plums, and nectarines. The peaches add sweetness, the plums contribute a slight tartness, and the nectarines manage to balance between the two extremes. Of course, I also love the variety that each brings to the salad.
But no salad would be complete or memorable without a truly delicious dressing. While I am the first to admit that I'm not too crazy about salad dressing (I'd just as soon eat a salad plain or with a drizzle of vinegar than make a dressing), this is my absolute favorite. My mom just sort of made it up one day, and I immediately began singing its (and her) praises. It is refreshingly tart, blending white wine vinegar with the natural acidity of tomatoes, and has a variation in texture because of the actual tomatoes and bounty of herbs it contains. But I think my favorite thing about this vinaigrette is the rosy hue that the tomato lends to it.
Truthfully, I could make a full meal out of a salad like this, and I often do, but it's perfect as a side to a lighter dinner or lunch, not to mention a fantastic antidote to the grueling summer heat.
Summer Salad with Stone Fruits and Tomato Vinaigrette
This vinaigrette recipe makes about a cup and a half of dressing. I prefer salad lightly dressed, so there is always leftover vinaigrette. It keeps very well in the refrigerator, covered, for about a week.
Yield: 4 servings
2 heads of Romaine lettuce, washed, dried, and torn into bite-size pieces
1 plum, roughly chopped
1 nectarine, roughly chopped
1 peach, roughly chopped
1 beefsteak tomato (or about 2 Roma tomatoes)
6 tablespoons extra-virgin olive oil
6 tablespoons white wine vinegar
1 1/2 teaspoons mayonnaise
1 1/2 teaspoons Dijon mustard
1/4 cup mixed leafy herbs (such as basil, parsley, marjoram, chives, and mint), minced
Pinch of garlic powder (or 1 clove of minced garlic)
Kosher salt and black pepper, to taste
Combine lettuce and stone fruits in a large bowl. Halve the tomato. Roughly chop one half and add to the bowl with the lettuce. Finely chop the other tomato and transfer to a jar (or other container), with juice. To jar, add olive oil, vinegar, mayonnaise, mustard, herbs, garlic powder, and salt and pepper. Seal jar and shake to incorporate the ingredients. Just before serving, pour dressing over lettuce and toss to combine.
Labels:
fruit,
herbs,
nectarines,
peaches,
plums,
salad dressing,
salads,
tomatoes,
vegetables
Sunday, August 1, 2010
Healthy Zucchini Bread
When my mom told me that we could harvest some vegetables from her friend’s own garden, I was elated. Although there were no fig trees to be found, we ended up with a wonderful variety of homegrown summer produce. A few peppers, some cucumbers, and a couple of cute cherry tomatoes, not to mention an assortment of delicious herbs. Oh, and a zucchini.
It was a pretty sizable bounty. And when I say sizable, I mean it. Our lone zucchini tipped the scales at over three and a half pounds. Yes, you read that correctly: three and a half pounds. About 60 ounces of pure vegetation. The problem with a three and a half-pound zucchini? Only about two and a half of those pounds are usable. Unlike average sized zucchini, this humongous squash had the most developed seed structure I’ve ever seen in a summer squash. It was more like a winter squash, and anyone who has ever prepped a butternut or acorn squash (or even scooped out a pumpkin for Halloween) knows that there’s a whole mess of seed webbing to work through and that the outer flesh is the only usable part.
This bread is also just about the healthiest quick bread recipe you may ever find. My mom swapped in applesauce for all the oil and cut back on the sugar by a third. (Apparently we have similar opinions about using vegetable oil and shortening.) Final verdict: an excellent use for our mammoth zucchini and perfect for breakfast in the morning or for a more healthful midnight snack.
Healthy Zucchini Bread
Adapted from an old family recipe
Shred the zucchini on the large holes of a box grater. Admittedly, we totally omitted the vanilla by accident, but the bread was just as tasty anyway. Include it if you like, but know that you can omit it also. I'd reason that the vanilla accents the other ingredients (much like salt - don't leave that out!) and also adds a floral note to the bread. This bread really improves with age and tastes delicious cold, as the crumb becomes especially tooth-sinking and dense. The loaves can be stored, wrapped in plastic and stored in the refrigerator, for up to one week.
Yield: 2 (shortish) loaves
3 large eggs
1 cup unsweetened applesauce
1 cup granulated sugar
2 cups shredded zucchini
1 tablespoon vanilla
3 cups all-purpose flour
1 1/2 teaspoons salt
1/2 teaspoon baking powder
1 teaspoon baking soda
2 teaspoons cinnamon
1/2 cup of chopped pecans
Adjust an oven rack to the middle position and preheat the oven to 350 degrees F. Grease and flour two 9 by 5-inch loaf pans.
Combine eggs, applesauce, sugar, zucchini, and vanilla in a large mixing bowl. Whisk until combined.
In a medium mixing bowl, whisk flour, salt, baking powder, baking soda, and cinnamon until well-combined. Meanwhile, toast the pecans in a dry skillet over medium heat until fragrant and lightly browned. Set aside.
Fold dry ingredients into wet ingredients until just-combined. Don't overmix; there should be no large streaks of white flour remaining, but lumps are fine. Stir in the pecans.
Divide the batter evenly among the loaf pans and bake for 45 minutes, or until a toothpick or wooden skewer inserted into the loaves comes out clean. Cool in the pans on a wire rack until the loaves reach room temperature.
Labels:
breads,
breakfast and brunch,
healthy,
nuts,
vegetables,
zucchini
Tuesday, July 6, 2010
Bread Salad
I know "Bread Salad" is about as unglamorous a title for a dish as you can think of, but in our house, it always elicits excitement. But for those of you who want a fancier name, let me tell you about a dish that the Italians call "panzanella."Thanks to my family's extreme fondness for vegetables year-round, as well as to the ingenious concept of wholesale food clubs, our house is rarely without the bread salad quartet of tomatoes, bell peppers, cucumbers, and bread.
This recipe, like so many of our favorites, is inspired by Ina Garten. As we've made the salad countless times in the past year or so (why we never decided to make it before, I have no idea), we have of course made a few modifications from Ina's original recipe.
Usually the process goes something like this:
"You know we have all the stuff to make bread salad, right?" I'll tell my mom nonchalantly. She'll nod, and we'll agree to make it for tomorrow's dinner. The better for me to mentally prepare myself for the deliciousness.
At around 7:30, I'll come downstairs and wash the vegetables. Two large tomatoes (we usually have beefsteak, but five or six Roma tomatoes would be fine, as well.), one whole English cucumber, and two bell peppers are about right. Then I'll dice up five or six slices of bread (my favorite is whole wheat).
Usually right about now my mom, inevitably knitting at the kitchen table, will chime in with "Can I do anything to help?" Now, while I strangely enjoy chopping vegetables and those kinds of menial prepwork tasks, I really can't stand to wash and dry greens and make salad dressing. So I let my mom do my leftover tasks, and she is always happy to do so (plus I am convinced that she makes amazing salad dressing, which is just as important a component in this dish as the bread and vegetables).The whole meal comes together very quickly. I always toast the bread in the oven (rather than in a skillet on the stove), and I sprinkle it with salt and pepper to make sure it's seasoned well. While the bread toasts, the vegetables are sitting happily in a huge (and I mean huge - way too big for just my mom and me) salad bowl, soaking up all that delicious vinaigrette. Once the bread is toasted, it goes straight into the bowl, and the warm cubes of bread readily absorb the dressing, too.
And, finally, a shout-out to the behind-the-scenes star of this dish, the capers, which at first glance can seem insignificant. After all, how can such a tiny berry make that great a difference in this sea of vegetables and bread? But they add a welcome brininess to the salad and a little pop of acidity that wonderfully complements the sweetness of the tomatoes, cucumbers, and peppers. I say it almost every time we make this salad, and I'll say it again: the capers make the bread salad.
And even though this dish is redolent of summer's bounty and bursting with bright colors, it is secretly dangerous. If you're not paying attention, you will quickly find yourself four bowls deep, wondering to yourself where all that bread salad went. I've found this out the hard way, because we used to place the bowl right on the table, where it would practically call out to you. The last time we made this, I made the wise decision to leave the bowl in the kitchen, away from view. Somehow, we ended up with leftovers, but, of course, those were quickly devoured, too.
Bread SaladAdapted from Ina Garten
If you like, you can also add half of a diced red onion (or sweet onion) to this salad. The onion adds a nice crunch and pungency. I like to soak the red onion in some cold water for about 10 minutes, which can mitigate that "Whoa, raw onion!" heat. But if you're not into raw onion, the salad will be no less delicious without it.
Yield: 4 servings
2 large beefsteak tomatoes (or 5 to 6 Roma tomatoes)
1 large English cucumber
2 bell peppers (red, orange, or yellow but not green)
5 or 6 slices of hearty bread, cut into 3/4-inch cubes
Kosher salt
Freshly ground black pepper
7 tablespoons extra-virgin olive oil
3 tablespoons champagne or white wine vinegar
1 1/2 teaspoons Dijon mustard
1 1/2 teaspoons mayonnaise
1 garlic clove, minced (or 1/2 teaspoon garlic powder)
2 tablespoons choppped fresh herbs (preferably basil but a mixture of leafy green herbs like parsley, mint, or chives with the basil also works)
3 heaping tablespoons capers
Enough lettuce greans for four (about two heads of romaine or 4 cups of greens)
Preheat the oven to 400 degrees F and line a baking sheet with foil.
Cut the tomatoes, cucumber, and bell peppers into about 1/2-inch pieces. Place in a large salad bowl.
Place the bread on the baking sheet and season with salt and pepper to taste. Toast the bread until golden brown and fragrant, about 10 minutes.
While the bread is toasting, make the dressing. Combine the olive oil, vinegar, mustard, mayonnaise, garlic and herbs in a jar or container. Seal the jar or container and shake vigorously to mix the dressing. Pour the dressing over the vegetables to coat (you may have extra; save some for salad later). Add the capers and toss the vegetables to distribute the dressing evenly throughout. Add the toasted bread to the salad and toss again to distribute the bread, making sure that the bread is coated with dressing.
To serve, place a handful of greens in a bowl and top with as much bread salad as you like.
2 large beefsteak tomatoes (or 5 to 6 Roma tomatoes)
1 large English cucumber
2 bell peppers (red, orange, or yellow but not green)
5 or 6 slices of hearty bread, cut into 3/4-inch cubes
Kosher salt
Freshly ground black pepper
7 tablespoons extra-virgin olive oil
3 tablespoons champagne or white wine vinegar
1 1/2 teaspoons Dijon mustard
1 1/2 teaspoons mayonnaise
1 garlic clove, minced (or 1/2 teaspoon garlic powder)
2 tablespoons choppped fresh herbs (preferably basil but a mixture of leafy green herbs like parsley, mint, or chives with the basil also works)
3 heaping tablespoons capers
Enough lettuce greans for four (about two heads of romaine or 4 cups of greens)
Preheat the oven to 400 degrees F and line a baking sheet with foil.
Cut the tomatoes, cucumber, and bell peppers into about 1/2-inch pieces. Place in a large salad bowl.
Place the bread on the baking sheet and season with salt and pepper to taste. Toast the bread until golden brown and fragrant, about 10 minutes.
While the bread is toasting, make the dressing. Combine the olive oil, vinegar, mustard, mayonnaise, garlic and herbs in a jar or container. Seal the jar or container and shake vigorously to mix the dressing. Pour the dressing over the vegetables to coat (you may have extra; save some for salad later). Add the capers and toss the vegetables to distribute the dressing evenly throughout. Add the toasted bread to the salad and toss again to distribute the bread, making sure that the bread is coated with dressing.
To serve, place a handful of greens in a bowl and top with as much bread salad as you like.
Tuesday, June 29, 2010
Any Way Strata
In terms of a recipe standby that is not only always comforting and delicious but that I can also always make, no matter what is in the refrigerator, nothing quite beats strata. Imagine a frittata enlivened by hearty, savory bread and you get the idea. We first started making this strata years ago, and it’s always a hit for brunch. But, in my opinion, it’s even better for dinner. You can make it early in the day and let it sit for a few hours in the fridge before baking it just before dinner. Aside from the ease of preparation involved, I also love how flexible the recipe is. Seriously, you can make this with just about anything. Have some bell peppers on hand? Saute them up. Spinach that’s not quite crisp enough to eat raw in a salad? Perfect for this! And the list goes on: broccoli, onions, asparagus, fennel, mushrooms, Swiss chard, zucchini, squash—they’d all work perfectly in this. And when coupled with gooey cheese and the more substantial bread, which soaks up the egg and almost takes on the texture of beautifully tender potatoes (hey, potatoes would be great in this, too!), you have a fabulous meal that needs only a green salad for accompaniment.
That said, there’s not exactly a precise recipe for this strata. The keys are cooking the vegetables until they’re tender and have given up all their moisture (no one likes a soggy strata, after all) and allowing enough time for the bread to soak up the eggs and milk. Play around with different vegetable, bread, and cheese combinations. (My most recent rendition included colorful bell peppers, fresh broccoli, and baby spinach; rosemary baguette; and nutty Parmesan cheese.) The possibilities are truly endless and the results are no less than delectable.
Strata—Your Way
Yield: About 8 or 9 servings (but less if I’m eating)
1 vegetable combination (choose from those I’ve listed below or create one of your own)
Kosher salt
Ground black pepper
½ teaspoon garlic powder or ½ teaspoon nutmeg
1 teaspoon dried Italian herb seasoning
9 eggs
2½ cups milk
2 tablespoons Dijon mustard
8 cups of hearty bread (not sandwich bread), cut into ¾- to 1-inch pieces*
1¼ cups cheese, divided**
Heat 12-inch nonstick skillet over medium-high heat. If using bell peppers, onions, or fennel, add them first to the pan, stirring occasionally, until they become soft and translucent (in the case of onions or fennel), about 5 minutes. Season with ¼ teaspoon each of salt and pepper. Add the remaining vegetables and cook, continuing to stir occasionally. If using spinach or another leafy green vegetable, add them last and cook until just wilted, about 1 minute. Continue cooking the vegetables until they are tender and all the moisture has evaporated.
Kosher salt
Ground black pepper
½ teaspoon garlic powder or ½ teaspoon nutmeg
1 teaspoon dried Italian herb seasoning
9 eggs
2½ cups milk
2 tablespoons Dijon mustard
8 cups of hearty bread (not sandwich bread), cut into ¾- to 1-inch pieces*
1¼ cups cheese, divided**
Heat 12-inch nonstick skillet over medium-high heat. If using bell peppers, onions, or fennel, add them first to the pan, stirring occasionally, until they become soft and translucent (in the case of onions or fennel), about 5 minutes. Season with ¼ teaspoon each of salt and pepper. Add the remaining vegetables and cook, continuing to stir occasionally. If using spinach or another leafy green vegetable, add them last and cook until just wilted, about 1 minute. Continue cooking the vegetables until they are tender and all the moisture has evaporated.
(Note: If you elect to use potatoes, either sweet or regular, you need to make sure that they are completely cooked before they are put in the oven with the rest of the strata. You can accomplish this by either roasting the potatoes in the oven until they’re tender or boiling them in water until they’re tender. Add the potatoes to the rest of the vegetables before adding garlic powder and herbs.)
Once vegetables are completely cooked through, add garlic powder (or nutmeg) and herbs and mix thoroughly. Remove pan from heat and allow vegetables to cool slightly.
Meanwhile, in a medium bowl whisk together eggs, milk, and Dijon mustard. Season with ¼ teaspoon each of salt and pepper. Set aside.
In a large bowl, combine bread and 1 cup of cheese. Add vegetable mixture to bread and toss to combine.
Spray a 9x13-inch baking dish with nonstick cooking spray and add bread-vegetable mixture. Carefully pour egg mixture evenly over bread. Sprinkle remaining ¼ cup of cheese over baking dish. Refrigerate for at least 1 hour or overnight.
Before baking, adjust oven rack to middle position and preheat oven to 350 degrees F. Bake strata until the eggs are completely set and the top is browned, 45 to 55 minutes. If the strata begins to brown too much, place a sheet of aluminum foil over the baking pan to prevent further browning. Remove strata from oven and cool for 10 minutes. Serve immediately. Stored in the refrigerator covered in aluminum foil or plastic wrap, the strata will keep for up to 1 week.
*My particular favorite bread in strata is a hearty whole wheat loaf. Baguettes or other crusty breads also work well (and are even better if they’ve started to become stale).
**You can use practically any type of cheese, as well as combinations of cheeses. Cheddar, Swiss, Gruyere, Parmesan, Pecorino Romano, Monterrey Jack, and low-moisture Mozzarella are all wonderful choices. Be creative with your pairings of bread, cheese, and vegetables. For example, a Tex-Mex version could include onion, bell pepper, and mushrooms; a milder baguette; and pepper jack cheese, with some hot sauce added to the egg mixture.
Vegetable Combinations:
Choose 3 or 4 vegetables from the list below. In the end you’ll want about 4 cups of cooked vegetables.
½ diced onion, 1 diced zucchini or yellow squash, 1 diced bell pepper, 8 ounces sliced mushrooms, 8 ounces broccoli (cut into ½-inch pieces), 1 diced fennel bulb, 8 ounces asparagus (cut into ½-inch pieces), 1 medium sweet or regular potato (cut into ½-inch pieces), 8 ounces spinach or other leafy green (such as Swiss chard).
You can also use 12-ounce bags of frozen vegetables if you have some on hand. Frozen spinach is especially convenient. Take the bag out of the freezer when you begin to saute the vegetables and add them to the pan according to the recipe, making sure to let the moisture evaporate in the pan before combining the vegetables with the bread.
Subscribe to:
Posts (Atom)