Pages

Showing posts with label holidays. Show all posts

Monday, November 19, 2012

The One Where I Rank All the Friends Thanksgiving Episodes

If you're like me, and find your enthusiasm for the Macy's Thanskgiving Day Parade waning with the years (is this a phase? based solely on my mother, I'd say yes) (because who really needs to watch a Canadian Justin Bieber sing to millions of shrieking preteens (voluntarily) on this most American of holidays?), then look no further than the most American of sitcoms, Friends.

Each Thanksgiving, Friends aired a special Thanksgiving episode. Not special as in "very special episode" but it usually involved all six Friends hanging out in Monica's apartment, but it was more special than all the other episodes they did that because holiday spirit! and turkey! and awkward family members!

In my opinion, 198 minutes (there are really only 9 exclusively Thanksgiving episodes of Friends; season two's doesn't really count, although Monica attempting to make Thanksgiving recipes out of Mockolate is hilarious. Too bad the FDA approval didn't turn out and Monica is allergic to cat hair) of Friends beats the three hours of Macy's Thanksgiving Day Parade any year, especially since Matt Lauer is getting more annoying by the day (I miss Ann, and Meredith), and I'm still curious how Savannah Guthrie got that co-anchor job, and Al Roker grates.

The following, a ranking* of all 9 Friends Thanksgiving episodes:

9. "The One Where Chandler Doesn't Like Dogs" (season seven): Ross is typically obsessive in this episode, as he struggles to name all fifty states before he can eat dinner. Meanwhile Joey comes up with 56. Also Chandler fakes an allergy to dogs when really he actually hates them (continuity errors aside, how is this possible?). For the record: I love Clunkers.
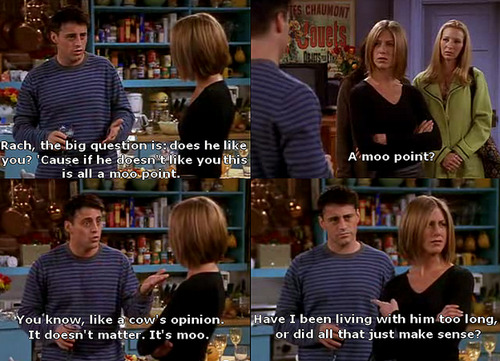
Don't let the ranking fool you: this episode still has some absolutely hilarious lines, including this one.

8. "The One with the Late Thanksgiving" (season ten): There are three things I remember about this episode: 1. Rachel enters Emma in a baby pageant show, which was less awful eight years ago when Toddlers and Tiaras didn't exist; 2. Monica slaves over a Thanksgiving dinner only to have everyone but Chandler show up late. Then Joey's head gets stuck in the door. 3. Chandler and Monica learn they are going to be adoptive parents so really nothing else matters.
(via lavatwilight)
10x08 TOW The Late Thanksgiving

7. "The One Where Underdog Gets Away" (season one): This is a special one. I'm always struck by how funny this show is, almost twenty years later. How many sitcoms had humor that still resonates nearly two decades after they premiered? The funny part about this episode is that pretty much everyone plans to not be together on Thanksgiving; it's hard to believe such a situation since the eight other Thanksgiving episodes that followed this always assumed that the six Friends would spend the holiday with one another.
The Friends' first Thanksgiving together: good for sentimental points alone. 

But in this episode we're introduced to Chandler's Thanksgiving hatred (a funny plotline that resurfaces in season five), Joey gets (fake) VD, Monica has to make like eleven different kinds of potatoes, and then the Underdog balloon gets away in the Macy's Parade and no one "got the keys" so everything burns and Chandler gladly serves everyone grilled cheese sandwiches instead of the usual turkey and fixings. If nothing else, we learn that no good can come of the Macy's Day Parade.

6. "The One with Chandler in a Box" (season four): In this one Monica gets ice in her eye and has to go to the eye doctor, only her ophthalmologist turns out to be Richard's son (played by a dreamy Michael Vartan). She invites him over for dinner, a kiss ensues, and it's obviously the weirdest thing ever (as Rachel says, it's like "inviting a Greek tragedy over for dinner").
Joey teaches Rachel how to curse in Italian. 
 
 Monica: "Fine! Laugh all you want but [to Ross] married a lesbian! [To Rachel] Left a man at the altar! [To Phoebe] Fell in love with a gay ice dancer! [To Joey] Threw a girl's wooden leg in a fire! [To Chandler] Live in a box!"

5. "The One with Rachel's Other Sister" (season nine): Oh, my God. This episode. Rachel's horrible and horribly hilarious sister Amy (played by the awesome Christina Applegate) shows up and is so un-self-aware and vicious and shallow and, yes, awesome. The climactic fight between Rachel and Amy at the end is golden.

4. "The One with All the Thanksgivings" (season five): Also known as the one where Ross and Chandler dress like the guys from Flock of Seagulls and Miami Vice, the return of Fat Monica, and the one where Monica puts a turkey on her head and Chandler tells her he loves her. Way back in the dark ages of VHS tapes, we had a box set of the "Top 10" Friends episodes, and this one was on it. Rest assured that nearly fifteen years later it's as funny as ever. Also: "Toes on Ice, coming soon to Madison Square Garden."
Rachel: Joey got a turkey stuck on his head?
Joey: Hey! It's not how it sounds. 
Chandler: It is exactly how it sounds. 

3. "The One with the Rumor" (season eight): Brad Pitt guest stars as Ross and Monica's high school friend who was in an "I Hate Rachel Green" club with Ross. Which is ironic because at the time Brad Pitt was married to Jennifer Aniston. Pitt's character Will also used to be fat, which is doubly ironic since Brad Pitt is physically flawless. It's a fun episode, campy and very meta for the show, although it's hard for me today to look back on it as fondly since I'm still bitter over Brangelina. #sorrynotsorry

2. "The One with the Football" (season three): This is a classic Friends episode, and not just of the Thanksgiving variety. Everyone was funny, and the sibling rivalry between Monica and Ross was actually endearing instead of slightly creepy. Plus, Joey thinks the Netherlands is where Tinker Bell and Peter Pan are from, Rachel goes "really long," and Phoebe and Rachel can't join the football league because they play on Sunday and Monday nights and Rachel works Monday nights.
 http://1.bp.blogspot.com/-AkjiRUuKKbo/UEWxhWwNTrI/AAAAAAAACxw/Qf1uFYIQrUo/s1600/the+one+with+the+football%2528S0309%2529.jpg
Let's take a minute to appreciate the meta of Phoebe wearing a That Girl shirt. Because that girl was played by Marlo Thomas, who also plays Rachel's mother.

1. "The One Where Ross Got High" (season six): This one is really just a non-stop half-hour of hilarity. Literally everything is funny, and it's incredibly quotable. This is probably my family's favorite (my dad to this day still quotes "What's not to like? Custard: good. Jam: good. Meat: goooood"). Those last few minutes where everything hits the fan are unmatched throughout the series. Plus the bloopers are incredible.
 
"It tastes like feet!"

Start at the 2:52 mark for the bloopers of Ross and Joey eating the beef trifle thing.

*Ranking these episodes was tough. They're all good, and it was like choosing a favorite child, if I had children who were sitcom episodes.

What is your favorite Friends Thanksgiving episode?

Friday, November 18, 2011

Being Thankful

A few days ago I read a post by Jennifer Perillo, who writes In Jennie's Kitchen. If you read lots of food blogs, you've probably heard Jennie's story; this past August, her husband died unexpectedly from a heart attack, and she quickly became a single mother to her two young daughters. It's a heartbreaking story, and though I'd never read her blog before, I began to after that. I'm not sure why I did, but in the past three months I've grown to look forward to her posts. They're filled with raw emotion; she doesn't sugarcoat anything; to be honest, some of the posts can be downright difficult to get through. The compassion, the pain, and the emotion you feel for this distant stranger can be pretty startling.

Anyway, this past week Jennie posted about being thankful for everything she has in her life, and she encouraged her readers to do the same this Thanksgiving. "Take a moment and think about everything that you feel fortunate for in your life," writes Jennie. "Then, think about the millions of voids that will be on Thanksgiving tables around the country."

In our family, we like to go around the table and each say what we are thankful for. It's pretty cheesy, yes, but it does allow us to reflect on everything we have. Usually, I say something like "I'm so grateful for all the delicious food we're about to eat," which is the truth. But my response never really delves deeper than that.

I don't often reflect on all the blessings in my life. I have so many. My education. My family and friends. A warm bed to sleep in at night. It can be really easy to turn these wonderful things around, though.

Classes are too hard. 

Too much family time. 

Why do I have to get out of bed so early? 

I've thought all of these things before. Actually, I've probably thought all of them in the past week (especially the first and last).

A few days ago I was in a real panic to decide what to make for dessert for Thanksgiving. I'd really wanted to make the brown butter tarts that I'd had as my birthday "cake," but I wasn't getting a response from the pastry chef at the restaurant where they're made. So I was frantically searching for an alternative. Will pie be too hard? Is crisp too boring? Are two springform pan desserts too similar? It was a whirlwind of self-inflicted stress.

And then I stopped searching for a while. Why was I making such a big deal about this Thanksgiving dessert? How was this in the spirit of Thanksgiving at all? How many people across America would gladly take any Thanksgiving dessert, be it pie, cake, fruit, or otherwise? How many people across America wouldn't even be partaking in a Thanksgiving feast? How many people around the world wouldn't be able to spend the day with their family? It was humbling to think about the embarrassment of riches I take for granted, to shift my perspective just a tad and realize how fortunate I am to consider my second dessert problem a problem at all.

This Thanksgiving will be a strange one at our home. For the first time, it will be only my parents and me, as my sister can't make the trip from Los Angeles to Atlanta. It will be a quiet day, for sure, but it won't make me love Thanksgiving any less.

Thanksgiving has long been my favorite holiday. I love the food, of course. The week-plus of leftovers that ensue. I love the Macy's Thanksgiving Day Parade and learning how to make carrot ring alongside my mom. And watching all the Friends Thanksgiving episodes and casually viewing the football games and seeing Miracle on 34th Street for the first time this holiday season. And taking a walk in the crisp morning before hunkering down in the kitchen. Having a peaceful and conversation-filled meal with my family. Staying at home. These are only some of the things I'm thankful for this year. They may seem little, but together they make Thanksgiving what it is, small memories I'll take with me in a few years when I have my own Thanksgiving dinner and begin to form my own traditions.
Last Thanksgiving I invited my Chinese roommate Chen to our home for Thanksgiving. It was a wonderful experience for both of us: Chen got to experience "real American Thanksgiving food" and I got to show it to her. Undoubtedly it's a Thanksgiving I won't soon forget.

As next Thursday approaches, I want to know: what are you thankful for? 

Saturday, February 12, 2011

Simplest Applesauce

If I could use one word to describe my cooking style, it would be simple. My favorite recipes and foods are usually the simplest, with few embellishments and incredibly easy preparations. Case in point: roasted root vegetables and plain cheesecake (it seems I can't get through a post without mentioning cheesecake). I'd so much rather eat a roasted sweet potato with little more than salt and pepper than a concoction that adds a myriad of different flavorings and ingredients so you can hardly taste the sweet potato-ness in the finished product. 

Take apples. I love apples. All kinds. I don't think I've ever met an apple that I didn't like. From Pink Lady to Golden Delicious to Honeycrisp (swoon) to the ubiquitous Granny Smith, I love them all. There is something so satisfying to biting into a crisp apple, juicy and sweet, with a hint of tartness coming through toward the end.
Plain apples, eaten out of hand, are one of my favorite foods. In my mind, they are perfect as is. Sometimes, though, when the mood strikes, I love to make a batch of applesauce. Usually I get the craving for applesauce around the holidays, or when the temperatures drop and a spoonful of warm applesauce seems the perfect antidote to the chilly weather. Keeping true to my simple is best philosophy, I make my applesauce with nothing but apples and water. It's almost embarrassingly easy, but the end product is proof that this strategy works. Fresh apples don't need anything else to taste wonderful. They already have the whole sweet/tart balance going for them, and when cooked down, I think the flavor concentrates into something greater than the sum of its parts.

Make this in the dead of winter, when you've had your share of citrus, to serve alongside any number of dishes. It would be great as a sweet side to poultry or pork, atop pancakes (sweet or savory) or waffles, or as an accompaniment to spice breads or cakes. As for me? I enjoy it alone, with only a spoon and perhaps a sprinkling of cinnamon for some warm spiciness. Yup, typical.
My Favorite Applesauce

Like nearly all foods, I enjoy my applesauce with some real texture so I leave it pretty chunky. If you like your applesauce smoother, or are using it in another application where smoothness is desired, you can use a foodmill to get it more evenly pureed. One of my favorite things about this "recipe" is that it's incredibly adaptable depending on how much applesauce you want to make. I usually make this around the holidays (it's a mainstay on our Thanksgiving table) so I make a large batch. You can adjust the proportions accordingly depending on how much you want to make. I find that sweet/tart apples work best for applesauce because they result in an end product that's sweet without being cloying. Golden Delicious (my favorite apple to eat out of hand), Pink Lady, Jonagold, Gala, and Honeycrisp are all excellent varieties perfectly suited for applesauce. Another great thing about applesauce? It's perfect for using apples that have seen better days or are just languishing, uneaten, in your crisper. This technique also works great with pears, although "pearsauce" just doesn't have that same ring to it, does it?

Yield: 10-12 servings

8 large to medium sweet/tart apples (see note)
Water

Peel and core the apples. Slice them into medium chunks (about 1 1/2-inch pieces) and place in a large pot. Pour in enough water to come halfway up the apples. Heat the apples and water over medium heat for about 30 minutes, or until the apples are very tender. With a potato masher (you could also use a wooden spoon and a bit more elbow grease), mash the apples until they form a chunky sauce. For a smoother applesauce, transfer the whole mixture to a food mill and process the apples until they reach the desired consistency. Transfer back to the pot.

At this point, the applesauce will be a little loose. Reduce the heat to low and simmer the applesauce for 20 to 30 minutes, until some of the water has evaporated and the applesauce is thick. Store the applesauce in the pot or in an airtight container for up to a week. Serve warm or cold.

P.S. I know I said that this year I wanted to post once a week. I also know it's been two weeks since my last post. Unfortunately, this past week was filled with three tests, a project, and lots of homework assignments. Since one of my other New Year's resolutions was to maintain my grades, I see this as a trade-off. I'm hoping to resume my minimum of one post a week from here on out, though. Thanks for reading, as always.

Friday, January 21, 2011

Creamed Spinach

Here we are, three weeks into the New Year. Isn't it crazy how time flies? Snowpocalypse 2011 really shook things up here for a while, but this week definitely marked a return to normalcy, with busy mornings and nights, homework and quizzes, and slightly higher temperatures.

All of this has made it more difficult to post here, but today I bring you one of my favorite vegetable side dishes. Traditional creamed spinach is a dish that, while undoubtedly delicious, I can't justify eating regularly because of its inherent richness. Sure, spinach contains lots of healthy vitamins and minerals, but when covered in a cream sauce often enhanced with some kind of meat, any nutritional benefits that it offers are virtually erased.

Enter a healthier version of creamed spinach. Like all white sauces, this one begins with roux of fat and flour. However, instead of adding heavy cream or half and half to the roux, this sauce uses a combination of skim milk and chicken broth, which is then reduced down to a creamy consistency. The milk provides the familiar, slightly sweet dairy flavor while the broth adds a savory element to the otherwise meatless dish.

Sauteed shallots provide a sweet onion flavor and nutmeg, customary in many dishes with a white sauce or greens (or both), gives the sauce a wonderful fragrant spice and a certain warmth. (If I was Rachael Ray, I'd tell you that the nutmeg will make people go, "Hmmm... what is that?" Since I am not, I will tell you that the nutmeg really boosts this dish up. You wouldn't immediately recognize it, but you'd notice if it was absent.)

Perhaps my favorite thing about this dish is the ease versus payoff factor. I'm a huge fan of things that go together quickly or with minimal effort but that really impress (ahem, cheesecake). The use of frozen spinach makes this dish one you can make any time, since all of the ingredients are pantry staples. The sauce comes together practically by itself, which allows you to attend to more important kitchen matters (ahem, cheesecake). What I'm trying to say is that you should make this, now, because nothing is stopping you. You will be greatly rewarded for your (not so) hard work with a dish that you can feel good about eating and serving.

Healthier Creamed Spinach
Adapted from Ellie Krieger

When we first discovered this recipe in 2009, we made it often and served it several ways. The creamed spinach is perfectly fine on its own, but we've also added sliced mushrooms to the sauce to bulk it up. If you opt to do this, slice a few cremini mushrooms and saute them along with the shallots. The creamed spinach (with or without mushrooms) also makes a great pasta sauce. We used it with butternut squash ravioli, which was a wonderful foil to the earthier flavor of the mushrooms and spinach. In addition to ravioli or plain pasta (I'd go with a short-cut pasta like penne or rigatoni to trap more of the sauce), the spinach would also go wonderfully with gnocchi. (To make the creamed spinach a bit "saucier," either add less spinach or more milk/broth. If you add more milk/broth, just cook the sauce longer to reduce it down to the correct consistency.) I've made this with both skim and low-fat milk, and both work equally well. If you can, use freshly grated nutmeg, which is much more fragrant and flavorful than pre-grated nutmeg.

Yield: 4-6 servings

2 (10-ounce) packages frozen chopped spinach, thawed
2 teaspoons extra-virgin olive oil
2 small shallots, minced
4 teaspoons all-purpose flour
1 1/2 cups skim milk
1/2 cup low-sodium chicken broth
1/4 teaspoon freshly grated nutmeg
Kosher salt and freshly ground black pepper

Once the spinach is thawed (I usually do this in the microwave), squeeze all of the water from the spinach. A clean kitchen towel or multiple layers of paper towels are ideal for this job.

In a large saucepan, heat the oil over medium heat. Add the shallots and cook, stirring occasionally, until softened, about 2 minutes. (If you opt to add mushrooms, now would be the time to add them.) Add the flour to the pan and cook, stirring, about 30 seconds. Cooking the flour now gets rid of that pasty, raw flour taste.

Add the milk and chicken broth and cook, scraping up any bits from the bottom of the pan. Bring to a simmer and cook, stirring ocassionally, until the sauce is reduced and thickened, about 15 minutes. When the sauce is ready, it will coat the back of the spoon.


Add the spinach to the sauce and cook until tender, about 5 minutes. Stir in the nutmeg, and season to taste with salt and pepper.

Serve hot, either alone or alongside pasta or gnocchi.

The creamed spinach can be stored in a well-sealed container in the refrigerator for up to a week, if it lasts that long.

Tuesday, January 11, 2011

Rainbow Blondies

I'm going to throw a few numbers out right now....

6: inches of snow that fell the other night.
3: number of days that Georgia Tech has canceled school.
4: bowls of oatmeal I've had in the past three days.
2: number of hours it took two of my friends and me to walk the mile to Publix and back.
0: number of cars you'd see out on the street because of this "snowpocalypse."

I've never before experienced this much snow in Atlanta. I don't think Tech has ever been closed for this many days at a time. It's certainly a strange experience to be stuck on this campus with virtually nothing to do. Sure, it was fun yesterday with nothing to do. The eerie silence on campus, save for the sound of shovels scraping against the sidewalks, was kind of cool. There was even one brave soul kayaking down the snow on Freshman Hill. We ate sub sandwiches, watched movies, and sat around on the floor playing the Girls' Night Out edition of Table Topics.

But today was a completely different story. Breakfast at the dining hall was wholly underwhelming. (To give you the idea of how sparse the selection was, know that I ate Wonder Bread for the first time in my entire life.) I attempted to tackle my Computer Science homework (pretty much a total failure), played solitaire with myself (with actual playing cards), and wished that I was at home, where it's familiar and cozy. At home, there are blankets and a fireplace, which make the vision looking out the window worth it. Here, I'm just stuck in my dorm room with little to do.

Hopefully you all are in a more promising situation than I am. (Maybe there's not even snow where you are!) In my mind, there's no better way to pass time than baking up a storm in the kitchen. And there's no better treat to make when the sky is bleak and gray than blondies.
Essentially chocolate chip cookies in bar form, blondies are wonderful because they take to so many variations and add-ins. In this particular version, I chose to add white chocolate chips and M&M's, which studded them with occasional bursts of blues, greens, and reds. The blondie itself has a warm butterscotch flavor from the brown sugar and butter and hints of sweet vanilla from the white chocolate.

In weather this crazy, eating a blondie warm from the oven suddenly makes the cabin fever melt away, although I wish the snow would, too.

Rainbow Blondies
Adapted from Dorie Greenspan's Chewy, Chunky Blondies

The butterscotch flavor of these blondies serves as the perfect backdrop to a myriad of flavors. Be creative! See the end of the recipe for more add-ins. When I made these, I used a hand mixer to mix the batter. While our hand mixer is certainly not state-of-the-art, it had trouble with this relatively thick batter. If you opt to use a hand mixer, know that you will have to stop periodically to get the batter out from the inside of the beaters. If I made these again, I'd probably use a stand mixer. (Note that you can also mix these by hand, but prepare to use a lot of elbow grease!)

Yield: 32 bars, each about 2 1/4 by 1 1/2 inches

2 cups all-purpose flour
3/4 teaspoon baking powder
1/2 teaspoon baking soda
1/2 teaspoon salt
2 sticks (16 tablespoons) unsalted butter, at room temperature
1 1/2 cups packed light brown sugar
1/2 cup granulated sugar
2 large eggs
1 teaspoon vanilla extract
1/2 cup white chocolate chips
1 cup M&M's

Position an oven rack to the center position and preheat the oven to 325 degrees F. Grease a 9- by 13-inch baking pan with nonstick spray.

In a medium bowl, whisk together the flour, baking powder, baking soda, and salt.

In the bowl of a stand mixer or in a large bowl working with a hand mixer, cream the butter and sugars on medium speed until light and fluffy, about 3 minutes. Add the eggs one at a time, beating well after each addition. Beat in the vanilla. Reduce the mixing speed to low and add the dry ingredients slowly, mixing just until they disappear into the batter. If a few streaks of flour remain, use a rubber spatula to incorporate them into the batter.

Add the white chocolate chips and M&M's by hand until they are evenly distributed throughout the batter. Scrape the batter (it will be quite thick) into the prepared pan and use a spatula to spread it out as evenly as possible.

Bake for 40 minutes, or until a toothpick or cake tester inserted into the center of the blondies comes out with a few crumbs attached. The blondies will have pulled away from the sides of the pan. Transfer the pan to a rack and cool for about 15 minutes. From there, you can turn the blondies out onto another cooling rack and cut them into bars or you can cut them into bars right in the pan. Enjoy warm or at room temperature.

Store the blondies in an airtight container at room temperature for up to two weeks. If the blondies are a little hard, heat them in the microwave for about 15 seconds to soften them up.

More add-ins for blondies:
Chocolate chips or chunks (semisweet or milk)
Butterscotch or peanut butter chips
Sweetened, shredded coconut
Chopped nuts (pecans, walnuts, macadamia nuts, almonds, peanuts, etc.)
Dried fruits (cranberries, cherries, figs, raisins)
Crystallized ginger
Chopped candy bars (Heath bars, Reese's, Snickers, Butterfingers, etc.)

Thursday, January 6, 2011

Biscotti for Winter

Once upon a time I didn't like yogurt, stinky cheese, and pizza (gasp!). Thankfully, I've come to my senses and now enjoy all of these things, although the jury's still out on arugula, grapefruit, and cheese straws.

But today is all about biscotti, a cookie that I once disliked but has rapidly become not only my favorite type of cookie to bake but also my favorite to eat. On the baking side of things, I love the ease with which biscotti come together. There's no complicated mixing technique and a single batch makes a few dozen cookies in about an hour.

Of course, I enjoy eating them most of all. I love the crunchy texture of biscotti. I recently started using recipes that require little to no butter or oil, which is traditional in Italian cuisine (usually eggs are the sole source of fat). The lack of fat in the dough prevents the cookies from becoming too soft as they sit out, and I think it also helps them stay fresh-tasting for a long time. (Such is another great thing about biscotti: they are wonderful candidates for make-ahead baking, which is always a plus during the busy holiday season.) If you are normally deterred from biscotti because of their crunchier texture, know that these are definitely not tooth-shattering hard; they will soften up just enough after a brief dip into a hot cup of coffee (or tea, if you're into that sort of thing).
Finally, I absolutely love the infinite number of ways that you can change up the flavor of the biscotti. Because Christmas was two weeks ago, I'm opting to call this specific rendition "winter" biscotti because the combination of flavors - tart/sweet cranberries, slightly salty pistachios, and vanilla-y white chocolate - seem the perfect antidote to all this cold weather (a white Christmas? Seriously?). Never mind that the shades of red, green, and white seem especially suited to this time of year.

The real stars of this biscotti though, aside from the wonderful variation of textures from the different mix-ins, are the almond extract and white chocolate chips. The former is subtle yet just strong enough to attract your attention. I'm not sure how else to describe its contribution to the cookie's flavor besides saying "nutty," but if you love the flavor of almonds then you'll love what the almond extract brings to the party.
As for the white chocolate, I'm reminded of a blog post David Lebovitz did a year of so ago about caramelized white chocolate. I know some people don't like the sweet flavor of white chocolate, but it works tremendously in this cookie to balance out the tart cranberries and naturally salty pistachios. Instead of just a one-note sweetness, the heat from the oven browns the white chocolate just enough to give it a warm, almost caramel flavor. It's sort of like a cross between a toasted marshmallow and the burnt sugar topping on creme brulee. All accented with vanilla. Trust me, it's delicious.

Really, the only mistake I made with these cookies was not making enough. Truly, they were all gone a week ago. (We did give some away, but still....) That is practically unheard of in our house. I recall because a time in the not-so-distant past when I discovered a tin of Christmas cookies, stowed away and forgotten, well past the new year. Whatever time of year it is, though, I'm positive you too will fall in love with these cookies.
Cranberry, Pistachio, and White Chocolate Biscotti
Adapted from Bon Appetit

The original recipe called for dried raspberries of dried strawberries. I've never actually seen either of those (outside of freeze-dried strawberries in Special K) and dried cranberries seem more wintry to me anyway. If you like, you can dip the cooled biscotti in melted white or dark chocolate. This is a great base recipe for any dried fruit and nut biscotti. For any other time of year, you could substitute dried figs, raisins, or dried cherries for the cranberries. In place of pistachios, walnuts or pecans would also be delicious.

Yield: 2 to 3 dozen cookies, depending on how thickly you slice the biscotti

3 cups all-purpose flour
2 teaspoons baking powder
1/2 teaspoon salt
1 cup sugar
3 large eggs
2 tablespoons canola (or other vegetable) oil
2 1/2 teaspoons almond extract
3/4 cup shelled, raw, and unsalted pistachios
1 cup dried cranberries
1/2 cup white chocolate chips

Adjust an oven rack to the center position and preheat the oven to 350 degrees F. Line a baking sheet with a silicon liner (such as Silpat) or with parchment paper.

In a medium bowl, whisk flour, baking powder, and salt to combine. Meanwhile, in the bowl of a stand mixer fitted with the paddle attachment, beat sugar, eggs, oil, and almond extract until well combined. Slowly add the flour mixture and beat until smooth. Using a rubber spatula, stir in the pistachios, dried cranberries, and white chocolate chips. Make sure to incorporate the add-ins so that they are distributed evenly throughout the dough (especially the dough at the bottom of the bowl).

Divide the dough in half and shape the dough into two logs, each about 12 inches long, 3 inches wide, and 1 inch tall. Space the logs about 3 inches apart. If the dough is sticking to your fingers, wet your fingertips to prevent it from sticking.

Bake the logs for 30 minutes, until slightly browned and just firm to the touch. Reduce the oven temperature to 325 degrees F. Cool the logs on the baking sheet for 10 to 20 minutes. Then, using a serrated knife, cut the logs crosswise into about 1-inch wide slices. (You can also cut the logs into thinner slices; you'll just end up with more cookies.) Turn the biscotti onto their sides (cut-sides down) and bake again for 10 minutes.

After 10 minutes, carefully flip the biscotti over onto their other sides and continue baking for another 10 minutes, until the biscotti are crisp, firm, and golden. Cool completely on the baking sheet before enjoying.

The cooled biscotti can be stored, at room temperature, in an airtight container for up to 3 weeks (if they last that long).

Thursday, December 30, 2010

Saltine Toffee Candy

Confession: I am about to talk about something that I in fact did not make. (I did, however, watch curiously as my sister did.)

Confession (again): I can't stop listening to Taylor Swift's new album, Speak Now.

Phew. That feels good to get off my chest. Anyway, now that I've been completely honest, there's no sense in holding this back either: I don't like candy.

Yes, I said it.

I've actually never been a fan of caramel-y, toffee-flavored confections. I don't even like lollipops or hard candies. And while it's completely accurate to call this sweet a candy, it's also accurate to say that I am totally obsessed with it.

My mom's friend brought this to our house before Christmas and my mom, who similarly isn't big on candy-like treats, promptly proclaimed it to be delicious. That alone should have been my first tipping point to how good this stuff was. Unfortunately (or fortunately, depending on how you look at it), I actually didn't get around to trying it for a few days, after which I scorned myself for waiting so long to enjoy its awesomeness.
At first glance including a cracker in this candy may seem a bit strange. Rest assured that the end result is nothing short of taste bud bliss. I think that the genius of this candy comes from the layering of the different components. The bottom layer of saltine crackers provides the perfect base for the candy, giving it sturdiness. The toffee-like combination of brown sugar and butter is, not surprisingly, rich but not too sweet. (Another thing that I love is that some of the sugar/butter mix seeps through the holes of the saltines and hardens onto the bottom of the crackers, too.) The crowning layer is semisweet chocolate, giving a hint of bitterness and a familiar chocolate flavor. A sprinkling of chopped pecans provides some textural contrast, too.

These were definitely the easiest things we made for the holidays this year. The ingredient list is short and the actual hands-on preparation time is minimal. Considering the end result, I'd say these are an all-around must-make. And since I don't throw around the word "must" too often here, consider it a testament to how addictive this stuff is. You've been warned.
Saltine Toffee Candy

This candy comes together quite quickly and is pretty foolproof (at least as far as candymaking goes). Instead of pecans, you could use any nut, and I'm inclined to think that toasted coconut and crushed peppermint candies would also be delicious. The candy (unbroken) can be made ahead and stored in the refrigerator until you are ready to break it into pieces.

Yield: Lots and lots (at least 12 servings)

About 40 saltine crackers, or enough to cover a 12 by 18-inch baking pan
2 sticks unsalted butter
1 cup brown sugar
12 ounces semisweet chocolate chips
1 cup chopped pecans

Position an oven rack to the center position and preheat the oven to 350 degrees F. Line a 12 by 18-inch (half-sheet) pan with foil. Arrange the saltine crackers in the pan so that they cover the entire pan.

In a medium saucepan, melt butter and brown sugar over medium heat, stirring occasionally. Continue to heat until the mixture comes to a boil, 3 to 5 minutes. Quickly but carefully pour the mixture over the saltine crackers. Using a rubber spatula, spread the butter/sugar mixture out so that it covers the saltines in as even a layer as possible. Since the toffee is very sticky, it may resist spreading in a perfectly even layer; just make sure it reaches to the edges of the pan, covering all the crackers.

Bake for 5 minutes. After 5 minutes, remove the toffee-covered crackers from the oven. Sprinkle the chocolate chips over the hot and bubbling toffee as evenly as possible. After a few seconds, the chocolate chips will begin to melt. Spread the chocolate into an even layer over the toffee using an offset spatula or rubber spatula. Once the chocolate is spread in an even layer, sprinkle the pecans on top. Lightly press down on the pecans to make sure that they are suspended in the chocolate.

Refrigerate for an hour, or until the chocolate is firm and set. Break up into pieces (the more irregular the better) and eat now or store in an airtight container at room temperature or in the refrigerator.

(Enjoy these now, before the first week of January comes around and you're bombarded with Weight Watchers ads and Special K commercials making you feel guilty about your Christmas cookie habit.)

Tuesday, December 28, 2010

Walnut Linzer Sables

I know it seems crazy to post about Christmas cookies after rambling on about New Year's resolutions. I'd like to say that I planned it all along.

The truth is that I am so accustomed to clicking "Publish Post" right after I finish a post that I completely forgot that I wanted to wait until Friday to share my New Year's post. And once it was done I really didn't feel like going back and changing anything. Oh, well.

The (other) truth is that these cookies are, to me at least, more winter-inspired than Christmas-specific. Well, except for the Christmas tree cut-outs. And so we'll pretend that they're actually winter evergreens for the next few minutes.

I received Dorie Greenspan's Baking From My Home to Yours for my birthday and after only a while perusing it all I could think was Where has this book been all my life? I mentally bookmarked about half of the recipes just flipping through and vowed to try out (at least) one this holiday season.
The chosen recipe is these Walnut Linzer Sables. I've long wanted to make Linzer cookies and I was inspired by a Martha Stewart variation that used a small Christmas tree cookie cutter for the top cutter.

I really can't say enough good things about this dough. Ground walnuts lend a wonderful toasty flavor and traditional winter spices add warmth. After being rolled out the dough is chilled before being cut and baked.

Plain, the cookies are redolent of butter, sugar, toasted nuts, and just a hint of cinnamon. The cookies have a sandy texture like a sable (or French butter cookie) but they're sturdy enough to be topped with jam and sandwiched.

I opted to use a cranberry jam that we had on hand because it seemed particularly festive, and it adds a subtle tartness that is a good contrast to the sweet, spiced cookie.

Perhaps my favorite thing about this recipe, besides how easy the dough is to work with, was how versatile it is. As you can see from the photos, the sandwiches can be easily adapted for all sorts of occasions. Obviously for Christmas a tree cutter or any other holiday cutter would be great for making the top cookie. You could use hearts for Valentine's day or flowers for Easter or summer. In autumn, a leaf would do.
After rolling and cutting out all the cookies there will inevitably be some leftover dough. Rather than throwing it away, I opted to roll them into balls and make thumbprint cookies. Now that's what I call fabulous leftovers!

Walnut Linzer Sables
Adapted from Dorie Greenspan

I doubled Dorie Greenspan's recipe and got about 30 or so sandwich cookies (of varying sizes) out of the recipe. Depending on the cutter size you use, you may get more or less. Instead of walnuts, you could use ground almonds, hazelnuts, or pecans. To finely grind the nuts, place them in the bowl of a food processor fitted with the steel blade and pulse until the nuts resemble a coarse cornmeal. Be careful not to grind the nuts too much, lest you end up with nut butter (which is still tasty, just not what you're looking for). Instead of cranberry jam, you can use any flavor of smooth jam, such as raspberry or strawberry. If you opt to use a flavor that still has chunks of fruit in it, strain the jam before making the filling for the cookies.

Yield: about 30 sandwich cookies, depending on the size of cookie

For the cookie dough:
3 cups finely ground walnuts (see note above)
3 cups all-purpose flour
1 tablespoon cinnamon
1/2 teaspoon salt
Scant 1/2 teaspoon cloves
2 large eggs
4 teaspoons water
2 sticks unsalted butter, at room temperature
1 cup sugar

For the jam filling:
About 1 cup cranberry jam
1 teaspoon water

Begin by making the dough. Whisk together the ground nuts, flour, cinnamon, salt, and cloves. In a small bowl, whisk the eggs and water.

In the bowl of a stand mixer fitted with the paddle attachment or in a large bowl using a hand mixer, cream the butter and sugar together at medium speed until smooth, about 3 minutes, scraping down the bowl as needed. Add the egg mixture and beat for 1 more minute. Reduce the speed to low and add the dry ingredients slowly, mixing until they just disappear into the dough. Be careful not to work the dough much once the flour is incorporated. If the dough comes together but some dry crumbs remain in the bottom of the bowl, stop the mixer and finish blending the ingredients with a rubber spatula.

Divide the dough into quarters. Working with one quarter at a time, put the dough between two large sheets of wax paper or plastic wrap. Use your hands to flatten the dough into a disk. Then, using a rolling pin, roll the dough until it is about 1/4 inch thick. Transfer the dough (still covered in paper or plastic) to a cookie sheet and repeat with the remaining dough. Once all the dough is rolled out, transfer the cookie sheet to the refrigerator and chill for about 2 hours, or until it is very firm. You can also freeze the dough for about 45 minutes. (The rolled-out dough can be wrapped airtight and stored in the refrigerator for up to 3 days or in the freezer for up to 2 months. Just thaw the dough enough to cut out the cookies and proceed from there.)

Once the dough is firm, prepare to bake the cookies. Adjust an oven rack to the center position and preheat the oven to 375 degrees F. Line two baking sheets with parchment paper or silicone mats (such as Silpat).

Working with one sheet of dough at a time, remove the dough from the refrigerator. Using a cookie cutter (I used a 1 3/4-inch size and a 2-inch size), cut out as many cookies as you can. Set the scraps aside for re-rolling or making into jam thumbprints (see below). Transfer the rounds to a baking sheet, leaving a little space between the cookies.

Bake the cookies for 11 to 13 minutes, or until the cookies are lightly golden, dry, and just firm to the touch. Transfer the cookies to a rack to cool to room temperature.

While the first batch of dough is baking, repeat with another sheet of dough, making sure to cut as many top pieces (with peekaboo cutouts) as bottom (non-cutout) pieces. Use any small cutter for the cutouts, which can be baked alongside the round cookies. Bake the second batch of cookies on the second baking sheet. Continue baking the cookies, one sheet at a time, until all the dough is used.

Once the cookies have cooled, make the jam filling. Place the jam and water in a microwave-safe bowl and stir to combine. Heat in the microwave until bowling, about 2 minutes. Let the jam cool and thicken slightly (it will still be pourable, though). To fill the cookies, place a bottom cookie flat-side up and spoon a bit of jam on top. Sandwich with a top cookie and let cool on a rack. If the jam layer is a bit thin, drizzle a little more filling into the cutout.

Cool, serve, and enjoy.

For the jam thumbprint cookies: If you have some remaining dough but don't wish to roll it out again, form them into about 1 1/2-inch balls. Flatten into disks about 1/2-inch thick and bake at 375 degrees F for 11 to 13 minutes, until golden around the edges and dry.

Remove the cookies from the oven. While they are still hot, carefully use your finger to form a small indentation in the center of the cookie (you could also use a small spoon). Transfer the cookies to a rack and cool to room temperature. Once the cookies have cooled, fill the indentation with any flavor of jam you like.

Monday, December 27, 2010

New Year's Resolution: Make More Rum Raisin Ice Cream

I've learned a lot this year. And I've gone through a lot of change this year, too, none bigger than the transition from high school girl to college girl.

My first semester at Tech was pretty much a whirlwind. Truthfully it turned out exactly nothing like I expected and I learned a lot: about Cholesky factorizations, how to calculate the effective temperature of a black body orbiting the sun, and other nerdy and generally uninteresting things (to the average person, that is). I learned how to study for exams, that you have to swipe your BuzzCard multiple times to get your clothes to dry properly, and the lyrics to more Taylor Swift songs than I'm willing to admit. I learned that I'm actually capable of succeeding at Tech, both academically and socially. I learned that I can take care of myself, too: buying groceries, taking medicine when you're sick (during finals...), and doing laundry. (Man, I feel like such a grown-up sometimes.)

And while I normally don't bother making New Year's resolutions, for some reason I feel compelled to this year. Perhaps it's my newly discovered independence. Likely it's the need to make lists and year-long goals that runs in the family. Either way, there are a few things that I want to hold myself accountable for in 2011.

The first is to keep my grades up. I'm taking harder classes this spring and I'm on track to take my first major (IE) classes in the fall, and I'm eager to see what it's all about.

My second resolution is to stay more organized. I've never been a huge organizer, so this will probably be the toughest for me. What usually happens is that I start out with a nice system for keeping things in their place, but after a week or two I get lazy and the clutter becomes overwhelming. Hopefully I can put an end to that cycle in 2011.

The last (and most prevalent to this blog) is to post more regularly over here. While it's difficult to post recipes from school because I can't cook that often, I don't want to use that as an excuse to post infrequently. I'm establishing a once-a-week goal for myself.

I haven't ever said it before (and I probably don't let it show that often), but this space here means a lot to me. I love sharing my ideas (and eccentricities) with everyone who reads the blog, and I only want to make this blog better.

For the new year, I want to share a delicious ice cream that we've made a few times in the past, most recently for this Christmas. It takes all of five minutes to prepare, and then the ice cream maker does the rest. The base is a lush vanilla flavor, and a heap of rum raisins adds a sweet and slightly spicy flavor. You could use this recipe as a starting off point for all kinds of variations. Other dried fruits like cranberries or figs would also work great. Liqueurs like Grand Marnier or even wines like port would do a fine job plumping up the fruit, but you could also use orange juice, apple cider, or cranberry juice if you wanted to keep things non-alcoholic.
Enjoy the New Year, and Happy 2011 to you all! Tell me - do you have any resolutions, food-related or otherwise?

Rum Raisin Ice Cream

Having the evaporated milk and cream cold makes this ice cream come together really quickly. It's important to have the base cold when it goes into the ice cream maker so that it freezes faster and more smoothly. I used spiced rum because it's what we have on hand. We also had only a 12-ounce can of evaporated milk, which was 1/2 cup short of the recipe's two cups. I supplemented the rest with 1% milk and it turned out fine. Either combination (16 ounces of evaporated milk or 12 ounces of evaporated milk plus 4 ounces of milk) would work.

Yield: about 6 cups (1 1/2 quarts)

1 cup raisins
Dark rum
1 cup heavy cream, cold
2 cups evaporated milk, cold (see note above)
1 tablespoon vanilla extract
3/4 cup sugar

Put the raisins in a small bowl and add enough rum to cover. Set aside for about an hour, or until the raisins are plump.

Once the raisins are plump, combine the cream, evaporated milk, and vanilla in a medium bowl. Add the sugar, and whisk until the sugar is dissolved. If the base is not cold, put the mixture in the refrigerator for about an hour to chill.

Freeze the ice cream in an ice cream maker according to the manufacturer's instructions. Meanwhile, reserve about 3 tablespoons of rum from the rum raisin mixture, draining off the excess rum. When the ice cream has reached a soft serve consistency (usually after about 25 minutes), add the rum raisins and reserved rum. Adding the alcohol will make the ice cream melt a little in the machine. Keep churning for a few minutes more, until the ice cream has returned to soft serve consistency and there is no liquid cream at the surface.

Transfer the ice cream to a plastic serving container, cover, and freeze until hardened. The ice cream won't stiffen up completely (because of the rum), but it will firm up into the perfect consistency for serving.

Saturday, December 4, 2010

The Perfect Pumpkin Cheesecake

It's certainly no secret that I love cheesecake. While I have located my favorite restaurant cheesecake and even baked up a perfect plain cake, my favorite homemade cheesecake by far is of the pumpkin variety.

There is something about the texture of cheesecake - smooth, silky, and substantial enough without being overly heavy - that when combined with the flavor of pumpkin and a few autumn spices, something positively magical results.

We first made this cheesecake a few years back, when I first got into baking, but I've since adapted the recipe to suit our tastes. Since I only make it once a year (for Thanksgiving), it's an absolute treat. The warm combination of fresh spices and sweet pumpkin is the perfect pairing for a spicy gingersnap crust.

I think one of my favorite things about cheesecake is that there is minimal work involved to actually make it but there is a huge payoff once it's all done. I think cheesecake is one of the most impressive desserts you can serve; it's an added perk that it's also one of the easiest (and deceptively so). That said, there are a few guidelines that I always follow when making a cheesecake:

1. Make sure all your ingredients are at room temperature. A few hours before you make the cheesecake, put the cream cheese and eggs on the counter to come to room temperature. It will make mixing the batter so much easier. If you forget to take the eggs out, you can submerge them (uncracked) in a bowl of warm water for five minutes. Although I don't advise this, you can also soften the cream cheese in the microwave, but that's a tough task because you don't want the cream cheese to melt too much. It's just easier to let the cream cheese warm up by itself on the counter. (I have, however, found that sour cream, if used in the recipe, does not need to be at room temperature. Same goes for small quantities of milk or heavy cream.)

2. Employ a rubber spatula often. It's crucial to scrape down the sides of the bowl you're using, especially if it's the bowl of a stand mixer, in order to fully incorporate all ingredients. Inevitably some sugar or cream cheese won't mix in entirely, and the last thing you want is unincorporated pockets of cream cheese in the finished cake.

3. Bake in a water bath. Always. Even if the recipe doesn't advise it. Actually, if the recipe doesn't advise it, then I don't even use that recipe. Cheesecake is a delicate specimen and it must be treated with care. If you cook it too fast, it will overcook and crack. There's certainly nothing wrong with cracks as far as taste goes, but appearance-wise, they leave something to be desired. Ideally, you have a roasting pan (sadly we don't) that can hold your springform pan. In this case, make sure to wrap the pan in a double layer of aluminum foil. When the cheesecake goes into the oven, pour in hot, steamy water to go about halfway up the sides of the pan. The water bath helps the cheesecake cook evenly and avoid cracking. The next best thing in our house to a roasting pan is the bottom of a broiler pan. Unfortunately, the low sides of the broiler pan encourage fast evaporation of the water. If this is your case, monitor the level of the water and refill with hot water as needed. (And, yes, I realize that this cheesecake does have a crack in it. That's why I advise monitoring the water levels as needed, something I neglected to do. It was still delicious, though.)

4. Let it cool. When the cheesecake comes out of the oven, it will have a solidified, matte-looking top layer. When you shake the pan it should still jiggle slightly in the center, though. Let the cheesecake cool for a little while on the counter (up to an hour, if possible) before chilling it in the refrigerator overnight. (That's another bonus of making cheesecake: it's an entirely make-ahead dessert, so it's perfect for company or hectic holidays.)
The original recipe, with notes scrawled all over: a sure sign of a tried and true favorite.

I realize this diatribe may be slightly intimidating if you've never made cheesecake before. I assure you that cheesecake is easy, though. I encourage you to make it for your next holiday gathering (or any other occasion). But if you find yourself needing help, don't hesitate to Skype me. I'm particularly skilled at giving late-night, virtual cheesecake-making lessons.

Pumpkin Cheesecake
Inspired by Bon Appetit

As I noted earlier, over the years I have changed quite a few components of the original recipe to suit our tastes. Namely, using only gingersnaps in the crust for a spicier contrast to the sweet pumpkin filling and using more spices in the filling. If you can, use freshly grated nutmeg. This may seem like a trivial detail, but you can really taste the nutmeg flavor in the finished cake, which, owing to the variety of spices used, has a wonderfully complex flavor. This cheesecake lasts for a long while in the refrigerator and, like other cheesecakes, freezes well. If you opt to freeze a few slices, wrap them tightly in plastic wrap and then in aluminum foil. I prefer this cheesecake chilled, but you can also serve it at room temperature. Although I think the cheesecake is perfect on its own, I imagine a dollop of spiced sour cream or Greek yogurt or a spoonful of whipped cream (similarly spiced or, if you'd like, bourbon-infused) would be a welcome addition.

Yield: 10 to 12 servings

For the crust:
About 12 ounces gingersnap cookies
3 tablespoons butter, melted

For the cheesecake batter:
4 (8-ounce) packages cream cheese (I use low-fat Neufchatel cheese)
1 1/4 cups sugar
2 teaspoons cinnamon
1 teaspoon ground ginger
1/2 teaspoon freshly grated nutmeg
1/2 teaspoon allspice
1/4 teaspoon cloves
1 (15-ounce) can solid pack pumpkin
3 large eggs
1 tablespoon vanilla extract

Adjust an oven rack to the middle position and preheat the oven to 350 degrees F. Process the gingersnap cookies in a food processor until finely ground. (Alternatively, you can place them in a ziploc bag and crush them with the bottom of a pan or a rolling pin.) Add butter and pulse until blended in.

Spray the inside of a 9-inch springform pan with nonstick cooking spray and wrap the outside of the pan with a double layer of aluminum foil. Pour buttered crumbs into the pan and, using the bottom of a measuring cup, press the crumbs onto the bottom and up the sides of the pan. Try to get as even a layer throughout as possible. Bake until just lightly toasted, about 10 minutes. Let cool while you prepare the filling.

In the bowl of a stand mixer fitted with the paddle attachment (or with a hand mixer), beat the cream cheese on medium speed until fluffy, about 2 minutes. Add the sugar and beat thoroughly to incorporate. After adding the sugar, the batter will appear shiny. Scrape down the sides of the bowl with a rubber spatula to ensure that all the sugar has been incorporated. Add the spices and beat until well-blended. Next beat in the pumpkin until well-blended. Scrape down the bowl again. Add the eggs and mix until well-blended. Once again, scrape down the sides of the bowl. Add the vanilla extract and beat to incorporate. Scrape down the bowl for a final time, making sure that the entire batter is homogeneous and that no lumps remain. If there are lumps, briefly beat the batter on high speed for a few seconds.

Pour the batter into the prepared crust and set the springform pan in a roasting pan or other large baking pan with high sides. Meanwhile, put a kettle of water on to boil. Once the water is boiling, set the roasting pan with cheesecake in it into the oven. Quickly and carefully pour the hot, steaming water into the roasting pan so that it comes about halfway up the sides of the springform pan. Bake for 1 hour and 30 minutes. As the cake bakes, periodically monitor the water level, refilling the roasting pan as needed. (Use the oven light to check on the cheesecake; don't open the door every 20 minutes. If you do need to refill the water level, do so very quickly to let out as little oven heat as possible.)

After an hour and a half, remove the roasting pan from the oven. The cheesecake will have a browned and set top. When lightly shaken, it will still jiggle somewhat in the center. Cool for 30 minutes to an hour. Then place the springform pan on a paper-towel lined (to avoid slipping) plate and transfer to the refrigerator. Refrigerate overnight.

When you are ready to serve the cheesecake, remove it from the refrigerator and run a knife around the perimeter of the springform pan to loosen the crust from the sides. Remove the sides of the springform pan. Cut into slices and serve.

The cheesecake will keep, wrapped well in foil or plastic, for at least a week (if it lasts that long). You can also freeze the cake (see note above) for enjoying later.

Tuesday, November 30, 2010

Roasted Root Vegetables

We have a very large tupperware at our house. It holds about 26 cups of stuff (in the past it has stored chex mix, pasta salad, and fruit salad). It currently sits in our refrigerator, taking up way too much space, with a big heap of roasted root vegetables in it.

To say that I like roasted root vegetables would be an understatement. To say that I like to make a lot of roasted root vegetables would also be an understatement. More than stuffing, carrot ring, and cranberry sauce, I look forward to these roasted vegetables on the Thanksgiving table. Forget about mashed potatoes; at our house, roasted root vegetables are king.

(I wonder how many times the phrase "roasted root vegetables" has been used in the span of seven sentences. My apologies for the lack of phrase variation.)
Mass quantities of roasted root vegetables = heaven.

Anyway, one of my favorite things about this recipe is that it's really more of a method than precise instructions. Once you learn the technique, you can craft dozens of different variations with all kinds of vegetables. This year, our mix included carrots, parsnips (my favorite of the bunch), sweet potatoes, fingerling potatoes, butternut squash, pearl onions, and cremini mushrooms. However, Brussels sprouts, rutabagas, beets, and even celery, which takes on a wonderful savory flavor when roasted, would also be delicious.
I chop furiously. It's kinda fun.

The real wild card in the dish is the roasted garlic and herb mixture that gets mixed in at the very end. Smashed roasted garlic gets tossed with a heap of fresh parsley and rosemary (other woody herbs like sage and thyme also taste great) and added to the melange right before serving. The sweetness of the roasted garlic, along with the fresh herb flavor, really elevates the more humble vegetables and takes them from delicious to absolutely fabulous. Without a doubt this is my favorite thing to eat during the holidays (and a good thing because I made enough to last until Christmas).
Roasted Root Vegetables

You can prepare this dish early in the day if you like. Just cover the roasted vegetables. When you are ready to serve them, warm them in an oven and top them with the garlic-herb mixture. If you prefer, you can peel the root vegetables, but I love the texture (and nutrition) that the peels provide. As I said before, you can substitute or add in other root vegetables if you like. Just be sure to cut them into similarly-sized pieces. If you choose to add beets, rutabagas, or celery, cook them along with the root vegetables. If you choose to add Brussels sprouts, halve or quarter them and cook alongside the mushrooms and onions. We use a large disposable aluminum roasting pan (the kind you'd use to roast a turkey) for the root vegetables. It's very important both to season the vegetables liberally and to toss them every 15 or so minutes so that they cook evenly (this is a lot of vegetables we're talking about here). We cook the vegetables using our oven's "convection roast" setting. If your oven doesn't have this setting, roast at the same temperature, keeping in mind that it may take longer for the vegetables to cook through. To ensure even cooking, just toss every 15 minutes until they are tender.

Yield: an insanely large amount; at least 20 servings

2 pounds carrots
2 pounds parsnips
2 large sweet potatoes
2 pounds fingerling potatoes
1 medium butternut squash, peeled and seeded
1/2 pound cremini mushrooms
2 (10-ounce) bags of pearl onions
10-12 cloves of garlic, unpeeled
Kosher salt and freshly ground black pepper
Olive oil
Large handful of fresh parsley
2-3 sprigs of fresh rosemary

Adjust two oven racks to the upper and lower middle positions and preheat the oven to 400 degrees F. Cut the carrots, parsnips, sweet potatoes, fingerling potatoes, and butternut squash into 3/4-inch to 1-inch pieces. It's important that the root vegetables be close to the same size so that they cook at the same rate. Place in a large roasting pan and set aside.

Halve or quarter the mushrooms and place on a foil-lined half-sheet pan. Meanwhile, bring a medium saucepan of water to a boil. When it has reached a bowl, drop in one of the bags of pearl onions. Cook for 1 minute. Drain in a colander and run cold water over the onions to cool them down. Using a paring knife, peel the outer layer off the pearl onions and add to the half-sheet pan with the mushrooms. Repeat with the second bag of pearl onions. Add the unpeeled garlic cloves to the half-sheet pan, too.

Lightly drizzle the root vegetables with olive oil and season liberally with salt and pepper. (You can also spray them with nonstick cooking spray and achieve the same result.) Toss the vegetables with your hands to ensure they are sufficiently and evenly seasoned. Repeat with the mushrooms and onions.

Place the roasting pan of root vegetables on the lower middle rack of the oven and roast for 15 minutes. After 15 minutes have passed, carefully and quickly toss the vegetables with a large spoon. Roast for another 15 minutes and toss again.

After the root vegetables have been roasting for 30 minutes (they will have been tossed twice), place the mushrooms and onions in the oven on the upper middle rack. Roast for 15 minutes and again toss both the root vegetables and mushroom-onion mix.

Roast for a final 15 minutes, or until the root vegetables are browned and fork tender. The mushrooms will be browned (and shrunken) and the onions will also have taken on some color. Remove all the vegetables from the oven and let cool while you prepare the garlic-herb mixture.

Finely chop both the parsley and rosemary and place into a small dish. Peel and mash the roasted garlic and add to the herb mixture. Mix the herbs and garlic together.

Transfer the vegetables to a serving platter, add the garlic-herb mixture, and toss to incorporate everything together. Serve hot.

Saturday, November 27, 2010

The Rogovin Family Stuffing

Let's talk about stuffing. Or, rather, dressing. I think some people take the difference between the two terms very seriously, but in our house, even though the only thing it stuffs is our bellies, it's always been stuffing.

For the past two years, I've been dying to make a homemade stuffing. I dreamed of toasted cubes of artisanal breads, sauteed wild mushrooms, buttered leeks, and woodsy rosemary and sage. Despite the deliciousness of the stuffing that we have made every year since I can remember, I was fully willing to cast it aside for a "foodier" (a word I just made up meant to signify more "foodie"-like; reminds me of "truthiness," but I digress...) recipe. You see, we use the Pepperidge Farms stuffing cubes in our recipe. Unfortunately, my food snob mentality had me believing that the entire product was pre-made (like that jiggly cranberry mold that comes from the can) and therefore unacceptable on our Thanksgiving table.

And then, a revelation.

Like so many things on this great earth of ours, the revelation came from Ina Garten. I was watching a Thanksgiving episode of hers, and she made stuffing with the same Pepperidge Farm stuffing cubes that we do! If it's good enough for Ina, it's certainly good enough for me. (I did not, however, approve of her serving cupcakes for Thanksgiving dessert. Really, Ina? I know it wasn't her actual Thanksgiving dinner, but the thought is unsettling enough.) Gosh, I am such a food snob.

Anyway, this recipe is so delicious that I've convinced my mom that we need to make two pans to keep up with people's demands for it. The recipe below makes only one pan and that will certainly be enough if you don't have ravenous stuffing-philes in your home.

Unlike many stuffing recipes, this one contains no meat and no butter. It does contain savory mushrooms and celery, which are moistened with chicken stock and baked with those bread cubes into a tried and true stuffing that is just as delicious covered in gravy, on a turkey sandwich, or completely unadorned (my preference). You would never guess that ingredients this simple could make something so incredibly scrumptious.
Rogovin Family Stuffing

You can assemble the stuffing early in the day (or the night before) and refrigerate it, covered in aluminum foil, until you are ready to bake it. The oven temperature and baking time are pretty flexible. We bake the stuffing at 325 because it cooks along with the more delicate carrot ring. However, you could increase the baking temperature and decrease the time accordingly to suit your baking schedule. Just look for visual cues that the stuffing is done: a moist interior and crunchy top layer.

Yield: 10-12 servings

8 ounced cremini mushrooms, coarsely chopped into 1/2-inch pieces
5 stalks of celery, diced into 1/2-inch pieces
2 1/2 cups of chicken stock
1 bag of Pepperidge Farm herbed stuffing cubes

Adjust an oven rack to the upper-middle position and preheat the oven to 325 degrees F. In a large bowl, mix mushrooms and celery with chicken stock. Add stuffing cubes and toss to coat. Pour into a 9-by-13-inch pan. Bake for 45 minutes to an hour, until the top is golden and toasty. Serve hot.