Wow.
Never in a million years would I think that my blogging would become as scarce as it has in the past few weeks, especially since it’s the summer. I have so much respect for the people who wake up every weekday at 5 or 6 in the morning, go work a 12-hour day, and then come home to blog about their lives. After a handful of weeks of a similar experience (except I don’t work nearly as much as a 12-hour day!), I can attest to how tired I am. After sitting in what can sometimes amount to nearly two hours of traffic a day, often times the last thing I want to do is stand in a hot kitchen (it’s been steadily 90+ degrees every day for the past month or so) and cook dinner.
But these are all excuses – and lame ones, if I do say so myself.
Still, my lack of posting does not necessarily equate to lack of cooking. (Quite the contrary, in fact, as I have a few recipes waiting in the wings that I need to write up.) Lately, the summer produce (peaches, melon, plums, tomatoes, squash, peppers, asparagus, and the list goes on) has just been so delicious that most nights we assemble a “salad plate” (our term for assorted crudités) and just dig in. It’s so tasty, but obviously not that inspirational. Who needs a recipe for slicing up some vegetables anyway?
One thing our family has been embracing in the past few weeks has been the grill. While I’ve yet to master the outdoors grill, I can say that I have become quite adept at using the grill pan indoors. We love to grill vegetables for salads or as sides to grilled fish or chicken.
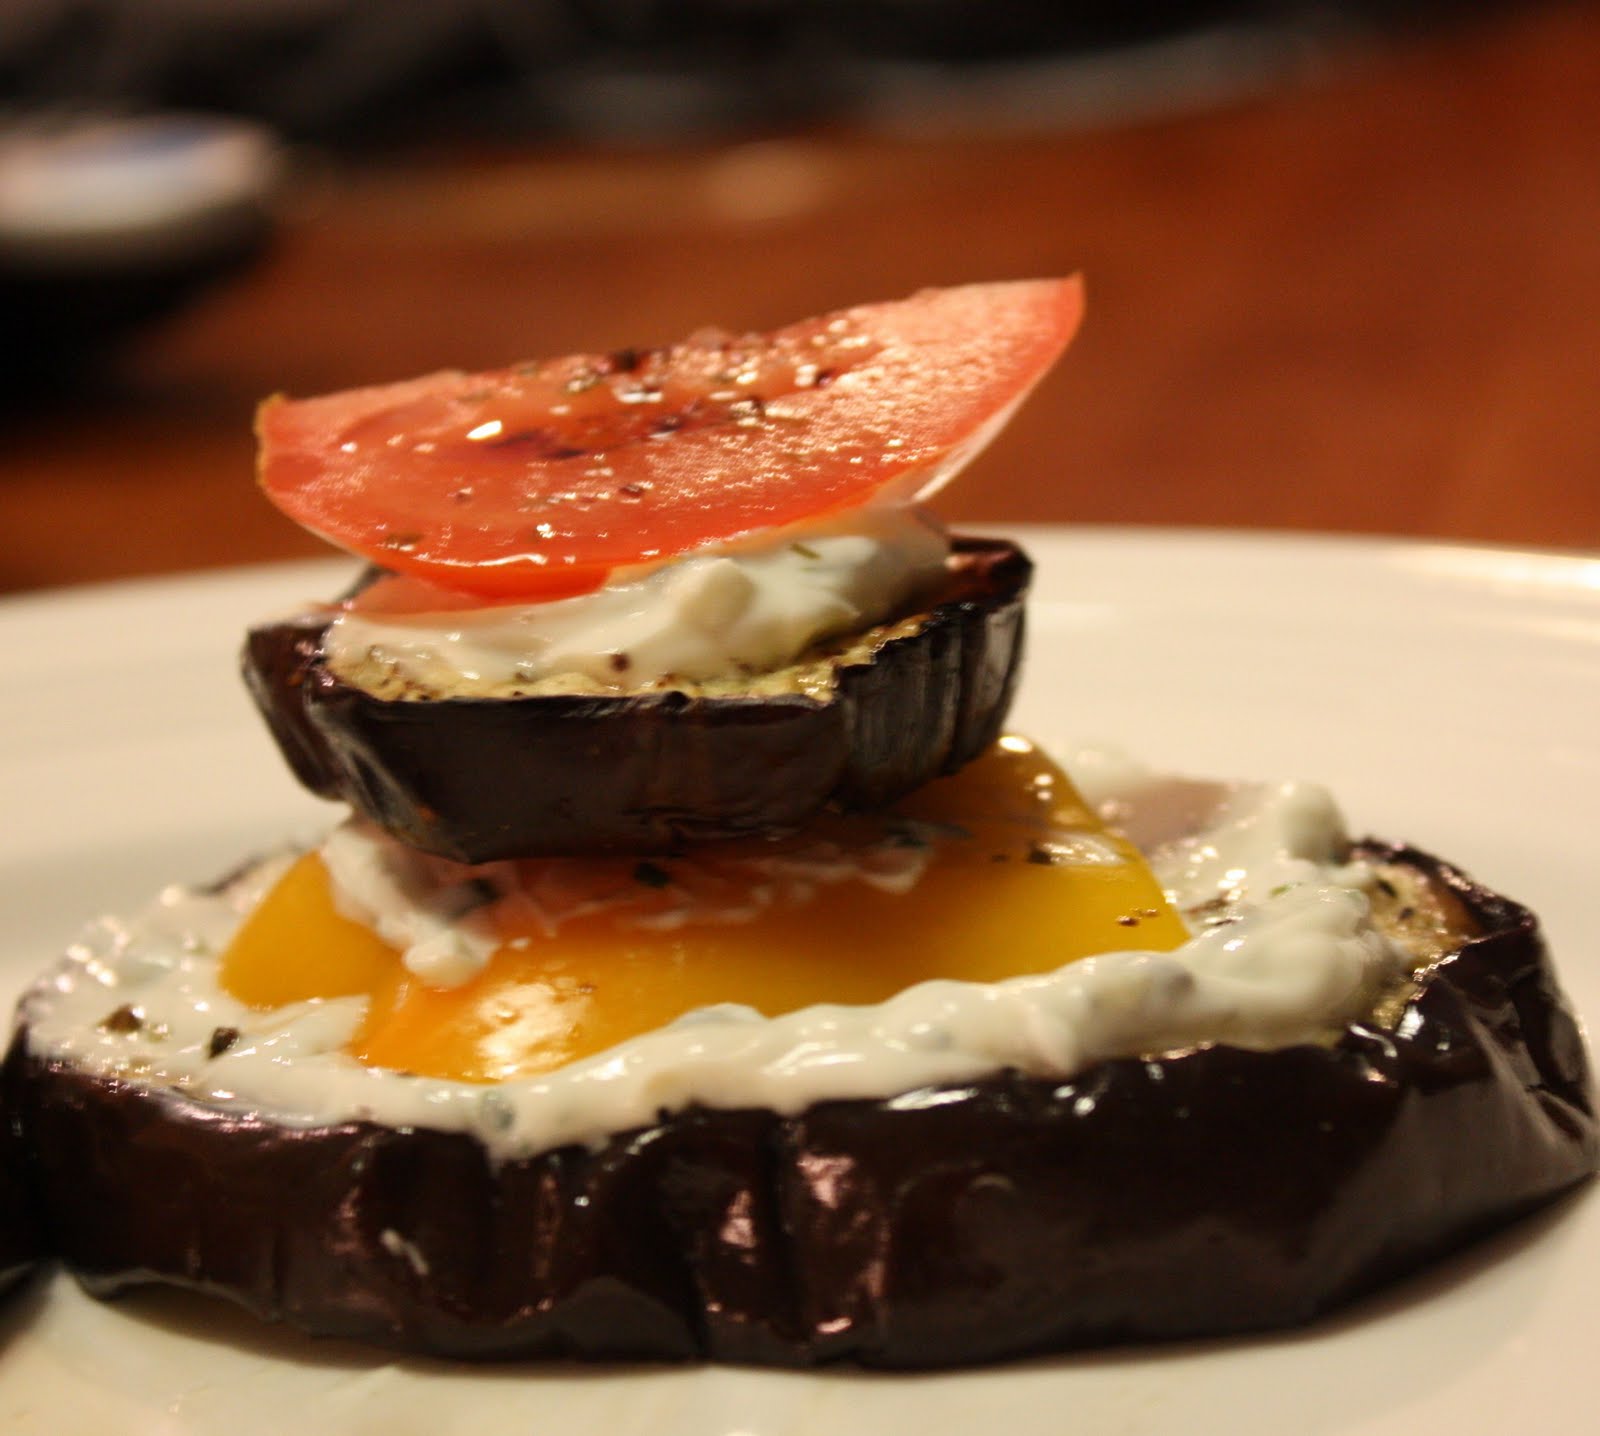
One of my favorite vegetables to grill is eggplant. It takes on a lovely charred flavor and savory quality that pairs perfectly with bright, fresh summer flavors. I had the idea of making eggplant “stacks” (for lack of a better term). You could call them napoleons if you wanted to get fancy, but who am I really kidding? They’re stacks. But don’t be fooled by the pedestrian name – this is one delicious dinner. It’s light but certainly filling and a perfect way to utilize the best the season has to offer.
I decided to layer the grilled eggplant, which has a soft and tender texture, with fresh bell peppers and tomatoes for some welcome crunch. In between each layer I spread a dollop of a creamy herbed garlic yogurt sauce. And wow was this yogurt sauce good. It uses one of my absolute favorite ingredients, Greek yogurt, and has the added punch of fresh garlic and parsley and basil from our herb “garden” (is it still called a garden if it’s really only a single pot?). It was absolutely delicious and worked so well to provide a creamy element in this summer vegetable medley. Served alongside an outstanding summer salad (more on that in a few days) and a baguette with extra yogurt sauce (do not waste any extra yogurt sauce!), this was a summer meal worth repeating. Even better, I can now cross one thing off my 20 Before 20 List: something grilled! Here’s to the next 19!
Grilled Eggplant Stacks with Herb Garlic Yogurt Sauce
This recipe makes enough for two servings, or a total of four eggplant stacks. Each eggplant stack contains two slices of eggplant (one larger, one smaller), one bell pepper plank, one tomato slice, and about 2 tablespoons of yogurt sauce, so adjust accordingly to make a specific number of servings. You can grill the eggplant earlier in the day and make the yogurt sauce beforehand and store it in the refrigerator, so this is a perfect make-ahead meal. In the future, I’d love to try this idea with different grilled vegetables (such as zucchini, yellow squash, and roasted peppers) and with different flavors of yogurt sauce. Be creative with your combinations and have fun with it!
Yield: 2 servings (2 stacks per serving)
1 large eggplant
Nonstick cooking spray
Kosher salt and freshly ground black pepper
½ cup Greek yogurt
1 tablespoon lemon juice
2 tablespoons fresh basil, chopped finely
1 tablespoon fresh parsley, chopped finely
1 garlic clove, minced
¼ large tomato
½ bell pepper (red, yellow, or orange)
Flaked sea salt, for serving (optional)
Each stack contains two slices of eggplant. Two eggplant stacks is enough for a light serving, so to make two servings you need 8 slices. Slice the eggplant into thick rounds, about ¾-inch thick. Preheat a grill pan (or grill) to medium-high and spray with nonstick cooking spray. Season the eggplant slices liberally on both sides with salt and pepper. Once the grill pan is very hot, begin to grill the eggplant. Grill each round about 5-7 minutes per side, turning once the eggplant takes on some browning and visible grill marks. You’ll know the eggplant round is cooked when it becomes tender and begins to give off some moisture. Remove the eggplant from the grill and set aside until ready to serve.
To make the yogurt sauce, combine Greek yogurt, lemon juice, basil, parsley, and garlic in a small bowl. Season to taste and refrigerate until ready to serve. The yogurt sauce will keep for several days covered in the refrigerator.
To prepare the eggplant stacks, start by cutting the bell pepper and tomato to size. You’ll need one bell pepper plank and one tomato slice per stack (so 4 total for two stacks). Try to cut the pepper and tomato so that they have about the same diameter as the medium-sized eggplant rounds.
To assemble each eggplant stack, place a larger round of eggplant on a plate. Evenly spread about 1 tablespoon yogurt sauce on the top of the eggplant. Top with a plank of bell pepper. Spread another ½ tablespoon yogurt sauce evenly on top of the bell pepper and top with a smaller round of eggplant. Again top with ½ tablespoon of yogurt sauce and a tomato slice. If using, sprinkle a bit of sea salt on each stack for some extra crunch and to really accentuate the flavors of the vegetables and creamy yogurt. Serve immediately.
Wednesday, June 29, 2011
Thursday, June 2, 2011
Pogo.
I'll just go ahead and get this out of the way: this post is not about food. At all. I try hard to keep this space as much about food as possible and not fill it with random thoughts and ramblings, but I must make an exception. I just must share this with you. (Prepare yourself for links galore!)
About a week ago I was scrolling through my Facebook news feed and came upon a friend's post of a video of an Alice in Wonderland mash-up-type video. Intrigued, I clicked on over to YouTube and proceeded to spend the next two hours completely entranced by the undeniably catchy music of Nick Bertke, or Pogo. Bertke is a master of taking short sound clips from movies and television shows (and sometimes just everyday life), mixing them, adding beats, sine waves, and a whole bunch of stuff that I can't exactly wrap my head around, and composing them into a final product that is part electronica, part instrumental, and altogether completely addicting. (And it's entirely possible that, since his first video was posted three years ago and he's touring in North America, everyone already knows about this guy, and I'm extremely late to jump on the bandwagon, but in the case that you haven't....) Take a listen:
See what I mean? I find myself unintentionally bobbing my head and mouthing the nonsensical "lyrics" to the tracks throughout the day. Embarassing? Sure. But I can't get enough of this guy's music. True talent here.
Ironically enough, most of the movies Bertke uses - Disney classics like Mary Poppins or Snow White or 90's throwbacks like The Little Princess or Hook - are movies that I really, really dislike. (That probably makes me a bad child of the 90's, but it's the truth.) For example, as much as I enjoy "Expialidocious," I absolutely despise Mary Poppins, or the slowest and most drawn-out Disney movie ever. I recentlysuffered through watched this movie and for some reason I remember it ending after Mary Poppins, Dick Van Dyke, and the children jump into the painting. Imagine my disbelief when I realize that that's only about the halfway point! Not even knowing where "tuppence a bag" (fast forward a minute) actually came from made up for the dullness of the rest of the movie.
Another example: Hook. You might think that the fantasy and nostalgia of this Disney-inspired movie would be a winning combination to a child. You'd be wholly wrong. Note to Steven Spielberg: do not include in a family movie that children will see a part in which Captain Hook forces a sorry pirate (actually played by Glenn Close - always thought "he" looked a little feminine but whoa!) into a tiny trunk and then stuffs it with scorpions. Nightmares, people, nightmares. The Boo Box still sends shivers up my spine. Still, I love Pogo's "Bangarang."
Similarly, you may think that The Little Princess would be a fantastic movie for a little girl to watch. It's a kid movie for sure. Well, not for this kid. Along with The Secret Garden (creepy), I found The Little Princess emotionally scarring as a girl. Since the main character's name was Sara (important to note: without the "h"), I for some reason felt that my fate was intrinsically linked to hers. I felt like, after I watched this movie, I would be banished to the attic, hunted down by the police, and verbally and physically abused by an evil Miss Minchin clone. No matter that the movie actually has a happy ending; getting there was just too painful. But "Whisperlude" is one of my favorite Pogo mixes.
Of course, now I've gone on and rambled random thoughts on the fragility of my childhood emotions, and I hope you're still reading. Don't let your childhood (or current) prejudices keep you from giving these mixes a listen. From Up to Toy Story to Harry Potter to Dexter to The King and I, Bertke does it all, and he does it flawlessly. You can download the mixes here.
In fact, given my recent obsession with all of these mixes, I almost feel like I should go back and give some of these movies a second chance, what with my new-found appreciation for the wealth of unique sounds they provide. Almost.
About a week ago I was scrolling through my Facebook news feed and came upon a friend's post of a video of an Alice in Wonderland mash-up-type video. Intrigued, I clicked on over to YouTube and proceeded to spend the next two hours completely entranced by the undeniably catchy music of Nick Bertke, or Pogo. Bertke is a master of taking short sound clips from movies and television shows (and sometimes just everyday life), mixing them, adding beats, sine waves, and a whole bunch of stuff that I can't exactly wrap my head around, and composing them into a final product that is part electronica, part instrumental, and altogether completely addicting. (And it's entirely possible that, since his first video was posted three years ago and he's touring in North America, everyone already knows about this guy, and I'm extremely late to jump on the bandwagon, but in the case that you haven't....) Take a listen:
See what I mean? I find myself unintentionally bobbing my head and mouthing the nonsensical "lyrics" to the tracks throughout the day. Embarassing? Sure. But I can't get enough of this guy's music. True talent here.
Ironically enough, most of the movies Bertke uses - Disney classics like Mary Poppins or Snow White or 90's throwbacks like The Little Princess or Hook - are movies that I really, really dislike. (That probably makes me a bad child of the 90's, but it's the truth.) For example, as much as I enjoy "Expialidocious," I absolutely despise Mary Poppins, or the slowest and most drawn-out Disney movie ever. I recently
Another example: Hook. You might think that the fantasy and nostalgia of this Disney-inspired movie would be a winning combination to a child. You'd be wholly wrong. Note to Steven Spielberg: do not include in a family movie that children will see a part in which Captain Hook forces a sorry pirate (actually played by Glenn Close - always thought "he" looked a little feminine but whoa!) into a tiny trunk and then stuffs it with scorpions. Nightmares, people, nightmares. The Boo Box still sends shivers up my spine. Still, I love Pogo's "Bangarang."
Similarly, you may think that The Little Princess would be a fantastic movie for a little girl to watch. It's a kid movie for sure. Well, not for this kid. Along with The Secret Garden (creepy), I found The Little Princess emotionally scarring as a girl. Since the main character's name was Sara (important to note: without the "h"), I for some reason felt that my fate was intrinsically linked to hers. I felt like, after I watched this movie, I would be banished to the attic, hunted down by the police, and verbally and physically abused by an evil Miss Minchin clone. No matter that the movie actually has a happy ending; getting there was just too painful. But "Whisperlude" is one of my favorite Pogo mixes.
Of course, now I've gone on and rambled random thoughts on the fragility of my childhood emotions, and I hope you're still reading. Don't let your childhood (or current) prejudices keep you from giving these mixes a listen. From Up to Toy Story to Harry Potter to Dexter to The King and I, Bertke does it all, and he does it flawlessly. You can download the mixes here.
In fact, given my recent obsession with all of these mixes, I almost feel like I should go back and give some of these movies a second chance, what with my new-found appreciation for the wealth of unique sounds they provide. Almost.
Sunday, May 15, 2011
Spring Vegetable Risotto
One of my favorite things about living in Atlanta is that we get seasons. By that, I mean that there are distinctive differences between summer, fall, winter, and spring. Summer is brutally hot, usually humid, and lasts far too long if you ask me (as in, four-plus months of at least 90-degree weather). Fall is strange, characterized by moderate weather that creeps up on you very quickly (but it still is my favorite season). The only nice thing about winter here is the cute knitted items my mom makes for me, but other than that, no redeeming qualities. Spring is nice, though. Moderate temperatures, slight breezes, the first sign of life after a few months of gray skies. The only problem is that it just doesn't last long enough. Before I know it, it's too hot to roll down my windows when driving lest I melt from the searing temperatures. Still, after a winter full of citrus fruits (not my favorite) and... not much else, bright red fresh strawberries are just the thing to give me a case of spring fever. Of course, those usually arrive in late February or early March, when spring hasn't officially "sprung," so there are still more weeks to wait before the season's characteristic produce makes its way into markets. But once it does? Oh, I love spring.
One of my favorite ways to highlight seasonal produce is to make risotto. In fall, it's delicious with sauteed butternut squash and hints of saffron; wild mushrooms in winter make a wonderful savory risotto. We really enjoyed this version, which used a medley of asparagus, broccoli, fennel, and onions. Carrots would also be delicious, as would green peas. Some shrimp added while the rice is cooking can also bring it into true main dish territory (we are perfectly happy with a meatless risotto as the main dish with a green salad and good bread to accompany).
Risotto often gets a reputation for being a fussy, time-consuming dish, but the truth is that I think it's actually very low-maintenance. Despite what others say, you really don't have to stir it constantly for close to an hour. A few seconds of good stirring every few minutes will leave you with a perfectly creamy (yet creamless) final product.
Like many of my other favorite things to cook up in the kitchen, I love risotto because it feels like a fancy or special-occasion food but is so simple and easy to make and can be recreated in countless ways (see: cheesecake). The work is minimal but the payoff is a superb, unbeatable combination: a creamy and colorful rice brimming with the freshest vegetables that the season has to offer. A love letter to spring. Now, if only the 75-degree weather would return...
Spring Vegetable Risotto
Inspired by Ina Garten
To prepare the fennel, first reserve the fronds. Then chop the top stalks off and discard. Slice the bulb in half. To remove the core, make two 45-degree cuts into the core (it is a triangular solid whitish section at the bottom of the bulb) and remove the core. To prepare the asparagus, place one hand at each end of the stalk and bend until the asparagus snaps. Instead of or in addition to broccoli, consider adding green peas. If they're frozen, add them at the very end of the cooking time (no need to defrost). If they're fresh, blanch them for a few minutes until the starchiness is cooked off. Cooked shrimp would also be a delicious addition to this risotto.
Yield: 6-8 servings
2 teaspoons olive oil
1 medium onion, diced
1 fennel bulb, cored and diced, fronds reserved (see Note)
1 1/2 cups Arborio rice
1/2 cup dry white wine
6 cups chicken or vegetable stock
1 bunch asparagus, trimmed (see Note)
10 ounces chopped broccoli
Zest of 1 lemon
Kosher salt and freshly ground black pepper
Heat the olive oil in a large pot over medium heat. Add the onion and fennel and saute for 5 to 7 minutes, until the onions are translucent and both the onion and fennel have softened. Add the Arborio rice and stir to incorporate. Cook for 1 to 2 minutes; the ends of the rice grains will begin to look translucent. Add the wine and stir to deglaze the pan. Once the wine is absorbed, begin adding the chicken stock. Add the stock about 1 1/2 cups at a time, stirring to incorporate the stock at first. If you like, you can stir constantly, but if you don't enjoy standing over a hot stove, allow the rice to simmer away for a few minutes unattended, stirring every few minutes. Once all the stock has been absorbed, add 1 1/2 more cups until all the stock is gone or the rice is al dente, whichever comes first.
Meanwhile, while the rice is cooking, cut the asparagus into 1-inch pieces. Blanch the asparagus and broccoli briefly either in the microwave or in a pot on the stove. To blanch in the microwave, put the vegetables in a microwave-safe bowl, add enough water to come half-way up the vegetables, and microwave on high for about 2 minutes; then drain the vegetables. To blanch in a pot on the stove, heat a medium saucepan full of water. Once the water comes to a boil, add the vegetables and cook for about 4 minutes; then drain the vegetables. The asparagus and broccoli should be bright green and al dente.
Once half the stock is gone, add the asparagus and broccoli to the rice. Continue adding stock incrementally as before. When the rice is done, add the lemon zest, reserved fennel fronds, and salt and pepper to taste. Serve immediately.
The risotto will keep in the refrigerator for up to a week.
One of my favorite ways to highlight seasonal produce is to make risotto. In fall, it's delicious with sauteed butternut squash and hints of saffron; wild mushrooms in winter make a wonderful savory risotto. We really enjoyed this version, which used a medley of asparagus, broccoli, fennel, and onions. Carrots would also be delicious, as would green peas. Some shrimp added while the rice is cooking can also bring it into true main dish territory (we are perfectly happy with a meatless risotto as the main dish with a green salad and good bread to accompany).
Risotto often gets a reputation for being a fussy, time-consuming dish, but the truth is that I think it's actually very low-maintenance. Despite what others say, you really don't have to stir it constantly for close to an hour. A few seconds of good stirring every few minutes will leave you with a perfectly creamy (yet creamless) final product.
Like many of my other favorite things to cook up in the kitchen, I love risotto because it feels like a fancy or special-occasion food but is so simple and easy to make and can be recreated in countless ways (see: cheesecake). The work is minimal but the payoff is a superb, unbeatable combination: a creamy and colorful rice brimming with the freshest vegetables that the season has to offer. A love letter to spring. Now, if only the 75-degree weather would return...
Spring Vegetable Risotto
Inspired by Ina Garten
To prepare the fennel, first reserve the fronds. Then chop the top stalks off and discard. Slice the bulb in half. To remove the core, make two 45-degree cuts into the core (it is a triangular solid whitish section at the bottom of the bulb) and remove the core. To prepare the asparagus, place one hand at each end of the stalk and bend until the asparagus snaps. Instead of or in addition to broccoli, consider adding green peas. If they're frozen, add them at the very end of the cooking time (no need to defrost). If they're fresh, blanch them for a few minutes until the starchiness is cooked off. Cooked shrimp would also be a delicious addition to this risotto.
Yield: 6-8 servings
2 teaspoons olive oil
1 medium onion, diced
1 fennel bulb, cored and diced, fronds reserved (see Note)
1 1/2 cups Arborio rice
1/2 cup dry white wine
6 cups chicken or vegetable stock
1 bunch asparagus, trimmed (see Note)
10 ounces chopped broccoli
Zest of 1 lemon
Kosher salt and freshly ground black pepper
Heat the olive oil in a large pot over medium heat. Add the onion and fennel and saute for 5 to 7 minutes, until the onions are translucent and both the onion and fennel have softened. Add the Arborio rice and stir to incorporate. Cook for 1 to 2 minutes; the ends of the rice grains will begin to look translucent. Add the wine and stir to deglaze the pan. Once the wine is absorbed, begin adding the chicken stock. Add the stock about 1 1/2 cups at a time, stirring to incorporate the stock at first. If you like, you can stir constantly, but if you don't enjoy standing over a hot stove, allow the rice to simmer away for a few minutes unattended, stirring every few minutes. Once all the stock has been absorbed, add 1 1/2 more cups until all the stock is gone or the rice is al dente, whichever comes first.
Meanwhile, while the rice is cooking, cut the asparagus into 1-inch pieces. Blanch the asparagus and broccoli briefly either in the microwave or in a pot on the stove. To blanch in the microwave, put the vegetables in a microwave-safe bowl, add enough water to come half-way up the vegetables, and microwave on high for about 2 minutes; then drain the vegetables. To blanch in a pot on the stove, heat a medium saucepan full of water. Once the water comes to a boil, add the vegetables and cook for about 4 minutes; then drain the vegetables. The asparagus and broccoli should be bright green and al dente.
Once half the stock is gone, add the asparagus and broccoli to the rice. Continue adding stock incrementally as before. When the rice is done, add the lemon zest, reserved fennel fronds, and salt and pepper to taste. Serve immediately.
The risotto will keep in the refrigerator for up to a week.
Sunday, May 8, 2011
For Mom
I’m pretty apathetic toward many of the “holidays” Americans choose to celebrate. (I’m looking at you, April Fool’s Day, Groundhog Day, St. Patrick’s Day, Cinco de Mayo, Official Grilled Cheese Month, and Super Bowl Sunday.) But Mother’s Day? That’s a whole other story! I love Mother’s Day! Certainly it’s not the only day a year where I celebrate my fabulous mother, but it is the only government-recognized day, so I guess that makes it more fancy.
Over time my gifts have evolved from felt-decorated picture frames and mix CDs to home-cooked meals, which are so much better, if not decidedly permanent. Tonight I will be treating my mom to a nice hot dinner (and I’ll clean up, of course!), but this morning I thought she’d also like a whole space over here dedicated to her.
My mom has taught me so much. She’s the person that I call when I’m feeling stressed out and overwhelmed; she’s the person I ask for advice; she’s the person whose opinion I seek on what really matters (ranging variously from clothes to school and everything in between). When I first began to compile a list of things she’s taught me, it was clear the complete list would be longer than is an acceptable length, but here’s an abbreviated list….
Things I learned from my mother, food-related and otherwise:
1. How to make coffee. Two rounded scoops each of regular and decaf coffee. Always bold, never mild. (For the record, hers always tastes better to me.)
2. Thanksgiving foods. One of my favorite parts about Thanksgiving is cooking with her in the morning. It’s the culmination of so much planning (mostly on my side; I obsessively think about the day forweeks months). In the past few years, I’ve really started to rack her brain about how to make the foods we eat every year, from stuffing to carrot ring. I really love those hours we get to spend cooking together every year.
3. How to do laundry. I’m continually surprised how many college-age kids don’t know how to do laundry properly. As in, throw everything in one load and dry everything together. It took me a while to get it right, but now it’s practically second-nature. It may take a little longer, but I do believe it’s important to do it right (that means line-drying a lot of things, and doing at least three loads).
4. The importance of green vegetables. When most people plan meals, the courses revolve around the meat or protein. I’ve learned that they should revolved around the vegetables. And it’s important to have at least two. After all, you can never have too much fruit and vegetables.
5. Always make your own salad dressing. And I’ve therefore become a salad dressing snob.
6. So many knitting terms it’s crazy. For someone who does not knit, I know a lot about it. From weird garment names (clapotis, top-down sweaters, vanilla socks) to what the numbers of the needles means to even the abbreviations on the pattern charts, knowing all this stuff allows me to follow what many of our conversations seem to about. (She similarly indulges my food-speak and Grey’s Anatomy forum gossip.)
7. Always buy organic milk. It lasts so much longer than regular milk, which justifies the slightly higher price. The health benefits aren’t too bad, either.
8. In the kitchen, a sponge is not a suitable cleaning tool. I finally learned after hearing it for the umpteenth time.
9. You don’t have to do it all yourself. Sometimes it’s okay to say no. I really don’t have to make homemade rolls on Thanksgiving or four different desserts (just remember come this November). But outside of the food world, it’s even more valuable. It’s okay to ask for help. It doesn’t make you weak, it makes you smart.
… And I’m still learning.
Happy Mother’s Day, Mom! I love you!
Over time my gifts have evolved from felt-decorated picture frames and mix CDs to home-cooked meals, which are so much better, if not decidedly permanent. Tonight I will be treating my mom to a nice hot dinner (and I’ll clean up, of course!), but this morning I thought she’d also like a whole space over here dedicated to her.
My mom has taught me so much. She’s the person that I call when I’m feeling stressed out and overwhelmed; she’s the person I ask for advice; she’s the person whose opinion I seek on what really matters (ranging variously from clothes to school and everything in between). When I first began to compile a list of things she’s taught me, it was clear the complete list would be longer than is an acceptable length, but here’s an abbreviated list….
Things I learned from my mother, food-related and otherwise:
1. How to make coffee. Two rounded scoops each of regular and decaf coffee. Always bold, never mild. (For the record, hers always tastes better to me.)
2. Thanksgiving foods. One of my favorite parts about Thanksgiving is cooking with her in the morning. It’s the culmination of so much planning (mostly on my side; I obsessively think about the day for
Thanksgiving 2008: A whirlwind.
4. The importance of green vegetables. When most people plan meals, the courses revolve around the meat or protein. I’ve learned that they should revolved around the vegetables. And it’s important to have at least two. After all, you can never have too much fruit and vegetables.
5. Always make your own salad dressing. And I’ve therefore become a salad dressing snob.
6. So many knitting terms it’s crazy. For someone who does not knit, I know a lot about it. From weird garment names (clapotis, top-down sweaters, vanilla socks) to what the numbers of the needles means to even the abbreviations on the pattern charts, knowing all this stuff allows me to follow what many of our conversations seem to about. (She similarly indulges my food-speak and Grey’s Anatomy forum gossip.)
7. Always buy organic milk. It lasts so much longer than regular milk, which justifies the slightly higher price. The health benefits aren’t too bad, either.
8. In the kitchen, a sponge is not a suitable cleaning tool. I finally learned after hearing it for the umpteenth time.
9. You don’t have to do it all yourself. Sometimes it’s okay to say no. I really don’t have to make homemade rolls on Thanksgiving or four different desserts (just remember come this November). But outside of the food world, it’s even more valuable. It’s okay to ask for help. It doesn’t make you weak, it makes you smart.
… And I’m still learning.
Happy Mother’s Day, Mom! I love you!
Sunday, April 24, 2011
20 Before 20
I live by goals.
Make a list, write down the goals, accomplish the tasks, erase the goals (such a sense of accomplishment), repeat as necessary. Short-term or long-term—it doesn’t really matter. Especially when the sheer number of things I need to accomplish becomes overwhelming, my little system of short, doable tasks makes the big picture more easily visible.
Coming up on the beginning of Dead Week, I am simultaneously overwhelmed by the studying in my immediate future and the reward that awaits come 11 AM on May 3rd.
The thought of my ongoing to-do list becoming, miraculously, blank is somewhat exhilarating. No Physics homework to do, Calculus tests to study for, English papers to write, CS codes to construct. Whatever will I do with all my time over my long (and well-deserved, if I do say so myself) summer break?
Well, I do have a summer job, but I’m looking forward to the comparatively abundant free time I’ll enjoy on nights and weekends. Naturally, I’ve thought of all the things I can cook and bake. After a year of limited chances to cook and bake in my dorm, I’m eagerly anticipating my opportunities to do just that this summer and next year in the kitchen of the apartment I’ll share with my three other roommates.
Partly for fun, and partly to expand my own culinary experience, I’ve constructed a grand “to-make” list. I call it 20 before 20 – 20 things to make in the kitchen before my 20th birthday this November. Some are things that I’ve never had but have always wanted to try and some are things that I love eating but have never attempted myself. All are things that I have never made before. As I take in the finished list (and it’s of course subject to change, as my interests and inspirations adapt from now until November 4th), I am utterly overwhelmed, but in the best possible way. I can’t wait to dive into these mini culinary projects, and I also can’t wait to share them with you.
Without further ado, the 20 Before 20 List:
Savories:
1. A savory tart: I come across recipes for savory tarts all the time and am itching to try one. I have my eyes (er, stomach?) set on one with sweet caramelized onions.
2. Polenta in any form: The one time I attempted this was a lumpy disaster. I've since read everything I could about the types of cornmeal to use and cooking methods to employ.
3. Something grilled: Summer is the perfect season for grilling. I don't necessarily have to use an outdoor grill (we do own a grill pan), but I do want to employ this cooking method.
4. Spaghetti and meatballs: This is absolutely one of my favorite meals of all time. I don't eat a lot of meat, but this and meatloaf are two of my favorite comfort foods.
5. Macaroni and cheese: I find it so amusing that the most popular recipes on cooking sites are invariably some form of mac and cheese. I'm looking to take on a simple yet delicious recipe that uses tasty cheeses like Gruyere or Fontina (swoon).
6. Something with poached eggs: Since my first experience with poached eggs and that irresistible runny yolk, I've wanted to recreate the magic in the kitchen. As with polenta, I've searched for every tip and trick I could in order to make the perfect poached egg.
7. Chicken chili: I'm a total soup person. I've had my eye on this recipe from Martha Stewart since I first saw it back in October.
8. Risotto without Arborio rice: By this I mean with another grain like farro or barley. I love the nutty taste of these grains, and I have wanted to try the risotto method with them, too.
9. Something with wild mushrooms: Whenever I try wild mushrooms at a restaurant, I'm wowed by their - excuse the pretentious "foodie" term - umami flavor. They're expensive, but a little bit goes a long way and I could easily knock out two birds with one stone by using them in a savory tart, risotto, or poached egg dish.
10. Something with tofu: The only time I'd ever tried tofu before this year was some sort of barbecued offering from the Whole Foods salad bar, and I was, to put it plainly, quite disgusted. However, I tried it again this year and was taken by its versatile ability to soak up the flavors of whatever you pair it with. I really want to try this crispy tofu recipe from Daily Garnish.
11. Chicken or vegetable stock: If it's good enough for Ina, it's good enough for me.
12a. Savory yeasted bread: By this I mean a crusty, European hearth-style bread. Of all the things on this list, this might be the one I'm most excited and motivated to tackle.
Sweets:
12b. Sweet yeasted bread: Pumpkin brioche. Cranberry walnut bread. Cinnamon rolls. How could I not?
13. Macarons: I finally want to see what all the fuss is about. (I have tried macarons from Dean & Deluca in New York before, but I want to see what all the fuss about homemade macarons is about.) Plus, the notion that they're a challenge to make naturally makes me even more motivated to try them.
14. Homemade granola: I should be more specific - I want to make a healthy granola. I bookmark just about every granola recipe I come across, and I finally want to take the plunge. Bonus since it'll be so much less expensive than the Kashi granola bar habit I've acquired.
15. Homemade Do-Si-Dos: This is very specific, but I really want to make a homemade version of my favorite Girl Scout cookie. I have very little desire for any other Girl Scout cookie, but Do-Si-Dos are too good for me to pass up.
16. Something with frangipane: OMG, frangipane. I have a true love for this stuff. Try it and you'll understand.
17. Chocolate chip cookies: There's something so alluring about this most simplistic of treats. In particular, I'd like to try either the Cook's Illustrated or New York Times version of the "best" chocolate chip cookie.
18. Something with coconut: I actually really love coconut but hardly ever use it in sweet desserts. Perhaps I'll find a way to incorporate it into a granola.
19. Rice pudding: As with granola, every time I see a rice pudding I bookmark it. Ina Garten even has a rum raisin version, and we all know how I feel about rum raisins.
20. Successful pie crust: It will happen.
Tell me: What's something that's on your "to-make" list?
Make a list, write down the goals, accomplish the tasks, erase the goals (such a sense of accomplishment), repeat as necessary. Short-term or long-term—it doesn’t really matter. Especially when the sheer number of things I need to accomplish becomes overwhelming, my little system of short, doable tasks makes the big picture more easily visible.
Coming up on the beginning of Dead Week, I am simultaneously overwhelmed by the studying in my immediate future and the reward that awaits come 11 AM on May 3rd.
The thought of my ongoing to-do list becoming, miraculously, blank is somewhat exhilarating. No Physics homework to do, Calculus tests to study for, English papers to write, CS codes to construct. Whatever will I do with all my time over my long (and well-deserved, if I do say so myself) summer break?
Well, I do have a summer job, but I’m looking forward to the comparatively abundant free time I’ll enjoy on nights and weekends. Naturally, I’ve thought of all the things I can cook and bake. After a year of limited chances to cook and bake in my dorm, I’m eagerly anticipating my opportunities to do just that this summer and next year in the kitchen of the apartment I’ll share with my three other roommates.
Partly for fun, and partly to expand my own culinary experience, I’ve constructed a grand “to-make” list. I call it 20 before 20 – 20 things to make in the kitchen before my 20th birthday this November. Some are things that I’ve never had but have always wanted to try and some are things that I love eating but have never attempted myself. All are things that I have never made before. As I take in the finished list (and it’s of course subject to change, as my interests and inspirations adapt from now until November 4th), I am utterly overwhelmed, but in the best possible way. I can’t wait to dive into these mini culinary projects, and I also can’t wait to share them with you.
Without further ado, the 20 Before 20 List:
Savories:
1. A savory tart: I come across recipes for savory tarts all the time and am itching to try one. I have my eyes (er, stomach?) set on one with sweet caramelized onions.
2. Polenta in any form: The one time I attempted this was a lumpy disaster. I've since read everything I could about the types of cornmeal to use and cooking methods to employ.
3. Something grilled: Summer is the perfect season for grilling. I don't necessarily have to use an outdoor grill (we do own a grill pan), but I do want to employ this cooking method.
4. Spaghetti and meatballs: This is absolutely one of my favorite meals of all time. I don't eat a lot of meat, but this and meatloaf are two of my favorite comfort foods.
5. Macaroni and cheese: I find it so amusing that the most popular recipes on cooking sites are invariably some form of mac and cheese. I'm looking to take on a simple yet delicious recipe that uses tasty cheeses like Gruyere or Fontina (swoon).
6. Something with poached eggs: Since my first experience with poached eggs and that irresistible runny yolk, I've wanted to recreate the magic in the kitchen. As with polenta, I've searched for every tip and trick I could in order to make the perfect poached egg.
7. Chicken chili: I'm a total soup person. I've had my eye on this recipe from Martha Stewart since I first saw it back in October.
8. Risotto without Arborio rice: By this I mean with another grain like farro or barley. I love the nutty taste of these grains, and I have wanted to try the risotto method with them, too.
9. Something with wild mushrooms: Whenever I try wild mushrooms at a restaurant, I'm wowed by their - excuse the pretentious "foodie" term - umami flavor. They're expensive, but a little bit goes a long way and I could easily knock out two birds with one stone by using them in a savory tart, risotto, or poached egg dish.
10. Something with tofu: The only time I'd ever tried tofu before this year was some sort of barbecued offering from the Whole Foods salad bar, and I was, to put it plainly, quite disgusted. However, I tried it again this year and was taken by its versatile ability to soak up the flavors of whatever you pair it with. I really want to try this crispy tofu recipe from Daily Garnish.
11. Chicken or vegetable stock: If it's good enough for Ina, it's good enough for me.
12a. Savory yeasted bread: By this I mean a crusty, European hearth-style bread. Of all the things on this list, this might be the one I'm most excited and motivated to tackle.
Sweets:
12b. Sweet yeasted bread: Pumpkin brioche. Cranberry walnut bread. Cinnamon rolls. How could I not?
13. Macarons: I finally want to see what all the fuss is about. (I have tried macarons from Dean & Deluca in New York before, but I want to see what all the fuss about homemade macarons is about.) Plus, the notion that they're a challenge to make naturally makes me even more motivated to try them.
14. Homemade granola: I should be more specific - I want to make a healthy granola. I bookmark just about every granola recipe I come across, and I finally want to take the plunge. Bonus since it'll be so much less expensive than the Kashi granola bar habit I've acquired.
15. Homemade Do-Si-Dos: This is very specific, but I really want to make a homemade version of my favorite Girl Scout cookie. I have very little desire for any other Girl Scout cookie, but Do-Si-Dos are too good for me to pass up.
16. Something with frangipane: OMG, frangipane. I have a true love for this stuff. Try it and you'll understand.
17. Chocolate chip cookies: There's something so alluring about this most simplistic of treats. In particular, I'd like to try either the Cook's Illustrated or New York Times version of the "best" chocolate chip cookie.
18. Something with coconut: I actually really love coconut but hardly ever use it in sweet desserts. Perhaps I'll find a way to incorporate it into a granola.
19. Rice pudding: As with granola, every time I see a rice pudding I bookmark it. Ina Garten even has a rum raisin version, and we all know how I feel about rum raisins.
20. Successful pie crust: It will happen.
Tell me: What's something that's on your "to-make" list?
Thursday, April 7, 2011
Homemade Ricotta with Herb Honey and Orange Toast
My favorite food city is, without question, New York. I love everything about the food atmosphere there. More so than any place I've ever traveled to, New Yorkers seem to really care about what they eat. Dining out is as much about the experience as it is about the food.
One dish in particular that stands out of the dozens I've tried in New York is whipped sheep's milk ricotta. At Locanda Verde, a restaurant in TriBeCa, it is served with truffle honey. And a hint of thyme. And burnt orange toast. Take it in.
Whipped sheep's milk ricotta, though? I know, that may sound a bit strange. And truffle honey and thyme and burnt orange toast? I know, it's a mouthful. But this appetizer (although, to be honest, I could eat it a whole bowl as a meal) is so insanely good. After my perfect cheesecake, this is the best thing I've ever shared on this blog.
Despite the multiple components of the dish, it really is so simple. Cheese + bread = yum. For this reason, it's imperative that the star - the ricotta cheese - is of the best quality you can find. Using fresh ricotta is vital. Surprisingly, fresh ricotta can be somewhat difficult to track down, even in Los Angeles, where I made this with my sister. After coming up empty at Whole Foods, we headed to The Cheesestore of Silverlake. They, too, were out. We were pretty discouraged by this point (if a cheese shop didn't have it, then who else would?), but the woman working at the cheese shop started on about how easy it was to make ricotta cheese at home.
And she's right. I'd read about it countless times before. While it's not technically ricotta cheese because it doesn't use the leftover whey from the cheese-making process like real ricotta does, it's undeniably delicious and miles ahead of anything store-bought in terms of texture and flavor. Creamy with a sweet, milky flavor, the ricotta is further enhanced with a drizzle of honey and a sprinkle of salt and pepper.
Taking inspiration from Locanda Verde, we then grilled up slices of a crusty hearth loaf and spritzed them with orange juice. Oh my. I was a bit nervous that our homemade ricotta simply wouldn't stand up to the lofty memories I had of Locanda Verde's rendition. Was I ever wrong. Even if I won't be making it back to New York soon to indulge in all its epicurean offerings, I'll rest assured that I can treat myself to this simplest of treats anytime.
Fresh Ricotta with Herb Honey and Orange Toast
Inspired by Locanda Verde's Whipped Sheep's Milk Ricotta
If you used a lower-fat milk to make the homemade ricotta instead of whole milk, you can make the ricotta richer here by substituting half and half or heavy cream for the milk. Orange zest can be used in place of the lemon zest. To warm the honey, place it in a microwave-safe bowl and heat on medium power for 1 minute. Be careful that the honey doesn't overflow. Alternatively, heat it in a small saucepan over low heat.
Yield: 4-6 servings
About 1 cup fresh ricotta cheese, homemade (recipe below) or store-bought
3-4 tablespoons milk
Kosher salt and freshly ground black pepper, to taste
1 teaspoon lemon zest
Herb Honey, warmed (recipe below)
Orange Toast (recipe below)
In a small bowl, combine ricotta and milk. The ricotta should be creamy but not too loose. Add more milk to reach the desired consistency. Sprinkle with salt and pepper to taste. Add the lemon zest and stir to combine. Drizzle the Herb Honey over the ricotta. Serve alongside warm slices of Orange Toast.
Homemade Ricotta
Adapted from Serious Eats
Most versions of homemade ricotta utilize the stove to separate the curds in the milk from the whey. This version is far easier and far less fussy, using the microwave instead. It's important to use pasteurized milk instead of ultra-pasteurized milk. We used whole milk when we made this, but I have a feeling that using a lower-fat milk will work just as fine; the resulting ricotta won't taste exactly as rich, but you can certainly remedy this by using half and half or heavy cream instead of milk to mix with the ricotta in the first step of the recipe for Fresh Ricotta with Herb Honey and Orange Toast.
Yield: about 1 cup ricotta cheese
4 cups milk, preferably whole (see note)
1/2 teaspoon table salt
4 tablespoons lemon juice (about 1 lemon)
Begin by lining a colander with 4 layers of cheesecloth or 2 layers of paper towels and set over a large bowl. Combine 2 cups milk, 1/4 teaspoon salt, and 2 tablespoons lemon juice in a microwave-safe glass 1-quart measuring cup. Microwave on high heat until lightly bubbling around the edges, anywhere from 2 to 4 minutes (ours took about 3 1/2 minutes). Remove from the microwave, and stir gently for 5 seconds. The milk should separate into solid white curds and translucent liquid whey. If not, microwave for 30 seconds longer, repeating as necessary until fully separated.
Using a slotted spoon or wire skimmer, transfer the curds to the prepared colander. Cover the exposed top with plastic wrap and allow to drain for about 5 minutes. Transfer the ricotta to a small bowl, wiping as much of the ricotta from the cheesecloth as possible. Repeat with the remaining 2 cups milk, 1/4 teaspoon salt, and 2 tablespoons lemon juice.
Once you have made all the ricotta, either chill it in the refrigerator until you're ready to use it or use immediately. If you opt to chill the ricotta until you're ready to use it, allow it to come to room temperature before serving.
Herb Honey
Any combination of spices and fresh herbs would be wonderful here. Instead of (or in addition to) cloves, think about peppercorns, cinnamon sticks, or ginger. Similarly, other herbs like thyme, mint, and basil would also be delicious. Keep an eye on the honey as it heats (especially if you opt to use the microwave) to avoid any overflow.
Yield: About 1/4 cup honey
About 3 tablespoons honey
4-6 cloves
2-3 sprigs fresh rosemary
In a microwave-safe bowl, combine honey, cloves, and rosemary. Microwave until warm, 1 to 2 minutes. Remove from the microwave and allow to sit until ready to use. Alternatively, combine the honey, cloves, and rosemary in a small saucepan over medium heat. Cook until bubbling. Remove from heat and allow to sit until ready to use.
Orange Toast
Any hearty country loaf, such as ciabatta, will work wonderfully here. Slice the bread about 1/2- to 3/4-inch thick. If you don't have a grill pan, toast the bread in the oven or in the skillet. Toast in the oven at 400 degrees F or in a skillet set over medium heat for about 5 minutes per side, or until golden brown.
Yield: 4 - 6 servings
8 slices (about half a loaf) of hearty, crusty bread (see note)
Extra virgin olive oil
Juice of half an orange
Heat a grill pan over medium heat. Place the slices of bread on the grill pan and brush with extra-virgin olive oil. Grill for about 5 minutes per side, or until golden brown. Flip the bread slices and grill for another 5 minutes, or until golden brown. Remove the toast slices from the grill pan and spritz with the orange juice (not too much, or the bread will become soggy). Use or serve immediately.
One dish in particular that stands out of the dozens I've tried in New York is whipped sheep's milk ricotta. At Locanda Verde, a restaurant in TriBeCa, it is served with truffle honey. And a hint of thyme. And burnt orange toast. Take it in.
Whipped sheep's milk ricotta, though? I know, that may sound a bit strange. And truffle honey and thyme and burnt orange toast? I know, it's a mouthful. But this appetizer (although, to be honest, I could eat it a whole bowl as a meal) is so insanely good. After my perfect cheesecake, this is the best thing I've ever shared on this blog.
Despite the multiple components of the dish, it really is so simple. Cheese + bread = yum. For this reason, it's imperative that the star - the ricotta cheese - is of the best quality you can find. Using fresh ricotta is vital. Surprisingly, fresh ricotta can be somewhat difficult to track down, even in Los Angeles, where I made this with my sister. After coming up empty at Whole Foods, we headed to The Cheesestore of Silverlake. They, too, were out. We were pretty discouraged by this point (if a cheese shop didn't have it, then who else would?), but the woman working at the cheese shop started on about how easy it was to make ricotta cheese at home.
And she's right. I'd read about it countless times before. While it's not technically ricotta cheese because it doesn't use the leftover whey from the cheese-making process like real ricotta does, it's undeniably delicious and miles ahead of anything store-bought in terms of texture and flavor. Creamy with a sweet, milky flavor, the ricotta is further enhanced with a drizzle of honey and a sprinkle of salt and pepper.
Taking inspiration from Locanda Verde, we then grilled up slices of a crusty hearth loaf and spritzed them with orange juice. Oh my. I was a bit nervous that our homemade ricotta simply wouldn't stand up to the lofty memories I had of Locanda Verde's rendition. Was I ever wrong. Even if I won't be making it back to New York soon to indulge in all its epicurean offerings, I'll rest assured that I can treat myself to this simplest of treats anytime.
Fresh Ricotta with Herb Honey and Orange Toast
Inspired by Locanda Verde's Whipped Sheep's Milk Ricotta
If you used a lower-fat milk to make the homemade ricotta instead of whole milk, you can make the ricotta richer here by substituting half and half or heavy cream for the milk. Orange zest can be used in place of the lemon zest. To warm the honey, place it in a microwave-safe bowl and heat on medium power for 1 minute. Be careful that the honey doesn't overflow. Alternatively, heat it in a small saucepan over low heat.
Yield: 4-6 servings
About 1 cup fresh ricotta cheese, homemade (recipe below) or store-bought
3-4 tablespoons milk
Kosher salt and freshly ground black pepper, to taste
1 teaspoon lemon zest
Herb Honey, warmed (recipe below)
Orange Toast (recipe below)
In a small bowl, combine ricotta and milk. The ricotta should be creamy but not too loose. Add more milk to reach the desired consistency. Sprinkle with salt and pepper to taste. Add the lemon zest and stir to combine. Drizzle the Herb Honey over the ricotta. Serve alongside warm slices of Orange Toast.
Homemade Ricotta
Adapted from Serious Eats
Most versions of homemade ricotta utilize the stove to separate the curds in the milk from the whey. This version is far easier and far less fussy, using the microwave instead. It's important to use pasteurized milk instead of ultra-pasteurized milk. We used whole milk when we made this, but I have a feeling that using a lower-fat milk will work just as fine; the resulting ricotta won't taste exactly as rich, but you can certainly remedy this by using half and half or heavy cream instead of milk to mix with the ricotta in the first step of the recipe for Fresh Ricotta with Herb Honey and Orange Toast.
Yield: about 1 cup ricotta cheese
4 cups milk, preferably whole (see note)
1/2 teaspoon table salt
4 tablespoons lemon juice (about 1 lemon)
Begin by lining a colander with 4 layers of cheesecloth or 2 layers of paper towels and set over a large bowl. Combine 2 cups milk, 1/4 teaspoon salt, and 2 tablespoons lemon juice in a microwave-safe glass 1-quart measuring cup. Microwave on high heat until lightly bubbling around the edges, anywhere from 2 to 4 minutes (ours took about 3 1/2 minutes). Remove from the microwave, and stir gently for 5 seconds. The milk should separate into solid white curds and translucent liquid whey. If not, microwave for 30 seconds longer, repeating as necessary until fully separated.
Using a slotted spoon or wire skimmer, transfer the curds to the prepared colander. Cover the exposed top with plastic wrap and allow to drain for about 5 minutes. Transfer the ricotta to a small bowl, wiping as much of the ricotta from the cheesecloth as possible. Repeat with the remaining 2 cups milk, 1/4 teaspoon salt, and 2 tablespoons lemon juice.
Once you have made all the ricotta, either chill it in the refrigerator until you're ready to use it or use immediately. If you opt to chill the ricotta until you're ready to use it, allow it to come to room temperature before serving.
Herb Honey
Any combination of spices and fresh herbs would be wonderful here. Instead of (or in addition to) cloves, think about peppercorns, cinnamon sticks, or ginger. Similarly, other herbs like thyme, mint, and basil would also be delicious. Keep an eye on the honey as it heats (especially if you opt to use the microwave) to avoid any overflow.
Yield: About 1/4 cup honey
About 3 tablespoons honey
4-6 cloves
2-3 sprigs fresh rosemary
In a microwave-safe bowl, combine honey, cloves, and rosemary. Microwave until warm, 1 to 2 minutes. Remove from the microwave and allow to sit until ready to use. Alternatively, combine the honey, cloves, and rosemary in a small saucepan over medium heat. Cook until bubbling. Remove from heat and allow to sit until ready to use.
Orange Toast
Any hearty country loaf, such as ciabatta, will work wonderfully here. Slice the bread about 1/2- to 3/4-inch thick. If you don't have a grill pan, toast the bread in the oven or in the skillet. Toast in the oven at 400 degrees F or in a skillet set over medium heat for about 5 minutes per side, or until golden brown.
Yield: 4 - 6 servings
8 slices (about half a loaf) of hearty, crusty bread (see note)
Extra virgin olive oil
Juice of half an orange
Heat a grill pan over medium heat. Place the slices of bread on the grill pan and brush with extra-virgin olive oil. Grill for about 5 minutes per side, or until golden brown. Flip the bread slices and grill for another 5 minutes, or until golden brown. Remove the toast slices from the grill pan and spritz with the orange juice (not too much, or the bread will become soggy). Use or serve immediately.
Saturday, March 26, 2011
Homemade Pizza Two Ways
When I was little, we used to go to a restaurant that would give kids little balls of pizza dough to play with before the food arrived. It was so much more exciting than crayons and a coloring book. Although I can't remember what restaurant it was that offered this unusual activity, I do remember how fun it was to stretch and mold that dough. It was like all-natural play-doh, but you could actually eat it (or, you could eat it and it wouldn't taste awful).
I hadn't thought about this distant memory for many years until yesterday. As I was making my own pizza dough, the aroma of flour and yeast suddenly brought me back to my childhood. It's safe to say that the scent of fresh dough is one of my favorites, right behind the smell of warm butter and sugar.
Although it's hard to believe, there was a brief time a few years ago when I didn't even like pizza (gasp!). Thank goodness my tastes have adapted, because good pizza is really one of my favorite foods. And when you can make good pizza at home? Even better.
It's my goal this summer to make homemade bread and this pizza was a successful foray into yeast breads. The dough itself was incredibly easy to make. Kneading the dough by hand really allows you to experience the transformation from a shaggy, floury amalgamation to a smooth, elastic ball of dough. After a leisurely rise, the dough was ready to be stretched and adorned with toppings.
I think my favorite thing about pizza is how creative you can be with the toppings. This batch of dough made enough for two medium-sized pizzas and I wanted to make one classic pizza and one that was a bit more whimsical. For the classic pizza, I took inspiration from one of my new cookbooks, Molto Gusto by Mario Batali. There are dozens of pizza recipes in the book, and one that looked particularly delicious combined tomato sauce, fresh mozzarella cheese, anchovies, and capers.
While that pizza is decidedly savory, the other has several sweet components. The pizza has a base of sweet caramelized onions; fig jam, mascarpone cheese, balsamic reduction, and chopped pistachios finish the pizza, offering contrasting tastes and textures.
Both of these pizzas are equally delicious (my mom enjoyed the caramelized onion and fig pizza, while I was fonder of the tomato and anchovy one) and their brief sojourn on a baking stone in a searingly hot oven rendered the crust crisp yet chewy.
We couldn't stop "mmm"-ing and "ahh"-ing over this simple yet satisfying meal. With pizza this good and this easy, it's safe to say we will be for a good while longer.
Homemade Pizza
Adapted from Smitten Kitchen
If you want to make a plain (not whole-wheat) pizza dough, simply use 3 cups of all-purpose flour. The dough may not need as much water (as whole-wheat flour absorbs more moisture than all-purpose) and may not need as much time to rise, so adjust accordingly. You can use dry active yeast instead of instant yeast. Simply use the same amount of yeast but add lukewarm water (about 105 to 110 degrees F) to the dry ingredients.
Yield: enough dough for 2 medium-sized thin crust pizzas
2 1/2 cups all-purpose flour, plus more for dusting work surface
1/2 cup whole-wheat flour
2 teaspoons kosher salt
1 1/2 teaspoons instant yeast
1 cup plus 1 tablespoon water
1 1/2 tablespoons extra-virgin olive oil
Cornmeal, for dusting
2 recipes of pizza toppings (see two variations below)
Mix flours, salt, and yeast in a large bowl. Add water and olive oil and mix until just combined and the dough is shaggy. Pour the dough onto a well-floured surface (I used a large Silpat baking mat) and knead, folding the dough into itself, until the dough is smooth, about 2 to 4 minutes. Form the dough into a ball.
Spray the bowl you mixed the dough in with non-stick baking spray (or drizzle with olive oil). Add the ball of dough to the bowl and coat with the oil. Cover the bowl with a layer of plastic wrap and allow to rise in a draft-free space for about 90 minutes, until the dough has doubled in size.
Once the dough has doubled in size, preheat a baking stone (or an overturned sheet pan) in the oven to 500 degrees F. Transfer the dough to a well-floured surface and gently press the air out of the dough with the palm of your hand. Take half of the dough and pat it into a round with your hands. Using your fingertips, poke dimples into the dough, slowly pushing the dough outward. Once the dough is about 8 inches in diameter, begin to gently stretch the dough thinner. Placing one hand in the center of the round, use your other hand to stretch the dough outward. Turn the dough as you go to evenly stretch the dough.
When the dough is stretched very thin (about 1/8 inch thick), dust a pizza peel or a sheet of parchment with cornmeal. Carefully transfer the dough round to the peel or parchment and add the toppings.
Once the toppings are added, transfer the dough to the oven. If the dough is on a pizza peel, slide the dough onto the baking stone or overturned pan by quickly jerking the peel forward and then pulling it back. If the dough is on a sheet of parchment, simply transfer the parchment to the baking stone or slide the dough off of the parchment and onto the stone.
Bake for 10 minutes, or until the crust is golden and crisp and the toppings are bubbly and delicious.
Carefully remove the pizza from the oven and allow to cool for a minute or two before cutting into slices, serving, and devouring.
Romana Pizza Topping
Inspired by Mario Batali's Molto Gusto
It's important to use fresh mozzarella here and not the the low-moisture, pre-shredded stuff, which won't melt as well and taste as creamy as the fresh kind. Anchovies often get a bad rap for being overly fishy and salty, but the heat of the oven really transforms them. Here, they are not fishy at all but subtly salty and savory; in a word: awesome. However, if you're still worried about an unwelcome fishiness in your pizza, white anchovies are much more mild than the more common brown anchovies, and you may find that they are less offensive to you. The capers add a welcome brininess that complements the creamy cheese and slightly sweet tomato sauce. If you have a favorite pizza sauce, feel free to use 1 cup of that.
Yield: enough topping for 1 pizza
About 1 cup canned tomato sauce
2 teaspoons dried Italian herb blend (or a mixture of dried basil, thyme, and oregano)
1/4 teaspoon garlic powder
Kosher salt and freshly ground black pepper
About ounces fresh mozzarella cheese
8 anchovy fillets, rinsed
2 tablespoons capers, drained
In a small bowl, combine tomato sauce, 1 teaspoon of the dried herbs, garlic powder, and salt and pepper to taste. Spoon the tomato sauce onto the pizza dough, spreading it out in an even layer, leaving a 1/2-inch border. Tear the cheese into medium-sized pieces and distribute it in an even layer on top of the sauce. Arrange the anchovies on top of the cheese, making sure to distribute them evenly (I placed whole fillets in the center then put smaller pieces around the edges). Distribute the capers evenly on top of the pizza. Finally, sprinkle the remaining 1 teaspoon of dried herbs evenly over the pizza.
Caramelized Onion and Fig Pizza Topping
Although this topping has several components, all of the elements are easy to prepare. In this recipe, I use my favorite way to caramelize onions, which uses no oil or sugar (I promise you don't need it!). You can make the caramelized onions ahead of time and store them in the refrigerator for several days. The measurements in this topping are not exact. If you want a sweeter or cheesier pizza, for example, add more of the fig jam and mascarpone cheese. Instead of mascarpone cheese, a creamy cheese like Fontina, Brie, or Gruyere would also be incredibly delicious.
Yield: enough topping for 1 pizza
1/2 large onion, sliced into half-inch rounds
Kosher salt and freshly ground black pepper
About 1/2 cup water
1/4 cup balsamic vinegar
2 to 3 tablespoons fig jam
3 to 4 tablespoons mascarpone cheese
1/4 cup shelled pistachios, roughly chopped
Heat a nonstick skillet over medium-high heat and add the onions in an even layer. Leave the onions alone for about a minute, until they begin to slightly brown around the edges and stick to the pan. They'll begin to get sticky. Season them liberally with salt and pepper and stir with a spatula. After another minute or so, you'll begin to see a brown film develop on the bottom of the pan (these are the sugars from the onion). Add a few tablespoons of water and scrape the bottom of the pan to release the browned bits. The onions should begin to take on a golden brown color. Continue stirring until all the browned bits have been released from the pan.
Again, leave the onions alone for a few minutes, until they start to stick to the pan and more browned bits develop on the bottom of the pan. Add more water as before. Continue this process as necessary -- adding more water, scraping, and leaving the onions alone -- until the onions are soft, deeply brown, and sweet. It could take anywhere from 15 to 20 minutes longer. When the onions are fully caramelized, transfer them to a bowl and either store in the refrigerator for up to a week or use on the pizza immediately.
Meanwhile, in a small saucepan, heat the balsamic vinegar over medium-low heat until it has reduced to about 2 tablespoons and is thick and syrupy. Reduce the heat to low and set aside until you are ready to top the pizza.
To top the pizza, spread the dough with the caramelized onions in an even layer, leaving a 1/2-inch border. Next, dot the pizza with the fig jam and mascarpone cheese. Drizzle the balsamic syrup evenly over the pizza. Finally, sprinkle the chopped pistachios over the top.
I hadn't thought about this distant memory for many years until yesterday. As I was making my own pizza dough, the aroma of flour and yeast suddenly brought me back to my childhood. It's safe to say that the scent of fresh dough is one of my favorites, right behind the smell of warm butter and sugar.
Although it's hard to believe, there was a brief time a few years ago when I didn't even like pizza (gasp!). Thank goodness my tastes have adapted, because good pizza is really one of my favorite foods. And when you can make good pizza at home? Even better.
It's my goal this summer to make homemade bread and this pizza was a successful foray into yeast breads. The dough itself was incredibly easy to make. Kneading the dough by hand really allows you to experience the transformation from a shaggy, floury amalgamation to a smooth, elastic ball of dough. After a leisurely rise, the dough was ready to be stretched and adorned with toppings.
I think my favorite thing about pizza is how creative you can be with the toppings. This batch of dough made enough for two medium-sized pizzas and I wanted to make one classic pizza and one that was a bit more whimsical. For the classic pizza, I took inspiration from one of my new cookbooks, Molto Gusto by Mario Batali. There are dozens of pizza recipes in the book, and one that looked particularly delicious combined tomato sauce, fresh mozzarella cheese, anchovies, and capers.
Romana pizza with tomato, fresh mozzarella, anchovies, and capers
Pizza with caramelized onions, fig jam, mascarpone, pistachios, and balsamic syrup
We couldn't stop "mmm"-ing and "ahh"-ing over this simple yet satisfying meal. With pizza this good and this easy, it's safe to say we will be for a good while longer.
Pizza so good you'll eat half a slice before photos have been taken (*cough* mom! *cough*)
Homemade Pizza
Adapted from Smitten Kitchen
If you want to make a plain (not whole-wheat) pizza dough, simply use 3 cups of all-purpose flour. The dough may not need as much water (as whole-wheat flour absorbs more moisture than all-purpose) and may not need as much time to rise, so adjust accordingly. You can use dry active yeast instead of instant yeast. Simply use the same amount of yeast but add lukewarm water (about 105 to 110 degrees F) to the dry ingredients.
Yield: enough dough for 2 medium-sized thin crust pizzas
2 1/2 cups all-purpose flour, plus more for dusting work surface
1/2 cup whole-wheat flour
2 teaspoons kosher salt
1 1/2 teaspoons instant yeast
1 cup plus 1 tablespoon water
1 1/2 tablespoons extra-virgin olive oil
Cornmeal, for dusting
2 recipes of pizza toppings (see two variations below)
Mix flours, salt, and yeast in a large bowl. Add water and olive oil and mix until just combined and the dough is shaggy. Pour the dough onto a well-floured surface (I used a large Silpat baking mat) and knead, folding the dough into itself, until the dough is smooth, about 2 to 4 minutes. Form the dough into a ball.
Pizza dough before the rising period
Pizza dough after the rising period
Pizza dough after being shaped into two balls
Once the dough has doubled in size, preheat a baking stone (or an overturned sheet pan) in the oven to 500 degrees F. Transfer the dough to a well-floured surface and gently press the air out of the dough with the palm of your hand. Take half of the dough and pat it into a round with your hands. Using your fingertips, poke dimples into the dough, slowly pushing the dough outward. Once the dough is about 8 inches in diameter, begin to gently stretch the dough thinner. Placing one hand in the center of the round, use your other hand to stretch the dough outward. Turn the dough as you go to evenly stretch the dough.
When the dough is stretched very thin (about 1/8 inch thick), dust a pizza peel or a sheet of parchment with cornmeal. Carefully transfer the dough round to the peel or parchment and add the toppings.
Once the toppings are added, transfer the dough to the oven. If the dough is on a pizza peel, slide the dough onto the baking stone or overturned pan by quickly jerking the peel forward and then pulling it back. If the dough is on a sheet of parchment, simply transfer the parchment to the baking stone or slide the dough off of the parchment and onto the stone.
Bake for 10 minutes, or until the crust is golden and crisp and the toppings are bubbly and delicious.
Carefully remove the pizza from the oven and allow to cool for a minute or two before cutting into slices, serving, and devouring.
Romana Pizza Topping
Inspired by Mario Batali's Molto Gusto
It's important to use fresh mozzarella here and not the the low-moisture, pre-shredded stuff, which won't melt as well and taste as creamy as the fresh kind. Anchovies often get a bad rap for being overly fishy and salty, but the heat of the oven really transforms them. Here, they are not fishy at all but subtly salty and savory; in a word: awesome. However, if you're still worried about an unwelcome fishiness in your pizza, white anchovies are much more mild than the more common brown anchovies, and you may find that they are less offensive to you. The capers add a welcome brininess that complements the creamy cheese and slightly sweet tomato sauce. If you have a favorite pizza sauce, feel free to use 1 cup of that.
Yield: enough topping for 1 pizza
About 1 cup canned tomato sauce
2 teaspoons dried Italian herb blend (or a mixture of dried basil, thyme, and oregano)
1/4 teaspoon garlic powder
Kosher salt and freshly ground black pepper
About ounces fresh mozzarella cheese
8 anchovy fillets, rinsed
2 tablespoons capers, drained
In a small bowl, combine tomato sauce, 1 teaspoon of the dried herbs, garlic powder, and salt and pepper to taste. Spoon the tomato sauce onto the pizza dough, spreading it out in an even layer, leaving a 1/2-inch border. Tear the cheese into medium-sized pieces and distribute it in an even layer on top of the sauce. Arrange the anchovies on top of the cheese, making sure to distribute them evenly (I placed whole fillets in the center then put smaller pieces around the edges). Distribute the capers evenly on top of the pizza. Finally, sprinkle the remaining 1 teaspoon of dried herbs evenly over the pizza.
The finished product: pure deliciousness
Caramelized Onion and Fig Pizza Topping
Although this topping has several components, all of the elements are easy to prepare. In this recipe, I use my favorite way to caramelize onions, which uses no oil or sugar (I promise you don't need it!). You can make the caramelized onions ahead of time and store them in the refrigerator for several days. The measurements in this topping are not exact. If you want a sweeter or cheesier pizza, for example, add more of the fig jam and mascarpone cheese. Instead of mascarpone cheese, a creamy cheese like Fontina, Brie, or Gruyere would also be incredibly delicious.
Yield: enough topping for 1 pizza
1/2 large onion, sliced into half-inch rounds
Kosher salt and freshly ground black pepper
About 1/2 cup water
1/4 cup balsamic vinegar
2 to 3 tablespoons fig jam
3 to 4 tablespoons mascarpone cheese
1/4 cup shelled pistachios, roughly chopped
Heat a nonstick skillet over medium-high heat and add the onions in an even layer. Leave the onions alone for about a minute, until they begin to slightly brown around the edges and stick to the pan. They'll begin to get sticky. Season them liberally with salt and pepper and stir with a spatula. After another minute or so, you'll begin to see a brown film develop on the bottom of the pan (these are the sugars from the onion). Add a few tablespoons of water and scrape the bottom of the pan to release the browned bits. The onions should begin to take on a golden brown color. Continue stirring until all the browned bits have been released from the pan.
Again, leave the onions alone for a few minutes, until they start to stick to the pan and more browned bits develop on the bottom of the pan. Add more water as before. Continue this process as necessary -- adding more water, scraping, and leaving the onions alone -- until the onions are soft, deeply brown, and sweet. It could take anywhere from 15 to 20 minutes longer. When the onions are fully caramelized, transfer them to a bowl and either store in the refrigerator for up to a week or use on the pizza immediately.
Meanwhile, in a small saucepan, heat the balsamic vinegar over medium-low heat until it has reduced to about 2 tablespoons and is thick and syrupy. Reduce the heat to low and set aside until you are ready to top the pizza.
To top the pizza, spread the dough with the caramelized onions in an even layer, leaving a 1/2-inch border. Next, dot the pizza with the fig jam and mascarpone cheese. Drizzle the balsamic syrup evenly over the pizza. Finally, sprinkle the chopped pistachios over the top.
The finished product: sweet and savory pizza heaven
Subscribe to:
Posts (Atom)


